Introduction
This manual provides comprehensive instructions for the installation, operation, and maintenance of your Rollerhouse 12V Smart Wired Mini Blind Motor. Designed for 25mm/28mm tubes, this low-voltage DC motor offers convenient automation for roller shades, Roman shades, and blackout panels, supporting up to 4.4 lbs (2kg) capacity. Please read this manual thoroughly before use to ensure proper functionality and safety.
Кутуда эмне бар

Figure 1: Included Components and Motor Parameters
- 1x 12V DC Mini Motor
- 1x 1-Channel Controller (Remote)
- 1x 25mm Mounting Hardware (Brackets)
- 1x 25mm/28mm Motor Rubber Drive Fittings
- Орнотуу боюнча колдонмо (бул колдонмо)
Note: A 12V DC power supply adapter is required and sold separately. Not compatible with AA batteries or wand controls.
Техникалык шарттар
| Өзгөчөлүк | Спецификация |
|---|---|
| Бренд | Rollerhouse |
| Модель номери | HA-EY1612-301W |
| Тtage | 12 вольт DC |
| Момент | 0.3 Нм |
| Ылдамдык | 28 RPM |
| Номиналдуу ток | 0.6 А |
| Номиналдуу кубаттуулук | 7.2 Ватт |
| Кубаттуулугу | 4.4 фунтка чейин (2 кг) |
| Түтүк шайкештиги | 25mm/28mm (1 inch OD) |
| Продукциянын өлчөмдөрү | 0.63"W x 9.4"H |
| Элемент Салмагы | 12.8 унция |
Орнотуу жана орнотуу
1. Prepare Your Existing Blinds

Figure 2: Retrofitting Existing Blinds
The Rollerhouse 12V motor is designed for easy retrofitting of existing roller blinds. You will need to remove the existing chain drive mechanism from your blind. Ensure your shade tube is compatible with the motor's dimensions.
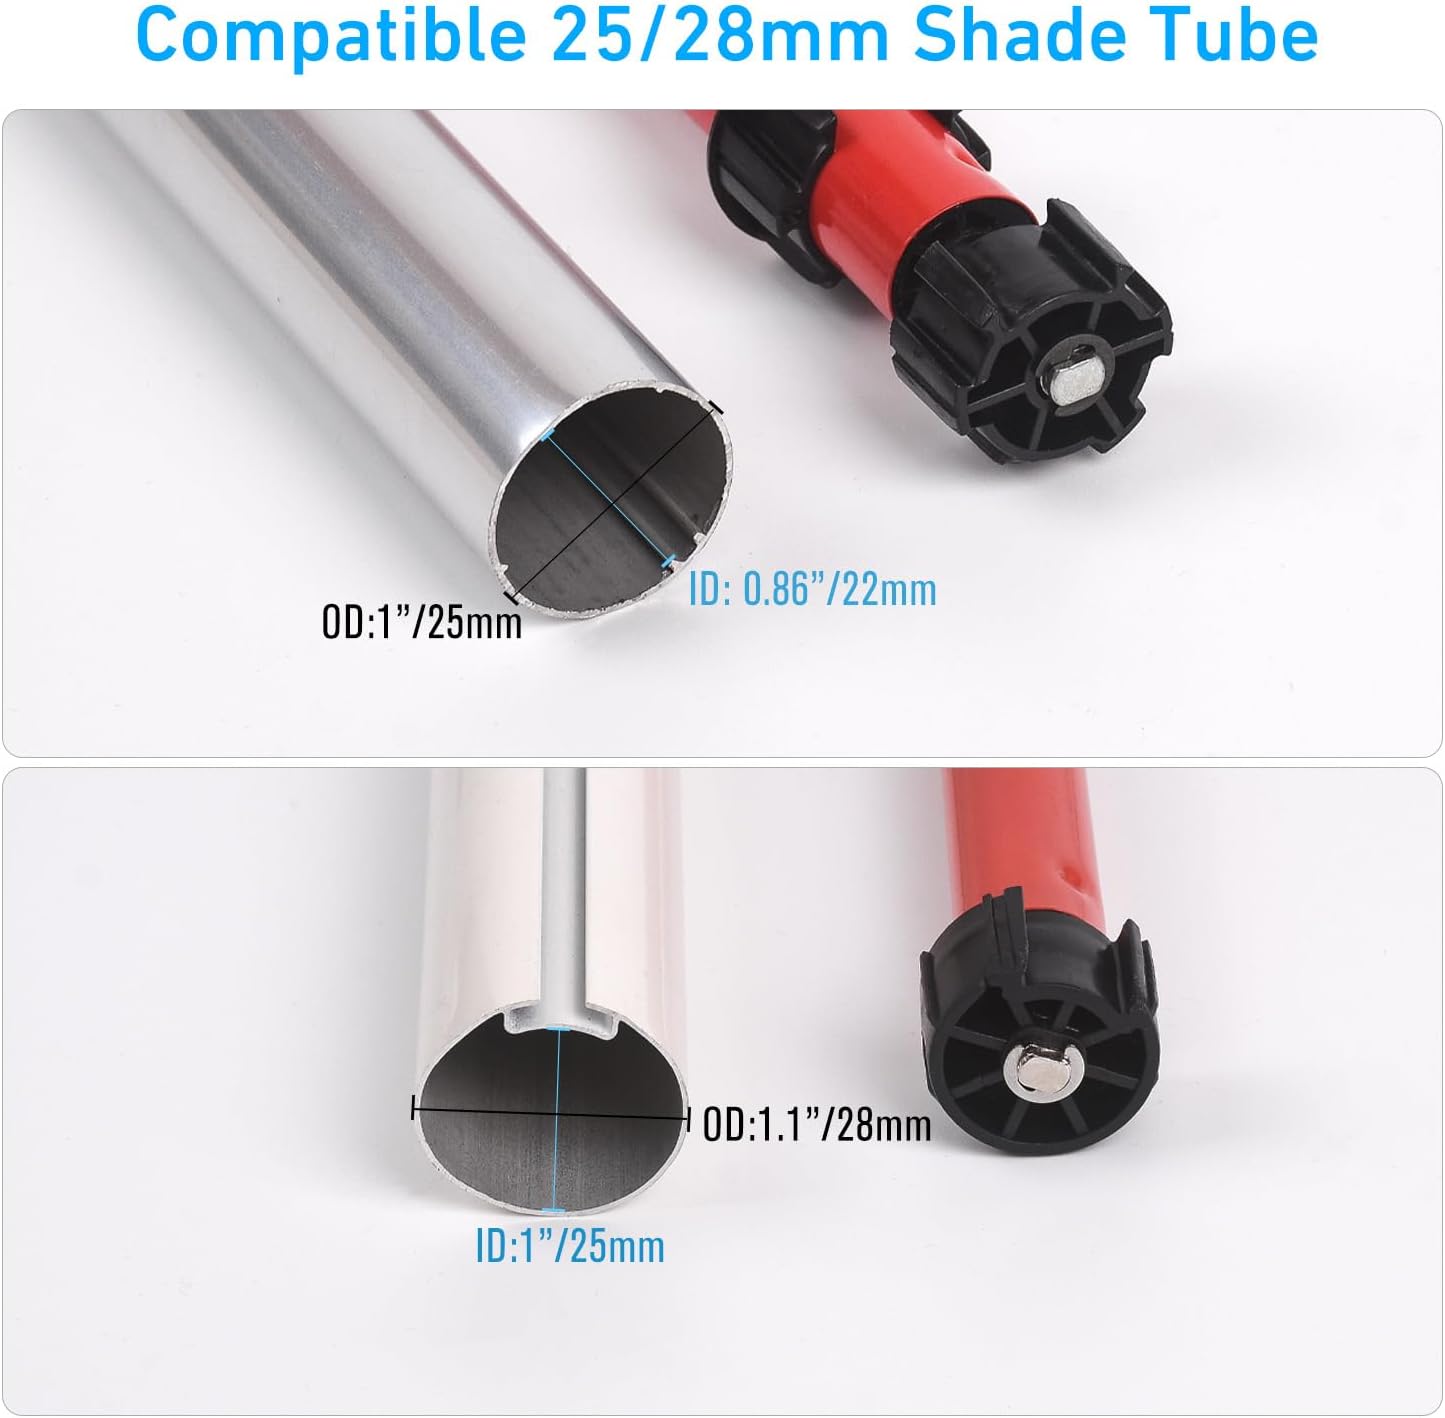
Figure 3: Compatible Shade Tube Dimensions
The motor is compatible with 25mm and 28mm (1-inch outer diameter) shade tubes. Verify your tube's inner and outer diameters for a perfect fit.
2. Install the Motor into the Shade Tube
Insert the 12V mini motor into the shade tube. Use the provided rubber drive fittings to ensure a snug and secure fit within the tube. The motor should slide smoothly into place.

Figure 4: Motor Compatibility with Different Shade Tube Types
3. Mount the Blind
Attach the 25mm mounting brackets to your window frame or wall. Once the motor is securely inside the shade tube, place the assembled blind onto the installed mounting brackets. Ensure it is level and moves freely.
4. Зымдар жана электр туташтыруу
Connect the motor to a 12V DC power supply (sold separately). Ensure all connections are secure. The motor is wired and does not operate on batteries internally.
5. Motorizing Existing Blinds (Detailed Guide)
Video 1: How to Motorize Your Existing Blinds, Shades, and Draperies. This video provides a step-by-step visual guide on adapting your current window treatments for motorization.
Иштөө нускамалары
1. Алыстан башкаруу операциясы

Figure 5: Remote Control in Use
Use the provided 1-channel remote control to operate your motorized blinds. The remote typically features buttons for raising, lowering, and stopping the shade at any desired position.
2. Voice and Smart Home Control (Requires Gateway)

Сүрөт 6: Үн менен башкаруунун интеграциясы
For voice control via Alexa, Google Home, or other smart home systems, an IR/RF gateway (sold separately) is required. This gateway acts as a bridge between your smart home assistant and the motor.
Video 2: How to Connect RF Shade Motor to an RF Hub (e.g., Broadlink). This video demonstrates the process of integrating your motor with a smart home hub for advanced control options.
Video 3: How To Program The Remote To Operate Motorized Blinds. This video guides you through the steps to program your remote control for seamless operation of your blinds.
Техникалык тейлөө
The Rollerhouse 12V motor is designed for low maintenance. Keep the motor and surrounding area clean and free from dust and debris. Periodically check the wiring for any signs of wear or damage. Do not attempt to disassemble the motor unit beyond what is described in this manual.
Проблемаларды чечүү
- Мотор жооп бербейт:
- Ensure the 12V DC power supply is correctly connected and providing power.
- Алыстан башкаруу пультунун батарейкаларынын иштешин текшериңиз.
- If using a smart hub, verify its connection and configuration.
- Inconsistent Operation / Requires Frequent Re-programming:
- Ensure a stable power supply. Fluctuations can sometimes affect programming.
- Re-program the remote control following the instructions in Video 3.
- If using a smart hub, ensure it is within range and has a stable connection.
- Blind Not Moving Smoothly:
- Check for any obstructions in the blind's path.
- Ensure the motor is securely fitted within the shade tube and the tube is properly mounted.
- Verify the weight of the shade does not exceed the motor's 4.4 lbs (2kg) capacity.
Кепилдик жана колдоо
Rollerhouse products are manufactured to high-quality standards. For warranty information, technical support, or service inquiries, please refer to the contact information provided on your product packaging or visit the official Rollerhouse webсайт. Сатып алуу квитанциясын кепилдик дооматтары үчүн сатып алуунун далили катары сактаңыз.


