1. Киришүү
The Godox X1R-S is a 2.4G wireless flash receiver designed for Sony DSLR cameras, offering TTL (Through-The-Lens) autoflash compatibility and high-speed sync capabilities. This receiver integrates seamlessly into the Godox wireless X system, allowing for remote control of compatible flashes and studio strobes. This manual provides detailed instructions for setting up, operating, and maintaining your X1R-S receiver.
2. Продукт бүтүп калдыview
Негизги өзгөчөлүктөрү:
- Шайкештик: Designed for Sony DSLR cameras, supporting TTL Autoflash.
- Зымсыз система: Built-in 2.4G wireless transmission for reliable communication up to 100 meters.
- Flash режимдери: Supports TTL Autoflash, Manual Flash, and Multi-Flash modes.
- Sync Functions: 1/8000s High-Speed Sync (HSS), Flash Exposure Compensation (FEC), Flash Exposure Lock (FEL), Modeling Flash.
- Контролдоо: Wireless remote control and grouping system with 5 groups (A/B/C/D/E) in GR mode and 3 groups (A/B/C) in Ratio mode, across 32 channels.
- Жапкычты чыгаруу: Functions as a wireless shutter release via its 2.5mm sync port.
- Дисплей: Wide LCD panel with backlight for easy operation.
- Күч: Uses 2x AA batteries.
- Микропрограмма: Микропрограмманы жаңыртуу үчүн микро USB порту.
Компоненттин идентификациясы:

Сүрөт 1: Алдыңкы view of the Godox X1R-S receiver, showing the hot shoe mount and 'TEST' button.

2-сүрөт: Жогорку view of the Godox X1R-S receiver, highlighting the LCD screen and channel/group buttons.

3-сүрөт: Каптал view of the Godox X1R-S receiver, showing the Micro USB port and 2.5mm sync port.
3. Орнотуу
3.1 Батареяны орнотуу
- Slide open the battery compartment cover located on the side of the receiver.
- Туура полярдуулукту (+/-) камсыз кылуу менен эки (2) AA батарейкасын салыңыз.
- Батарея уясынын капкагын бекем жабыңыз.

Figure 4: The battery compartment of the X1R-S receiver, showing two AA batteries being inserted.
3.2 Mounting the Receiver
- Attach the X1R-S receiver to the hot shoe of your Sony camera.
- Secure the receiver by tightening the locking wheel.
- Mount your compatible flash unit onto the hot shoe of the X1R-S receiver.

5-сүрөт: Төмөнкү view of the X1R-S receiver, showing the hot shoe mount for camera attachment.
3.3 Connecting to Studio Strobes/Other Devices
For studio strobes or other devices requiring a sync connection, use the provided 2.5mm sync cable. Connect one end to the 2.5mm sync port on the X1R-S receiver and the other end to the sync port of your studio strobe or device.
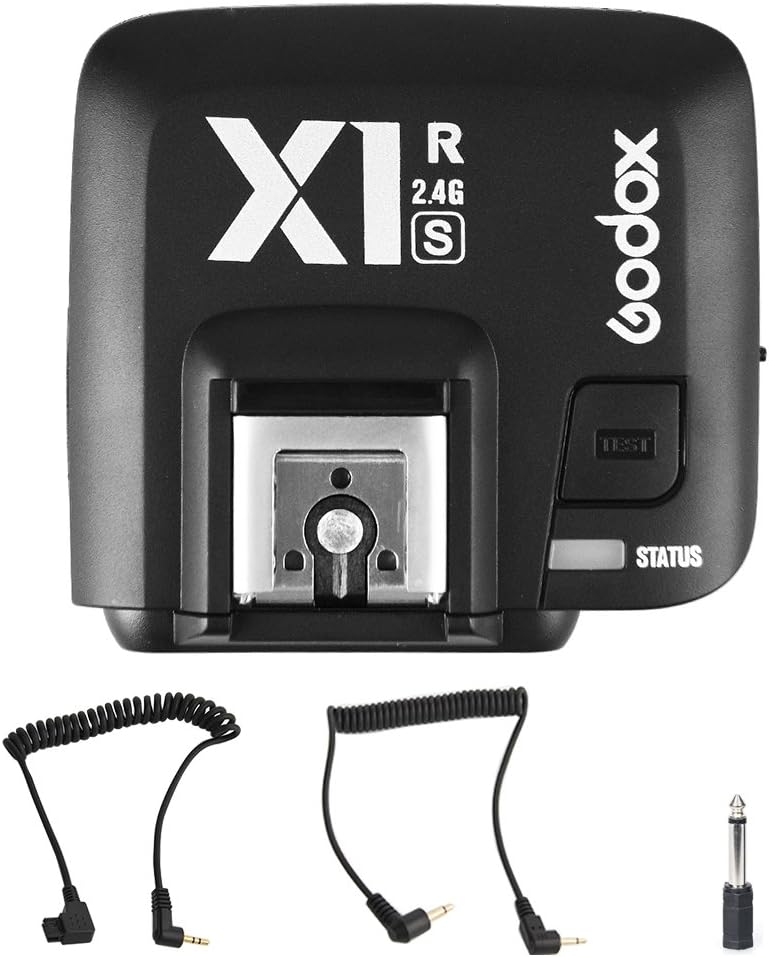
Figure 6: The X1R-S receiver shown with various sync cables for connecting to different flash units.
3.4 Channel and Group Settings
Ensure the channel and group settings on your X1R-S receiver match those on your Godox X-series transmitter (sold separately). This ensures proper communication between the units.
- Use the 'CH' button to select the desired channel (1-32).
- Use the 'GR' button to select the desired group (A/B/C/D/E).
4. Иштөө нускамалары
4.1 Күйгүзүү/өчүрүү
Slide the ON/OFF switch located on the side of the receiver to power it on or off.
4.2 Тест жаркылдагы
Press the 'TEST' button on the receiver to manually trigger the connected flash unit. The 'STATUS' indicator will light up to confirm the flash has fired.
4.3 Wireless Flash Control
Once the receiver is properly set up and paired with a compatible Godox X-series transmitter, the flash connected to the X1R-S will fire in sync with your camera's shutter release, according to the settings configured on the transmitter. This includes TTL, Manual, Multi-flash, HSS, FEC, and FEL functions.
4.4 Wireless Shutter Release
The X1R-S receiver can also function as a wireless shutter release for your camera. Connect the receiver to your camera's shutter release port using an appropriate 2.5mm sync cable. The shutter release function is typically controlled via the transmitter.
4.5 ЖК панели
The wide LCD panel displays current settings such as channel, group, flash mode, and battery status. The backlight can be toggled on/off for visibility in various lighting conditions.
5. Техникалык тейлөө
5.1 Батареяны алмаштыруу
Replace the AA batteries when the battery indicator on the LCD panel shows low power to ensure uninterrupted operation.
5.2 Орнотулган программаны жаңыртуу
The X1R-S receiver features a Micro USB port for firmware upgrades. Visit the official Godox webоптималдуу иштөөнү жана шайкештикти камсыз кылуу үчүн эң акыркы микропрограмма жана көрсөтмөлөр үчүн сайт.
6. Кыйынчылыктарды
- Жарк этпейт:
- Check if the receiver is powered on and has fresh batteries.
- Ensure the channel and group settings on the receiver match the transmitter.
- Verify that the flash unit is properly mounted and powered on.
- Check the connection of the 2.5mm sync cable if using a studio strobe.
- Test the flash manually using the 'TEST' button on the receiver.
- Inconsistent firing:
- Ensure the receiver and transmitter are within the effective operating range (up to 100m).
- Check for potential interference from other 2.4G wireless devices. Try changing channels.
- Verify battery levels in both the receiver and the connected flash unit.
- TTL/HSS not working:
- Confirm that both your camera and flash unit support TTL/HSS.
- Ensure the receiver is securely mounted on the camera's hot shoe and the flash is securely mounted on the receiver.
- Check the settings on your transmitter to ensure TTL/HSS is enabled.
7. Техникалык шарттар
| Өзгөчөлүк | Спецификация |
|---|---|
| Модел | X1R-S |
| Шайкештик | Sony DSLR Cameras (TTL Autoflash), Cameras with PC Sync Socket |
| Зымсыз берүү | 2.4G зымсыз системасы |
| Берүүнүн диапазону | >100м |
| Модуляция режими | MSK |
| Каналдар | 32 |
| Башкарылуучу кул топтору | 5 (A/B/C/D/E) in GR mode; 3 (A/B/C) in Ratio mode |
| Шайкештирүү ылдамдыгы | Up to 1/8000s (High Speed Sync) |
| Жаркылдактын таасири үчүн компенсация | Yes, ±3 Stops in 1/3 stop increments |
| Flash Exposure Lock | Ооба |
| Focus Assist | Кол менен ачуу |
| Экинчи көшөгө синхрондоштуруу | Жок |
| Моделдөө Flash | Yes, Fired with Camera's depth-of-field preview баскычы |
| Зымсыз жапкычты чыгаруу | Receiver can control camera shooting through 2.5mm sync port |
| Zoom Setting | Adjust the Flash's focal length through the transmitter |
| LCD панели | Wide LCD Panel, Backlight on/off |
| Output Interface | 2.5mm sync cord output |
| Микропрограмманы жаңыртуу | Микро USB порт |
| Электр камсыздоо | 2x AA батарейкалары |
| Өлчөмдөр | 4.41 x 4.37 x 2.24 дюйм |
| Салмагы | 3.52 унция |
8. Расмий продукт Videos
Godox CT-16 Flash Trigger Kit Operation
Video demonstrating the setup and basic operation of the Godox CT-16 Wireless Flash Trigger Kit. While a different model, it illustrates general principles of battery installation, channel setting, and connecting to a flash unit.
Godox CT-16 Wireless Flash Trigger
Кыскача алдын алаview видео шоуcasing the Godox CT-16 Wireless Flash Trigger. This video provides a quick visual overview of the product's components and basic functionality.
Godox X3 Trigger Operation Tutorial
This tutorial demonstrates the operation of the Godox X3 Trigger. While the X1R-S receiver has a different interface, this video can provide insight into advanced trigger functions like multi-group settings, sync modes, and custom functions within the Godox ecosystem.
9. Кепилдик жана колдоо
For warranty information, technical support, or service inquiries, please refer to the official Godox website or contact your authorized dealer. Specific warranty terms may vary by region and retailer.


