1. Киришүү
This manual provides detailed instructions for the installation, operation, and maintenance of your Pyle PLRVST400 Double DIN In-Dash Car Stereo Head Unit. This versatile audio and video receiver system is designed for universal standard console or wall panel installation, making it suitable for RVs, travel trailers, motor homes, and campers. It features Bluetooth connectivity, a CD/DVD player, MP3/USB playback, AM/FM radio, and a 3-zone audio control system.
2. Коопсуздук маалыматы
- Ensure proper wiring connections to prevent electrical shorts or damage.
- Агрегатты айдоодон алаксыта тургандай иштетпеңиз.
- Avoid exposing the unit to extreme temperatures, moisture, or direct sunlight.
- Бардык тейлөөлөрдү квалификациялуу кызматкерлерге тапшырыңыз.
- Always disconnect the vehicle's battery before performing any installation or wiring.
3. Пакеттин мазмуну
Пакетте бардык буюмдар бар экенин текшериңиз:
- Pyle PLRVST400 A/V Receiver System
- Электр кубаты жана зымдары
- Алыстан башкаруу
- Монтаждоочу жабдыктар (бурамалар)

Image 3.1: Pyle PLRVST400 unit, remote control, and wiring harness.
4. Орнотуу жана орнотуу
The PLRVST400 is designed for universal Double DIN installation in a console or wall panel. Proper installation requires careful attention to wiring connections.
4.1 Зымдарды туташтыруу
Use the included power and wiring harness to connect the unit to your vehicle's electrical system and speakers. Refer to the wiring diagram provided with the harness for specific connections. Ensure all connections are secure to prevent intermittent operation or damage.
- Power (Yellow B+): Туруктуу 12V кубаттуулукка туташтырыңыз.
- Accessory (Red ACC): Connect to switched 12V power (ignition).
- Жер (Кара): Унаанын шасси жерге туташтыруу.
- Динамиктин чыгышы: Connect to your vehicle's speakers, observing polarity.
- RCA Audio/Video: Use for external audio/video input or output connections.

Сүрөт 4.1: Арткы view of the Pyle PLRVST400, illustrating the various input and output ports for wiring.
4.2 Монтаждоо
Secure the unit into the Double DIN opening using the provided mounting hardware. Ensure the unit is firmly seated and does not obstruct any vehicle controls.
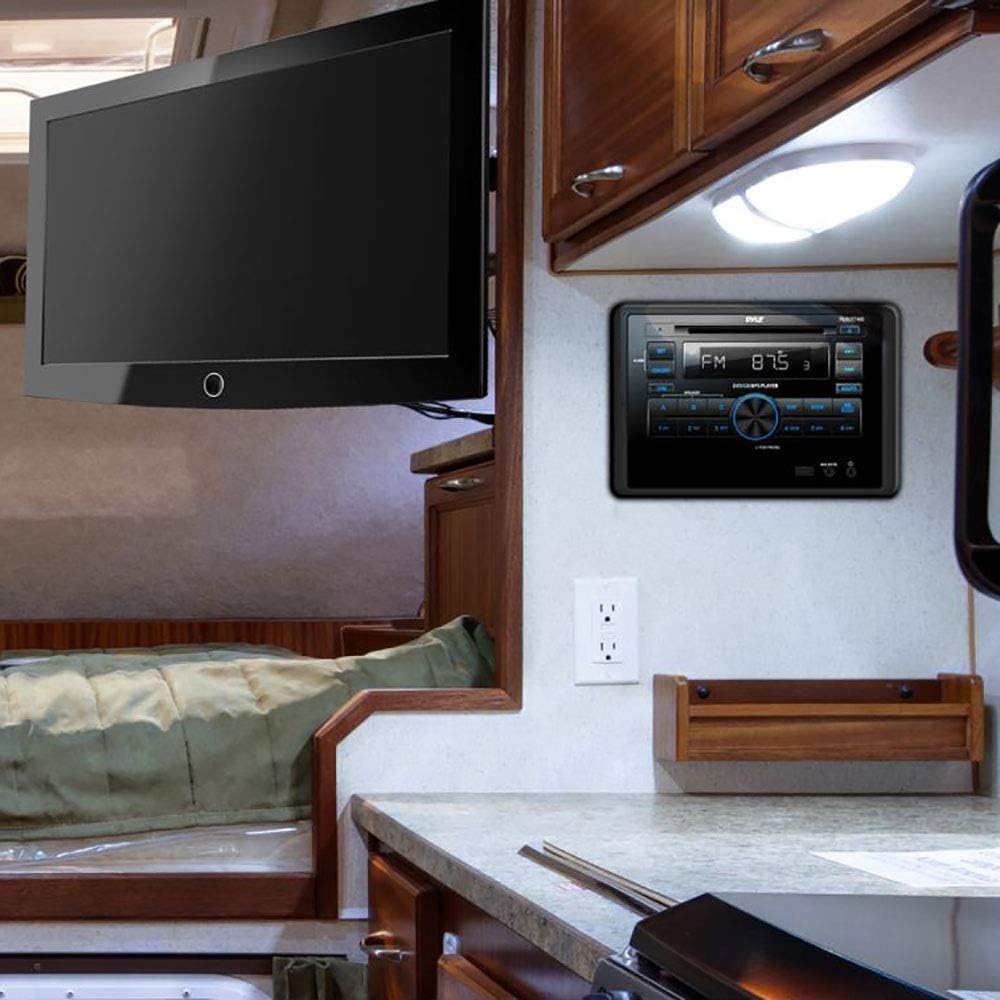
Image 4.2: The Pyle PLRVST400 unit installed in an RV wall panel, demonstrating a typical mounting scenario.
5. Иштөө нускамалары
The PLRVST400 features a user-friendly interface with front panel controls and a remote control for convenient operation.

Image 5.1: Front panel of the Pyle PLRVST400 with its accompanying remote control, highlighting key buttons and the LCD display.
5.1 Негизги башкаруу каражаттары
- КҮЙГҮЗҮҮ/ӨЧҮРҮҮ: Түзмөктү күйгүзүү же өчүрүү үчүн басыңыз.
- DIM: Adjusts the brightness of the LCD display.
- PUSH PWR/SEL Knob: Press to select functions or confirm settings. Rotate to adjust volume or navigate menus.
- РЕЖИМ: Cycles through available audio sources (Radio, CD/DVD, USB, AUX, Bluetooth).
- ЖӨНДӨӨ: Accesses system settings and configuration options.
5.2 Bluetooth байланышы
The unit features built-in Bluetooth for wireless audio streaming.
- Ensure Bluetooth is enabled on your mobile device (smartphone, tablet, etc.).
- Select 'Bluetooth' as the source on the PLRVST400 using the MODE button.
- Издөө available Bluetooth devices on your mobile device. The unit will appear as 'Pyle Audio' or similar.
- Select the unit to pair. The default Bluetooth network password is '0000' (four zeroes).
- Once paired, you can stream audio wirelessly from your device to the PLRVST400.
5.3 CD/DVD Player
Insert a compatible CD or DVD into the disc slot. The unit will automatically detect the disc and begin playback. Supported disc types include CD-R, CD-RW, VCD, DVD, and MP3-CD.
5.4 Радио менен иштөө
Press the MODE button to select 'Radio'.
- AM/FM: Use the band button (often labeled 'WB BAND' or similar) to switch between AM, FM, and Weatherband frequencies.
- тюнинг: Use the seek buttons (◀◀ / ▶▶) to automatically search for stations. Manual tuning may be available through the SET menu or by holding seek buttons.
- Алдын ала орнотуулар: Store up to 30 radio stations using the numbered preset buttons (1-6). To save a station, tune to it, then press and hold a preset button until you hear a confirmation beep.
- Weatherband (WB): Access weather alerts and information on the Weatherband frequency.
5.5 USB ойнотуу
Insert a USB flash drive (up to 32GB) into the USB port. The unit supports MP3 and WMA audio files. Playback will begin automatically or can be selected via the MODE button.
5.6 AUX киргизүү
Connect external audio devices using the RCA (L/R) audio input connectors or a 3.5mm jack. Select 'AUX' as the source via the MODE button.
5.7 3-Zone Audio Control
The unit features a multi-speaker '3-zone' audio source feature, allowing you to control three separate speaker zones. Use the A, B, and C buttons on the front panel to select and manage audio output for each zone independently.
5.8 Үн конфигурациясы
Access sound settings through the SET menu. Adjust Bass/Treble levels (+/-10dB) and other equalizer settings to customize your audio experience.
6. Техникалык тейлөө
- Тазалоо: Түзмөктүн алдыңкы панелин тазалоо үчүн жумшак, кургак чүпүрөктү колдонуңуз. Абразивдүү тазалоочу каражаттарды же эриткичтерди колдонбоңуз.
- Дискке кам көрүү: Handle CDs and DVDs by their edges. Keep discs clean and free of scratches to ensure optimal playback.
- USB порт: USB портун чаңдан жана таштандылардан тазалаңыз.
7. Кыйынчылыктарды
If you encounter issues with your PLRVST400, refer to the following common problems and solutions:
| Көйгөй | Мүмкүн болгон себеп / Чечим |
|---|---|
| Түзмөк күйбөйт. | Check power connections (Yellow B+ and Red ACC). Ensure both are connected to a 12V source. Some installations may require twisting the Yellow B+ and Red ACC wires together and connecting both to constant 12V power. Check the ground connection. Verify vehicle's fuse. |
| Динамиктерден үн жок. | Check speaker wiring connections and polarity. Ensure the correct audio source is selected. Verify volume level is not at minimum or muted. Check 3-zone audio settings (A, B, C buttons) to ensure desired zones are active. |
| Bluetooth байланышы көйгөйлөрү. | Ensure the unit is in Bluetooth mode. Verify Bluetooth is enabled on your mobile device and within range (30+ ft). Try unpairing and re-pairing the device. Confirm the correct password ('0000') is used. |
| Disc playback errors. | Ensure the disc is clean and free of scratches or damage. Verify the disc type is compatible (CD-R, CD-RW, VCD, DVD, MP3-CD). |
| Пульт иштебей жатат. | Check the battery in the remote control. Ensure there are no obstructions between the remote and the unit's IR sensor. |
| Volume control issues (e.g., too loud at lowest setting). | This can sometimes occur due to specific audio source or zone settings. Adjust individual zone levels if available, then control overall volume. |
8. Техникалык шарттар
| Өзгөчөлүк | Спецификация |
|---|---|
| Модель номери | PLRVST400 |
| MAX кубаттуулугу | 4 x 50 Ватт |
| Universal Size Standard | Double DIN |
| Үн режими | Стерео / Моно |
| Frequency Response | 40Hz-18kHz (+/- 3dB) |
| Импеданс | 4 Ом |
| S/N катышы | 60дБ |
| Стерео бөлүү | >50дБ, @ 1кГц |
| Тон башкаруу | Bass/Treble +/-10dB |
| Радио | PLL Synthesizer Stereo Radio, Weatherband |
| Electronic Shockproof (ESP) | Function included |
| Максималдуу USB Flash колдоосу | 32 ГБ |
| Radio Station Memory | Up to 30 Presets |
| Digital Audio File Колдоо | MP3, WMA |
| Digital Video File Колдоо | MP4, AVI, MOV, MPG, FLV, XVID |
| CD/DVD Disc Compatibility | CD-R, CD-RW, VCD, DVD, MP3-CD |
| Күч | DC 12V |
| Current Drain/Power Consumption | 10 Amp (Макс.) |
| Шассидин өлчөмдөрү | 7.0'' x 6.3'' x 3.9'' |
| Продукциянын өлчөмдөрү | 7.13 x 6.3 x 10.52 дюйм |
| Элемент Салмагы | 4 фунт |
| Байланыш технологиясы | Bluetooth |
| Controller Type | Кол менен башкаруу (аралыктан) |
| Шайкеш түзмөктөр | Smartphone, Speaker, Tablet |
| Туташтыргыч түрү | 3.5mm Jack, HDMI, RCA, USB Type A |
| Аудио чыгаруу режими | Стерео, моно |
| Көлөмдүү үн каналынын конфигурациясы | 3.0 |
9. Кепилдик жана колдоо
Warranty information for the Pyle PLRVST400 is typically provided with your purchase documentation. For specific warranty details, claims, or technical support, please refer to the official Pyle website or contact Pyle customer service directly. Keep your proof of purchase for warranty purposes.


