Introduction
This manual provides essential information for the safe and efficient operation, installation, and maintenance of your Utilitech 2-Sone 70-CFM White Bathroom Fan. Please read all instructions carefully before installation and use. Keep this manual for future reference.
Коопсуздук маалыматы
ЭСКЕРТҮҮ:
- Агрегатты тейлөөдөн же тазалоодон мурун ар дайым тейлөө панелинен электр кубатын өчүрүңүз.
- Орнотуу бардык жергиликтүү жана улуттук электр эрежелерине ылайык квалификациялуу электрик тарабынан аткарылышы керек.
- Do not use this fan in a kitchen. This fan is designed for bathroom ventilation only.
- Электр шок коркунучун азайтуу үчүн туура жерге туташтырууну камсыз кылыңыз.
- Never insert objects into the fan grille while the fan is operating.
- This product is designed for general ventilating use only. Do not use to exhaust hazardous or explosive materials and vapors.
Пакеттин мазмуну
Орнотууну баштоодон мурун бардык компоненттер бар экендигин текшериңиз:
- Utilitech 2-Sone 70-CFM Bathroom Fan Unit
- Гриль капкагы
- Орнотуу жабдыктары (бурамалар, зым гайкалар)
- Колдонуучунун Колдонмосу (бул документ)
Орнотуу жана орнотуу
Follow these steps for proper installation of your bathroom fan. It is recommended to have a second person assist during installation.
Керектүү куралдар:
- Бурагыч (Phillips жана Flathead)
- Wire Strippers
- Drill (if creating new opening)
- Өлчөө лентасы
- Пайдалуу бычак же гипсокартон араа
- Коопсуздук көз айнектери жана мээлейлер
Орнотуу кадамдары:
1. Кубатты өчүрүү:
Before starting any work, turn off the power to the circuit at the main service panel. Verify power is off using a voltage сыноочу.
2. Prepare Opening:
If replacing an existing fan, remove the old unit. If installing in a new location, cut an opening in the ceiling that matches the fan housing dimensions (7.5 x 7.2 inches). Ensure there is sufficient clearance above the ceiling for the fan housing and ductwork.
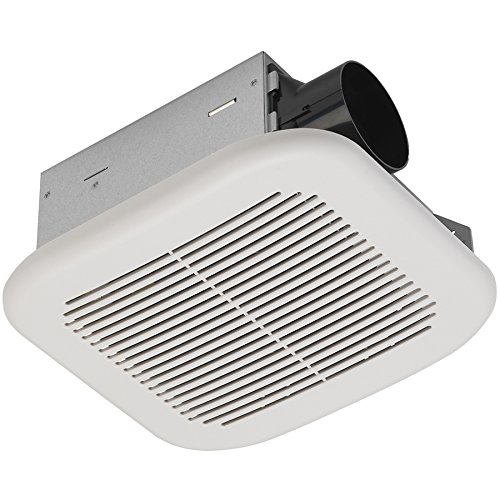
Image: The Utilitech 2-Sone 70-CFM Bathroom Fan unit, showing the white grille cover, the metal housing, and the circular duct connection port on the side.
3. Mount Fan Housing:
Insert the fan housing into the ceiling opening. Secure the housing to the ceiling joists using the provided mounting brackets and screws. Ensure the fan is level and securely fastened.
4. Connect Ductwork:
Connect appropriate ductwork (typically 4-inch round duct) to the fan's exhaust port. Secure the duct with duct tape or clamps to ensure an airtight seal. Route the ductwork to an exterior vent cap.
5. Электр зымдары:
Remove the wiring cover plate on the fan housing. Connect the household electrical wires to the fan's wires according to the wiring diagram provided inside the fan's junction box. Typically, this involves connecting black to black (hot), white to white (neutral), and green/bare copper to green (ground). Use wire nuts to secure connections. Replace the wiring cover plate.
6. Install Grille Cover:
Once the fan is wired and secured, attach the grille cover. The grille typically has spring clips that fit into slots on the fan housing. Push the grille firmly until it snaps into place.
7. Кубатты калыбына келтирүү:
Turn the power back on at the main service panel. Test the fan to ensure it operates correctly.
Иштөө нускамалары
The Utilitech 2-Sone 70-CFM Bathroom Fan is designed for simple operation. Once installed and wired to a wall switch (not included), simply toggle the switch to turn the fan ON or OFF. For optimal performance, operate the fan during and after showering or bathing to effectively remove moisture and odors from the bathroom.
Техникалык тейлөө
Regular maintenance ensures the longevity and efficiency of your fan.
Торчо жана желдеткич корпусун тазалоо:
1. Кубатты өчүрүү:
Тазалоодон мурун ар дайым автоматтык өчүргүчтөгү желдеткичтин кубатын өчүрүңүз.
2. Remove Grille:
Gently pull down the grille cover to disengage the spring clips. Remove the grille from the fan housing.
3. Clean Grille:
Тордун капкагын жумшак самын жана суу менен жууңуз. Жакшылап чайкап, кайра орнотуудан мурун толугу менен кургатыңыз.
4. Clean Fan Housing and Blades:
Using a soft cloth or a vacuum cleaner with a brush attachment, carefully remove dust and debris from the fan motor, fan blades, and interior of the housing. Do not use abrasive cleaners or solvents.
5. Reattach Grille:
Once clean and dry, reattach the grille cover by aligning the spring clips with the slots and pushing it firmly into place.
6. Кубатты калыбына келтирүү:
Электрди өчүргүчтөн кайра күйгүзүңүз.
No lubrication is required for the fan motor. The motor is permanently lubricated.
Проблемаларды чечүү
Эгерде сиз желдеткичиңиз менен көйгөйлөргө туш болсоңуз, кардарларды колдоо кызматына кайрылуудан мурун төмөнкү таблицаны караңыз.
| Көйгөй | Мүмкүн себеп | Чечим |
|---|---|---|
| Желдеткич иштебейт | желдеткичке кубат жок | Check circuit breaker or fuse. Ensure wall switch is ON. Verify wiring connections. |
| Желдетүүчү ызы-чуу | Loose mounting screws or ductwork; debris in fan blades; motor issue | Ensure fan housing is securely mounted. Check ductwork for obstructions or loose connections. Clean fan blades. If noise persists, motor may need replacement. |
| Абанын начар кыймылы | Blocked ductwork; dirty fan blades/grille; fan too small for room | Check ductwork for obstructions. Clean fan blades and grille. Ensure fan CFM rating is appropriate for bathroom size. |
| Желдетүүчү ашыкча титирет | Improper mounting; unbalanced fan blade | Re-check mounting screws for tightness. Inspect fan blade for damage or debris causing imbalance. |
Техникалык шарттар
| Өзгөчөлүк | Спецификация |
|---|---|
| Бренд | Utilitech |
| Модель номери | 7111-04-L |
| Продукциянын өлчөмдөрү | 7.5 x 7.2 x 3.9 дюйм |
| Элемент Салмагы | 4.7 фунт |
| Аба агымынын кубаттуулугу | Мүнөтүнө 70 куб фут (CFM) |
| Ызы-чуу деңгээли | 2.0 Sones (equivalent to 70 dB) |
| Тtage | 120 вольт |
| Түс | Ак |
| Бөлмө түрү | Ванна |
| Сунушталган колдонуу | Желдетүү |
Кепилдик жана колдоо
Utilitech products are manufactured to high-quality standards. For warranty information or technical support, please refer to the warranty card included with your purchase or contact Utilitech customer service. Keep your proof of purchase for warranty claims.
For further assistance, please visit the official Utilitech webсайтына кириңиз же алардын кардарларды колдоо линиясына кайрылыңыз. Байланыш маалыматын, адатта, продуктунун таңгагынан же өндүрүүчүнүн webсайт.


