1. Киришүү
This manual provides detailed instructions for the safe and effective operation of your BENNING CM 12 True RMS Digital Power Clamp Multimeter. Please read this manual thoroughly before using the device and keep it for future reference. The BENNING CM 12 is designed for demanding measurement tasks in industrial and commercial environments, offering precise measurements of AC, AC+DC True RMS, inrush current, and more, with data logging and Bluetooth connectivity.
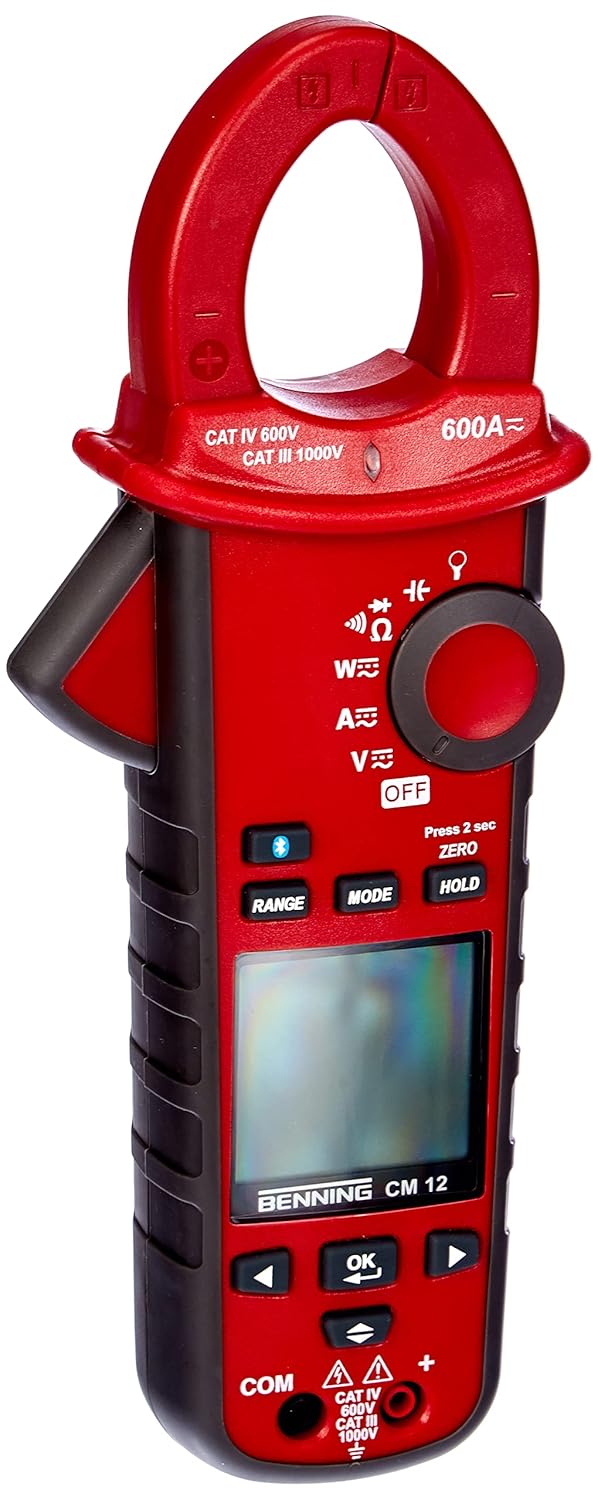
1-сүрөт: The Benning CM 12 True RMS Digital Power Clamp Multimeter. This image displays the main unit with its red casing, clamp jaw, display screen, and control buttons.
2. Коопсуздук маалыматы
Always observe the following safety precautions to prevent personal injury and damage to the instrument:
- Эгерде ал бузулуп калса же сыноо өткөргүчтөрүнүн изоляциясы бузулса, эсептегичти колдонбоңуз.
- Өлчөөлөрдү жүргүзүүдөн мурун, туура функция жана диапазон тандалганын текшериңиз.
- Эч бир функция үчүн киргизүүнүн максималдуу чегинен ашпаңыз.
- Том менен иштөөдө этият болуңузtag30V AC RMS, 42V пик же 60V DC жогору, анткени булар шок коркунучун жаратат.
- Ар дайым чынжырдагы кубатты ажыратып, бардык жогорку көлөмдү чыгарыңызtage capacitors before performing resistance, continuity, diode, or capacitance tests.
- Жергиликтүү жана улуттук коопсуздук эрежелерин сактаңыз.
3. Продукциянын компоненттери
The BENNING CM 12 package includes the following items:
- BENNING CM 12 Digital Power Clamp Мультиметр
- Сыноочу (Кызыл жана Кара)
- AAA батареялары (6 камтылган)
- Ташуу кутусу
- Колдонуучунун Колдонмосу (бул документ)

2-сүрөт: Red and black test leads. These leads are used for voltage, resistance, continuity, and other measurements.

3-сүрөт: Six AAA batteries. These batteries power the Benning CM 12 multimeter.

4-сүрөт: Black carrying case. This case provides protection and portability for the multimeter and its accessories.
4. Орнотуу
4.1. Батареяны орнотуу
- Аппараттын артындагы батарея бөлүкчөсүнүн капкагын табыңыз.
- Батарея отсегин ачуу үчүн бурагычты колдонуңуз.
- Insert six (6) AAA batteries, ensuring correct polarity as indicated inside the compartment.
- Батарея уясынын капкагын ордуна коюңуз жана аны бурама менен бекитиңиз.
4.2. Баштапкы күйгүзүү
Turn the rotary switch to any measurement function (e.g., V~ for AC Voltage) to power on the device. The display will illuminate, indicating the device is ready for use.
5. Иштөө нускамалары
The BENNING CM 12 offers a variety of measurement functions. Select the desired function using the rotary switch.
5.1. Өзгөрмө/Туруктуу Токту Өлчөө (Clamp Функция)
- Айланма которгучту 'A~' (өзгөрмө ток) же 'A=' (Туруктуу ток) абалына буруңуз.
- cl басыңызamp жаакты ачуу үчүн триггер.
- Бир өткөргүчтү cl менен кошуңузamp жаак. Жаактын толугу менен жабык экенин текшериңиз.
- Дисплейдеги учурдагы маанини окуңуз.
- For AC+DC True RMS measurements, ensure the appropriate mode is selected if available via the MODE button.
5.2. Томtage Өлчөө (AC/DC)
- Insert the red test lead into the 'VΩ' input jack and the black test lead into the 'COM' input jack.
- Turn the rotary switch to 'V~' (AC Voltage) же 'V=' (ТКнын көлөмүtagжана).
- Сыноо өткөргүчтөрүн текшерилип жаткан схемага же компонентке параллелдүү туташтырыңыз.
- Томду окуңузtage мааниси дисплейде.
5.3. Resistance and Continuity Measurement
- Ensure the circuit is de-energized before measurement.
- Insert test leads as for voltage өлчөө.
- Turn the rotary switch to 'Ω' (Resistance/Continuity).
- Компонент боюнча сыноо өткөргүчтөрүн туташтырыңыз.
- For continuity, the meter will beep if resistance is below approximately 30Ω - 100Ω.
5.4. Диод сыноо
- Схема кубаты өчүрүлгөнүн текшериңиз.
- Insert test leads as for voltage өлчөө.
- Айлануучу которгучту "Диод" белгисине буруңуз.
- Кызыл зымды анодго, ал эми кара зымды диоддун катодуна туташтырыңыз. Алдыга вольтtage drop (approx. 0.8V) will be displayed. Reverse the leads for an open circuit reading.
5.5. Кирип келүүчү токту өлчөө
This function measures the initial surge of current when a device (e.g., motor, lamp) is first turned on.
- Айланма которгучту 'A~' абалына буруңуз.
- Press the 'INRUSH' button (if dedicated) or activate via 'MODE' button.
- Clamp the meter around the power conductor of the device.
- Turn on the device to measure the inrush current.
5.6. Power Measurement (W) and Power Factor
The BENNING CM 12 can simultaneously detect current (A) and voltage (V) to calculate active power (W) and power factor in AC/DC networks.
- Turn the rotary switch to the 'W' (Power) position.
- Connect the test leads for voltage measurement and clamp the jaw around the current conductor.
- The display will show active power (W) and power factor.
5.7. Data Logger Function (LOG) and Bluetooth Interface
The device features a data logger capable of storing 10,000 readings with a sampling rate from 1 second to 10 minutes. It also includes a Bluetooth interface for data connection to smartphones or tablets via the "BENNING MM-CM Link" app.
- Download and install the "BENNING MM-CM Link" app from your device's app store (iOS and Android compatible).
- Activate Bluetooth on your smartphone/tablet and on the BENNING CM 12 (refer to the device's specific button for Bluetooth activation, usually a dedicated button or a long press of 'MODE').
- Pair the device with the app.
- Use the app to configure logging parameters (sampling rate, start/stop logging) and to view/export recorded data.
5.8. Low-Pass Filter (HFR)
The HFR (High-Frequency Rejection) low-pass filter is used for accurate measurements on clocked motor drives or other noisy environments by filtering out high-frequency interference.
- Activate the HFR filter via a dedicated button or by pressing the 'MODE' button in relevant measurement functions (e.g., AC Voltage or Current).
- The display will typically show an indicator when the filter is active.
5.9. Total Harmonic Distortion (THD) Measurement
The THD function assesses network quality by measuring the total harmonic distortion of voltage or current waveforms.
- Select the THD function using the rotary switch or 'MODE' button in AC Voltage/Current modes.
- Connect the meter as appropriate for voltage же учурдагы өлчөө.
- The display will show the THD value.
5.10. Two-Pole Rotary Field Testing
This function is used to determine the phase sequence in three-phase systems.
- Turn the rotary switch to the 'Rotary Field' symbol (if dedicated) or select via 'MODE' button in a relevant AC voltage функциясы.
- Connect the test leads to two phases of the three-phase system.
- The display will indicate the phase sequence (e.g., L1-L2, L2-L3).
6. Техникалык тейлөө
6.1. Тазалоо
Ишти жарнама менен сүртүңүзamp кездеме жана жумшак жуугуч каражат. Абразивдүү заттарды же эриткичтерди колдонбоңуз. Тазалоодон мурун түзмөктүн өчүрүлгөнүн жана бардык чынжырлардан ажыратылганын текшериңиз.
6.2. Батареяны алмаштыруу
When the low battery indicator appears on the display, replace the batteries as described in Section 4.1. Remove batteries if the device will not be used for an extended period to prevent leakage.
6.3. Сактоо
Store the multimeter in its carrying case in a cool, dry environment, away from direct sunlight and extreme temperatures. Remove batteries for long-term storage.
7. Кыйынчылыктарды
| Көйгөй | Мүмкүн себеп | Чечим |
|---|---|---|
| Эсептегич күйбөйт. | Өлүк же туура эмес орнотулган батарейкалар. | Батареянын полярдуулугун текшерүү; батареяларды алмаштыруу. |
| Окуу же "OL" (Ашыкча жүктөө) көрсөтүлгөн жок. | Incorrect range selected, open circuit, or measurement exceeds range. | Select appropriate range, check circuit connections, ensure measurement is within device limits. |
| Туура эмес окуулар. | Poor test lead connection, external interference, or low battery. | Ensure secure connections, move away from strong electromagnetic fields, replace batteries. |
| Bluetooth байланышы көйгөйлөрү. | Bluetooth not activated on device/phone, app issues, or out of range. | Ensure Bluetooth is on for both devices, restart app, move closer to the meter. |
8. Техникалык шарттар
| Өзгөчөлүк | Деталь |
|---|---|
| Модель номери | CM 12 |
| Өлчөө түрү | True RMS (AC, AC+DC) |
| Катуу агым | Ооба |
| Pro жүктөөfile Жаздыруу | Yes (single-phase and three-phase) |
| Power Measurement | Active Power (W), Power Factor |
| Үзгүлтүксүздүк тести | 30 Ω - 100 Ω |
| Диод сыноо | 0.8 V |
| Rotary Field Testing | Эки уюлдуу |
| Төмөн өткөрүүчү чыпка | HFR (High-Frequency Rejection) |
| Harmonic Measurement | THD (Толук гармоникалык бурмалоо) |
| Data Logger | 10,000 readings, 1s - 10min sampылдамдыгы |
| Интерфейс | Bluetooth (iOS and Android app "BENNING MM-CM Link") |
| Power Source | 6 AAA батарейка (кошулган) |
| Продукциянын өлчөмдөрү | 11.42 x 5.12 x 2.76 дюйм |
| Элемент Салмагы | 1.3 фунт (590 грамм) |
| Өндүрүүчү | Benning |

5-сүрөт: Өлчөмдүү view of the Benning CM 12 Multimeter, indicating its approximate height of 11 inches (27 cm).
9. Кепилдик маалыматы
BENNING products are manufactured to high-quality standards. For specific warranty terms and conditions, please refer to the warranty card included with your product or visit the official BENNING webсайт. Кепилдик дооматтар үчүн сатып алганыңыздын далилин сактаңыз.
10. Кардарларды колдоо кызматы
If you encounter any issues or have questions regarding your BENNING CM 12, please contact BENNING customer support. You can find contact information on the official BENNING webсайтка же жергиликтүү дистрибьюторуңуз аркылуу.
- Webсайт: www.benning.de (Аймагыңызды текшериңиз webсайт)
- Электрондук почта: караңыз webбелгилүү бир байланыш электрондук почталары үчүн сайт.
- Телефон: караңыз webатайын байланыш номерлери үчүн сайт.


