1. Киришүү
This manual provides essential instructions for the safe and efficient use of your EVoCharge Level 2 EV Charger, Model EVC3AA0B2E1A1. This electric vehicle charging station is designed to provide up to 32 Amps of power at 240 Volts, significantly reducing charging times compared to Level 1 chargers. It features a 25-foot cable and a NEMA 6-50 plug, suitable for both indoor and outdoor installations. Please read this manual thoroughly before installation and operation.
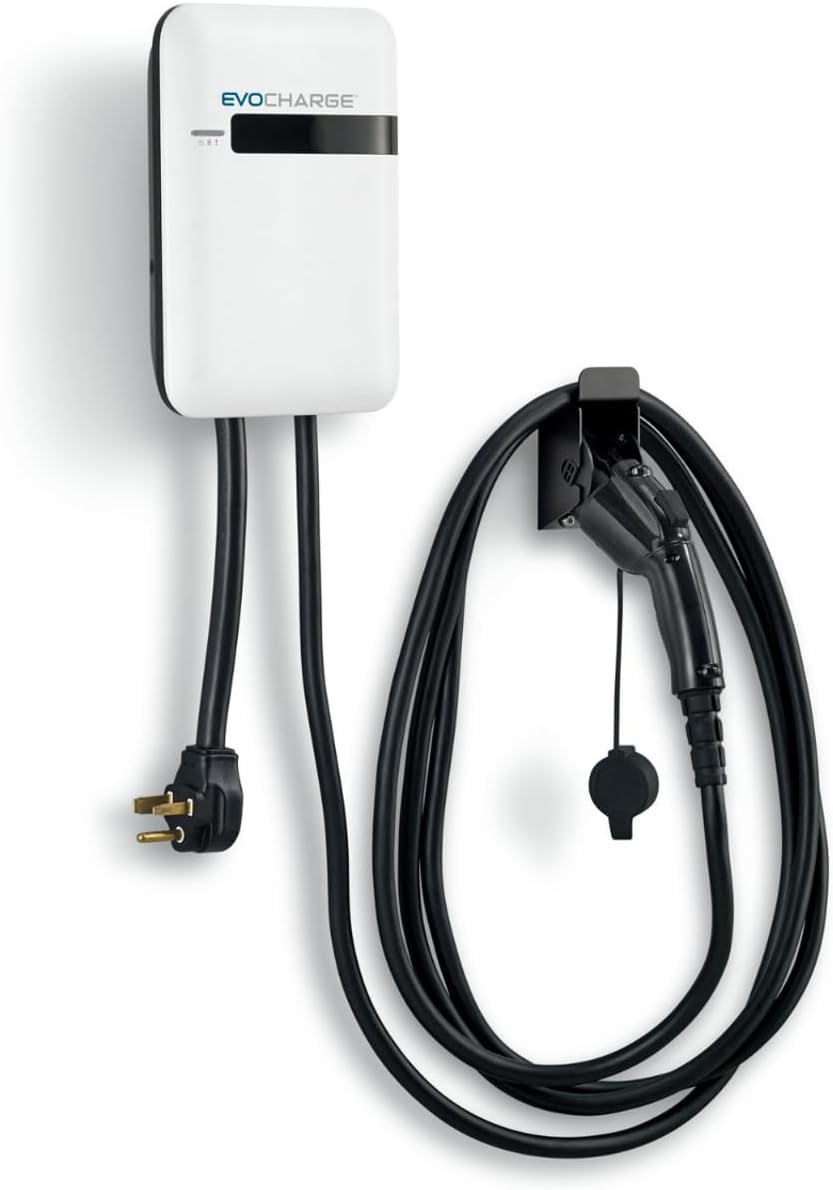
Image 1: The EVoCharge Level 2 EV Charger, showing the main unit, NEMA 6-50 power plug, and the J1772 charging connector with its holster.
1.1 Продукт бүттүview Video
Видео 1: таанышуу видеосуasing the EVoCharge brand and the benefits of Level 2 EV charging. This video highlights the product's features such as faster charging and outdoor reliability.
2. Коопсуздук боюнча маанилүү маалымат
WARNING: Failure to follow these safety instructions may result in fire, electric shock, serious injury, or death.
- Кесиптик орнотуу: Installation of this charging station requires electrical work. It is strongly recommended that a qualified electrician performs the installation to ensure compliance with all local and national electrical codes.
- Негиздөө: The charging station must be properly grounded. Do not use an adapter or extension cord with this product.
- Кубат булагы: Connect the charger only to a 240V, NEMA 6-50 receptacle on a dedicated circuit with appropriate overcurrent protection (e.g., a 40 Amp circuit breaker for 32 Amp заряддоо).
- Зыянды текшерүү: Before each use, inspect the charging cable, plug, and charging station for any signs of damage. Do not use if any components are damaged.
- Суу таасири: While designed for outdoor use, avoid submerging the unit or charging connector in water. Ensure the charging connector is dry before plugging it into your vehicle.
- Балдар жана үй жаныбарлары: Keep children and pets away from the charging station during operation.
- Шашылыш өчүрүү: Know the location of your circuit breaker for the charging station and how to turn it off in an emergency.
3. Кутуда эмне бар
Your EVoCharge Level 2 EV Charger package includes the following components:
- EVoCharge Level 2 EV Charging Station (Model EVC3AA0B2E1A1)
- Integrated 25-foot charging cable with J1772 connector
- Integrated NEMA 6-50 power plug
- Wall-mount holster for J1772 connector
- Монтаждоочу жабдыктар (буроолор, анкерлер)
- Колдонуучунун колдонмосу жана Кепилдик маалыматы
3.1 Unboxing and Components Video
Video 2: This video provides a visual guide to the contents of the EVoCharge Level 2 EV Charger package, showing the main unit and accessories.
4. Орнотуу жана орнотуу
The EVoCharge Level 2 EV Charger is designed for straightforward installation. However, due to the electrical requirements, professional installation by a certified electrician is highly recommended to ensure safety and compliance with local codes.
4.1 Заряддоо станциясын орнотуу
- Жайгашкан жерди тандоо: Select a suitable indoor or outdoor location near your NEMA 6-50 outlet and where the 25-foot charging cable can comfortably reach your vehicle's charging port. Ensure the mounting surface is sturdy enough to support the unit's weight (approximately 16.52 lbs).
- Бургулоо пункттарын белгилөө: Use the provided mounting template (if applicable) or measure the mounting holes on the back of the unit. Mark the drilling points on the wall.
- Бургулоо тешиктери: Drill pilot holes at the marked locations. Insert wall anchors if mounting into drywall or masonry.
- Коопсуздук бирдиги: Mount the charging station to the wall using the provided screws. Ensure it is securely fastened.
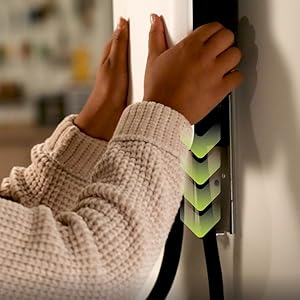
Сүрөт 2: Жакын план view of hands securing the EVoCharge charging unit to a wall, demonstrating the mounting process.
4.2 Power Connection (NEMA 6-50 Plug)
The EVoCharge charger comes with a NEMA 6-50 plug. Plug this directly into a compatible 240V NEMA 6-50 receptacle. Ensure the receptacle is on a dedicated circuit and properly installed by a qualified electrician.
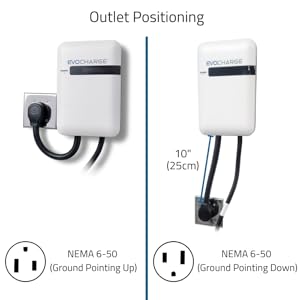
Image 3: A diagram illustrating the correct orientation for a NEMA 6-50 outlet, showing both ground-up and ground-down configurations for optimal cable routing.
4.3 Кабелди башкаруу
Utilize the provided wall-mount holster to store the J1772 connector and neatly coil the charging cable when not in use. This helps protect the cable from damage and keeps your charging area tidy.

Image 4: The EVoCharge unit mounted on a wall, with the charging cable neatly coiled and the J1772 connector stored in its holster, demonstrating effective cable management.
4.4 Cable Management Video
Video 3: A demonstration of how to properly coil and store the EVoCharge charging cable using the wall-mounted holster, ensuring a tidy and safe charging area.
5. Иштөө нускамалары
Using your EVoCharge Level 2 EV Charger is simple and intuitive.
- Күчтү камсыз кылуу: Verify that the EVoCharge unit is plugged into the NEMA 6-50 outlet and receiving power. The unit's indicator lights should be on (refer to the LED Status Indicators section for details).
- Retrieve Connector: Remove the J1772 charging connector from its holster.
- Унаага туташуу: Open your electric vehicle's charging port cover. Firmly insert the J1772 connector into the vehicle's charging port until it clicks into place.
- Заряддоо башталат: The charging process will typically begin automatically. The indicator lights on the EVoCharge unit and your vehicle will change to show that charging is active.
- Монитор заряддоо: You can monitor the charging status via your vehicle's dashboard or mobile app.
- Заряддоону бүтүрүү: To stop charging, unlock your vehicle's charging port (if applicable), press the release button on the J1772 connector, and pull it out from the vehicle.
- Store Connector: Return the J1772 connector to its holster and neatly coil the cable.

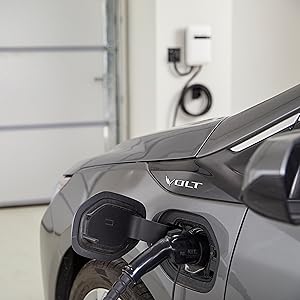
Image 5: A user connecting the J1772 charging connector from the EVoCharge unit into the charging port of an electric vehicle, illustrating the start of the charging process.
Сүрөт 6: деталдуу view of an electric vehicle's charging port with the J1772 connector securely inserted, indicating an active charging connection.
5.1 LED абал көрсөткүчтөрү
The EVoCharge unit features LED indicators to communicate its status:
- Катуу жашыл: Кубаттоого даяр.
- Жаркылдаган жашыл: Charging actively.
- Катуу кызыл: Fault or error. Refer to the Troubleshooting section.
- Жарык жок: Unit is not powered or in standby mode.
6. Техникалык тейлөө
Regular maintenance ensures the longevity and optimal performance of your EVoCharge charger.
- Тазалоо: Periodically wipe the charging station and cable with a soft, damp кездеме. Катуу химиялык заттарды же абразивдүү тазалагычтарды колдонбоңуз. Тазалоодон мурун бирдиктин розеткадан ажыратылганын текшериңиз.
- Кабельге кам көрүү: Avoid kinking, crushing, or driving over the charging cable. Always coil the cable neatly in its holster when not in use.
- Туташтыргыч текшерүү: Regularly check the J1772 connector for dirt, debris, or damage. Keep the protective cap on the connector when not in use.
- Курчап турган чөйрөнү коргоо: While designed for outdoor use, protecting the unit from direct, prolonged exposure to extreme weather conditions (e.g., heavy snow, direct sunlight for extended periods) can extend its lifespan.
7. Кыйынчылыктарды
If you encounter issues with your EVoCharge charger, refer to the following common problems and solutions:
| Көйгөй | Мүмкүн себеп | Чечим |
|---|---|---|
| Charger not powering on (no LED lights) | No power from outlet; circuit breaker tripped; unit unplugged. | Check if the NEMA 6-50 plug is fully inserted. Check your electrical panel for a tripped circuit breaker and reset if necessary. Verify the outlet is functional. |
| Унаа заряддалбай жатат | J1772 connector not fully inserted; vehicle charging schedule active; vehicle fault; charger fault. | Ensure the J1772 connector is fully seated and locked into the vehicle's port. Check your vehicle's charging settings. Unplug and re-plug the charger. If the issue persists, consult your vehicle's manual or contact EVoCharge support. |
| Кызыл LED индикатору күйүк | Internal fault; overcurrent; over-temperature. | Unplug the charger from the wall outlet for 5 minutes, then plug it back in. If the red light persists, discontinue use and contact EVoCharge support. |
| Жай кубаттоо | Vehicle settings; electrical supply issue. | Check your vehicle's charging settings to ensure it's configured for maximum AC charging rate. Ensure the NEMA 6-50 outlet is providing full 240V power. |
If these steps do not resolve the issue, please contact EVoCharge Customer Support for further assistance.
8. Техникалык шарттар
| Өзгөчөлүк | Спецификация |
|---|---|
| Модель номери | EVC3AA0B2E1A1 |
| Ampөчүрүү | 32 Amps |
| Тtage | 240 вольт |
| Ватtage | 7.68 кВт |
| Кабелдин узундугу | 25 фут |
| Электр сайгыч түрү | NEMA 6-50 |
| Заряддоо туташтыргычы | J1772 (Universal for North American EVs) |
| Коопсуздук рейтинги | UL (Underwriters Laboratories), UL/cUL, File Номери: E469990 |
| Өлчөмдөрү (бирдик) | 11 x 7.5 x 3.2 дюйм |
| Элемент Салмагы | 16.52 фунт |
| Иштөө чөйрөсү | Ички/тышкы |
9. Кепилдик жана Кардарларды колдоо
EVoCharge stands behind the quality of its products. For warranty information, please refer to the warranty card included in your product packaging or visit the official EVoCharge website. If you require technical assistance, have questions about installation, or need to report a problem, please contact EVoCharge Customer Support:
- Webсайт: www.evocharge.com (for general inquiries and FAQs)
- Байланыш маалыматы: Refer to your product packaging or the EVoCharge webакыркы байланыш маалыматтары үчүн сайт (телефон, электрондук почта).
Please have your model number (EVC3AA0B2E1A1) and purchase date ready when contacting support.


