1. Киришүү
The Hubsan HT006 GPS Watch is an accessory designed to provide enhanced control and functionality for compatible Hubsan X4 series drones. This device enables hands-free operation for various intelligent flight modes, including Follow Me and Orbiting, utilizing its integrated GPS capabilities. This manual provides comprehensive instructions for the proper setup, operation, and maintenance of your HT006 GPS Watch.
2. Продукт бүтүп калдыview
2.1 Негизги өзгөчөлүктөрү
- Автоматтык учуу: Initiates drone take-off with a single command.
- Мени ээрчүү режими: Drone automatically tracks the GPS position of the watch.
- Orbiting Mode: Drone circles around the GPS position of the watch.
- GPS жайгашкан жери: Provides precise positioning for flight modes.
- Үйгө кайтуу (RTH): Commands the drone to return to its take-off point.
- Сүрөт/Видео тартуу: Triggers photo and video recording on the drone.
- Башкаруу аралык: Effective control range of approximately 50 meters.
2.2 Пакеттин мазмуну
- 1 x Hubsan HT006 GPS Watch
- 1 x USB заряддоо кабели

Сүрөт 1: Алдыңкы view of the Hubsan HT006 GPS Watch, showing control buttons and indicator lights.

2-сүрөт: Бурчтуу view of the Hubsan HT006 GPS Watch, highlighting its ergonomic design and wrist strap.
3. Орнотуу
3.1 Саатты кубаттоо
- Locate the Micro USB port on the side of the HT006 GPS Watch.
- Connect the provided USB charging cable to the watch and a suitable USB power source (e.g., computer USB port, USB wall adapter).
- The Charging Status LED will illuminate to indicate charging is in progress.
- A full charge takes approximately 40 minutes. The LED will change or turn off once charging is complete.

3-сүрөт: Каптал view of the Hubsan HT006 GPS Watch, showing the Micro USB charging port.
3.2 Күйгүзүү/өчүрүү
- Күйгүзүү үчүн: Press and hold the Power button (typically located on the side or front) until the indicator lights illuminate.
- Өчүрүү үчүн: Индикатор жарыктары өчкөнгө чейин Кубат баскычын басып, кармап туруңуз.
4. Иштөө нускамалары
Before operating, ensure both the HT006 GPS Watch and your Hubsan drone are fully charged and powered on. Always operate your drone in an open area, away from obstacles, people, and electromagnetic interference.

Figure 4: Labeled diagram of the Hubsan HT006 GPS Watch, detailing buttons for height adjustment, arm/disarm, auto take-off/return to home, power, and photo capture.

Figure 5: Labeled diagram of the Hubsan HT006 GPS Watch, detailing buttons for heading adjustment/Follow Me mode, directional controls (Forward, Right, Backward, Left), Orbit Mode, Video recording, and various status LEDs (HT006 GPS, HT006 Power, Video Recording, Aircraft Power, Aircraft GPS).
4.1 Pairing with Drone
To establish a connection between the HT006 GPS Watch and your drone:
- Power on your Hubsan drone and place it on a flat, open surface.
- Power on the HT006 GPS Watch.
- The watch will automatically attempt to connect to the nearest compatible Hubsan drone. Observe the Aircraft Power status LED and Aircraft GPS status LED on the watch for connection confirmation. Refer to your drone's specific manual for detailed pairing procedures if automatic connection does not occur.
4.2 Automatic Take-off
Once paired, press the dedicated Auto Take-off button (labeled with an upward arrow) to initiate an automatic take-off sequence. The drone will ascend to a preset altitude and hover.
4.3 Follow Me Mode
To activate Follow Me mode:
- Ensure the drone has a stable GPS lock.
- Press the Follow Me Mode button (often combined with Heading Adjustment dial). The drone will begin to follow the GPS position of the watch.
- To exit Follow Me mode, press the button again or take manual control.
4.4 Orbiting Mode
To activate Orbiting mode:
- Ensure the drone has a stable GPS lock.
- Press the Orbit Mode button. The drone will begin to circle around the current GPS position of the watch.
- To exit Orbiting mode, press the button again or take manual control.
4.5 Үйгө кайтуу (RTH)
To activate the Return to Home function:
- Ensure the drone has a stable GPS lock and has recorded its home point.
- Press the Return to Home button (often combined with Auto Take-off). The drone will ascend to a safe altitude, fly back to its recorded home point, and land automatically.
4.6 Фото жана видео тартуу
- Сүрөт: Press the Photo button to capture a still image.
- Видео: Press the Video button to start or stop video recording. The Video Recording Status LED will indicate recording status.
4.7 Manual Control (Directional)
Use the directional buttons (Forward, Right, Backward, Left) to make fine adjustments to the drone's position while in certain modes or to override automated movements.
5. Шайкештик
The Hubsan HT006 GPS Watch is compatible with the following Hubsan X4 series drone models:
- Hubsan H501S
- Hubsan H501A
- Hubsan H502S
- Hubsan H502E
- Hubsan H109S
- Hubsan H602S
- Hubsan H501C
- Hubsan H502S+
- Hubsan H502E+
- Hubsan H502T
- Hubsan H216E
- Hubsan H216S
- Hubsan H507D
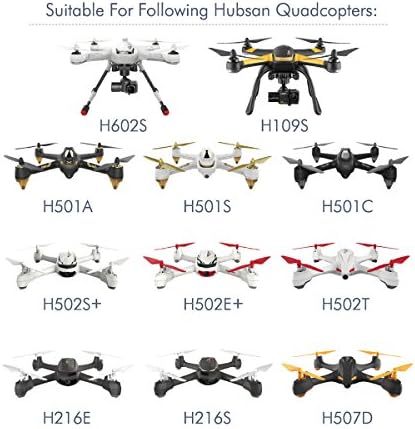
Figure 6: Visual representation of Hubsan drone models compatible with the HT006 GPS Watch.
6. Техникалык шарттар
| Өзгөчөлүк | Спецификация |
|---|---|
| Модель номери | HT006 |
| Өлчөмдөр | 59.22 x 45.87 x 22.83 мм |
| Элемент Салмагы | 2.39 унция |
| Control Distance | 50 метр |
| Батарея түрү | 3.7V 200mAh Li-Po |
| Заряддоо убактысы | Болжол менен 40 мүнөт |
| Иштөө убактысы | Болжол менен 120 мүнөт |
| Байланыш технологиясы | USB (for charging), Bluetooth |
| Supported Satellite System | GPS |
7. Техникалык тейлөө
7.1 Тазалоо
To clean the watch, use a soft, dry cloth. Avoid using harsh chemicals or abrasive materials, as these can damage the surface or internal components.
7.2 Сактоо
When not in use, store the HT006 GPS Watch in a cool, dry place, away from direct sunlight and extreme temperatures. For long-term storage, ensure the battery is partially charged (around 50%) to prolong its lifespan.
7.3 Батареяга кам көрүү
Батареянын ден соолугун сактоо үчүн:
- Батареяны бат-баттан толук кубаттап калуудан алыс болуңуз.
- Do not leave the watch connected to a charger for extended periods after it is fully charged.
- Avoid exposing the watch to very high or very low temperatures.
8. Кыйынчылыктарды
8.1 Саат күйбөйт
- Батареяны текшерүү: Ensure the watch battery is sufficiently charged. Connect it to a USB power source and allow it to charge for at least 15 minutes before attempting to power on again.
- Кубат баскычы: Confirm you are pressing and holding the Power button for the required duration.
8.2 Watch Not Connecting to Drone
- Drone Power: Ensure the drone is powered on and its battery is charged.
- Жакындык: Make sure the watch and drone are within close proximity (e.g., 1-2 meters) during the initial pairing process.
- Кайра жупташтыруу: Power off both the watch and the drone, then power them on again in the correct sequence (drone first, then watch) to re-attempt pairing.
- Шайкештик: Verify that your drone model is listed as compatible with the HT006 GPS Watch (refer to Section 5).
8.3 GPS сигналынын көйгөйлөрү
- Ачык аймак: Operate the drone and watch in an open outdoor area with a clear, unobstructed view асмандын.
- Интерференция: Avoid areas with tall buildings, dense foliage, or strong electromagnetic interference, which can degrade GPS signal quality.
- Wait for Lock: Allow sufficient time for both the drone and the watch to acquire a stable GPS lock before initiating GPS-dependent flight modes.
9. Кепилдик жана колдоо
For warranty information, technical support, or service inquiries, please refer to the official Hubsan website or contact Hubsan customer service directly. Keep your proof of purchase for warranty claims.


