1. Киришүү
Thank you for choosing the TechniSat VIOLA 2 Portable DAB/FM Radio. This compact and versatile radio allows you to enjoy high-quality digital DAB+ and traditional FM radio broadcasts wherever you are. This manual provides essential information for setting up, operating, and maintaining your device to ensure optimal performance and longevity.

Image 1.1: The TechniSat VIOLA 2 radio positioned on a wooden table in an outdoor setting, highlighting its portability.
2. Коопсуздук маалыматы
Please read these safety instructions carefully before using the device and keep them for future reference.
- Электр камсыздоо: Берилген кубат адаптерин гана колдонуңуз. Voltage сиздин аймактын талаптарына дал келет.
- Батареялар: Use 4 x AA-LR6 batteries. Do not mix old and new batteries, or different types of batteries. Remove batteries if the device will not be used for an extended period.
- Суу жана ным: Do not expose the device to rain, moisture, or dripping/splashing liquids. Do not place objects filled with liquids, such as vases, on the device.
- Жылуулук: Түзмөктү радиаторлор, жылыткычтар, плиталар же башка жылуулук булактарынан (анын ичинде ampкөтөргүчтөр) жылуулукту пайда кылуучу.
- Вентиляция: Адекваттуу вентиляцияны камсыз кылыңыз. Эч кандай желдетүүчү тешиктерди жаап албаңыз.
- Тазалоо: Тазалоодон мурун электр кубатынан сууруп коюңуз. Жумшак, кургак чүпүрөктү колдонуңуз. Суюк же аэрозоль тазалагычтарды колдонбоңуз.
- Тейлөө: Бул продуктту өзүңүз тейлөөгө аракет кылбаңыз. Бардык тейлөөнү квалификациялуу тейлөө кызматкерлерине тапшырыңыз.
3. Пакеттин мазмуну
Кутучаны кылдаттык менен ачып, бардык буюмдардын бар экенин жана жакшы абалда экенин текшериңиз:
- TechniSat VIOLA 2 Portable DAB/FM Radio
- Кубат адаптери (6V DC)
- Колдонуучунун Колдонмосу (бул документ)
Note: 4 x AA-LR6 batteries are required for portable use and are not included in the package.
4. Продукт бүтүп калдыview
Familiarize yourself with the various parts and controls of your VIOLA 2 radio.

Сүрөт 4.1: Алдыңкы view of the TechniSat VIOLA 2, displaying the speaker grille, LCD screen, and control buttons.
4.1 Алдыңкы панелдин башкаруу элементтери
- Баяндамачы: Аудио чыгаруу үчүн интеграцияланган динамик.
- LCD дисплей: Two-line display showing station information, time, and menu options.
- Күйгүзүү/өчүрүү баскычы: Аппаратты күйгүзөт же өчүрөт.
- Volume/Enter Knob: Rotate to adjust volume, press to confirm selections.
- Tune +/- Buttons: Used for manual tuning or navigating menus.
- DAB/FM Button: DAB+ жана FM радио режимдерин которушат.
- Маалымат/Меню баскычы: Displays additional information or accesses the menu settings.

Сүрөт 4.2: деталдуу view of the control buttons and rotary knob on the TechniSat VIOLA 2, illustrating its simple operation.
4.2 Арткы панелдин туташуулары

Image 4.3: The rear panel of the radio, showing the headphone output and the DC 6V power input.
- Наушник уячасы (3.5 мм): Жеке угуу үчүн.
- DC 6V киргизүү: Берилген кубат адаптерин бул жерге туташтырыңыз.
- Батарея бөлүмү: Located on the rear, for 4 x AA batteries.
- Телескопиялык антенна: Оптималдуу радио кабыл алуу үчүн кеңейтүү.
5. Орнотуу
5.1 Аппаратты кубаттоо
The VIOLA 2 can be powered by the included mains adapter or by batteries for portable use.
5.1.1 Электр кубаты
- Insert the small plug of the power adapter into the DC 6V input on the rear of the radio.
- Кубат адаптерин стандарттуу розеткага сайыңыз.
5.1.2 Батареянын кубаттуулугу
- Радионун арткы жагындагы батарея бөлүмүнүн капкагын ачыңыз.
- Insert 4 x AA-LR6 batteries, ensuring correct polarity (+/-).
- Батарея уясынын капкагын бекем жабыңыз.
5.2 Антеннаны тууралоо
For optimal reception, fully extend the telescopic antenna. Adjust its position and angle to achieve the best signal quality, especially in FM mode or areas with weaker DAB+ signals.
6. Иштөө нускамалары
6.1 Күйгүзүү/өчүрүү
басыңыз On/Off радиону күйгүзүү же өчүрүү үчүн баскыч.
6.2 Mode Selection (DAB/FM)
басыңыз DAB / FM button to switch between DAB+ digital radio mode and FM analog radio mode.
6.3 Станцияларды издөө
6.3.1 DAB+ Auto Scan
When you first turn on the radio in DAB+ mode, it will automatically perform a full scan for available stations. If you move to a new location or wish to refresh the station list:
- Ensure the radio is in DAB+ mode.
- басып, кармап туруңуз Маалымат/Меню менюга кирүү үчүн баскычты басыңыз.
- айлантыңыз Volume/Enter knob to select "Full Scan" and press the knob to confirm.
- The radio will scan and update the station list.
6.3.2 FM Auto Scan
FM режиминде:
- Радио FM режиминде экенин текшериңиз.
- басып, кармап туруңуз Түзүү +/- buttons. The radio will scan for the next available station.
6.4 Үндү башкаруу
айлантыңыз Volume/Enter knob to adjust the listening volume.
6.5 Гарнитураны колдонуу
Connect standard 3.5mm headphones to the headphone jack on the rear of the radio for private listening. The internal speaker will automatically mute when headphones are connected.
6.6 Маалыматты көрсөтүү

Image 6.1: A close-up of the radio's two-line LCD display, showing current station and program information.
The two-line LCD display provides various information depending on the mode:
- DAB+ Mode: Station name, program type, scrolling text (DLS), signal strength, time, date.
- FM режими: Frequency, station name (if RDS available), program type (if RDS available), time, date.
басыңыз Маалымат/Меню button repeatedly to cycle through available display information.
7. Техникалык тейлөө
7.1 Тазалоо
Wipe the radio with a soft, dry, lint-free cloth. Do not use abrasive cleaners, waxes, or solvents as they may damage the finish.
7.2 Батареяны алмаштыруу
When the battery indicator on the display shows low power, replace all four AA batteries with new ones. Ensure the radio is turned off or connected to mains power before replacing batteries.
8. Кыйынчылыктарды
| Көйгөй | Мүмкүн себеп | Чечим |
|---|---|---|
| Күч жок | Power adapter not connected; Batteries depleted or incorrectly inserted. | Кубат адаптеринин туташуусун текшериңиз; Батареяларды алмаштырыңыз же полярдуулуктун тууралыгын текшериңиз. |
| Үн жок | Volume too low; Headphones connected; Mute activated. | Increase volume; Disconnect headphones; Check for mute function (if applicable). |
| Poor reception (DAB+/FM) | Antenna not extended or poorly positioned; Weak signal area. | Fully extend and adjust the telescopic antenna; Try moving the radio to a different location. Perform a full scan in DAB+ mode. |
| DAB+ stations missing | Not all stations scanned; Moved to a new area. | Perform a full scan (see Section 6.3.1). |
| Дисплей иштебейт | Device off; Faulty unit. | Түзмөк күйүп турганын текшериңиз; Эгер көйгөй чечилбесе, кардарларды колдоо бөлүмүнө кайрылыңыз. |
9. Техникалык шарттар
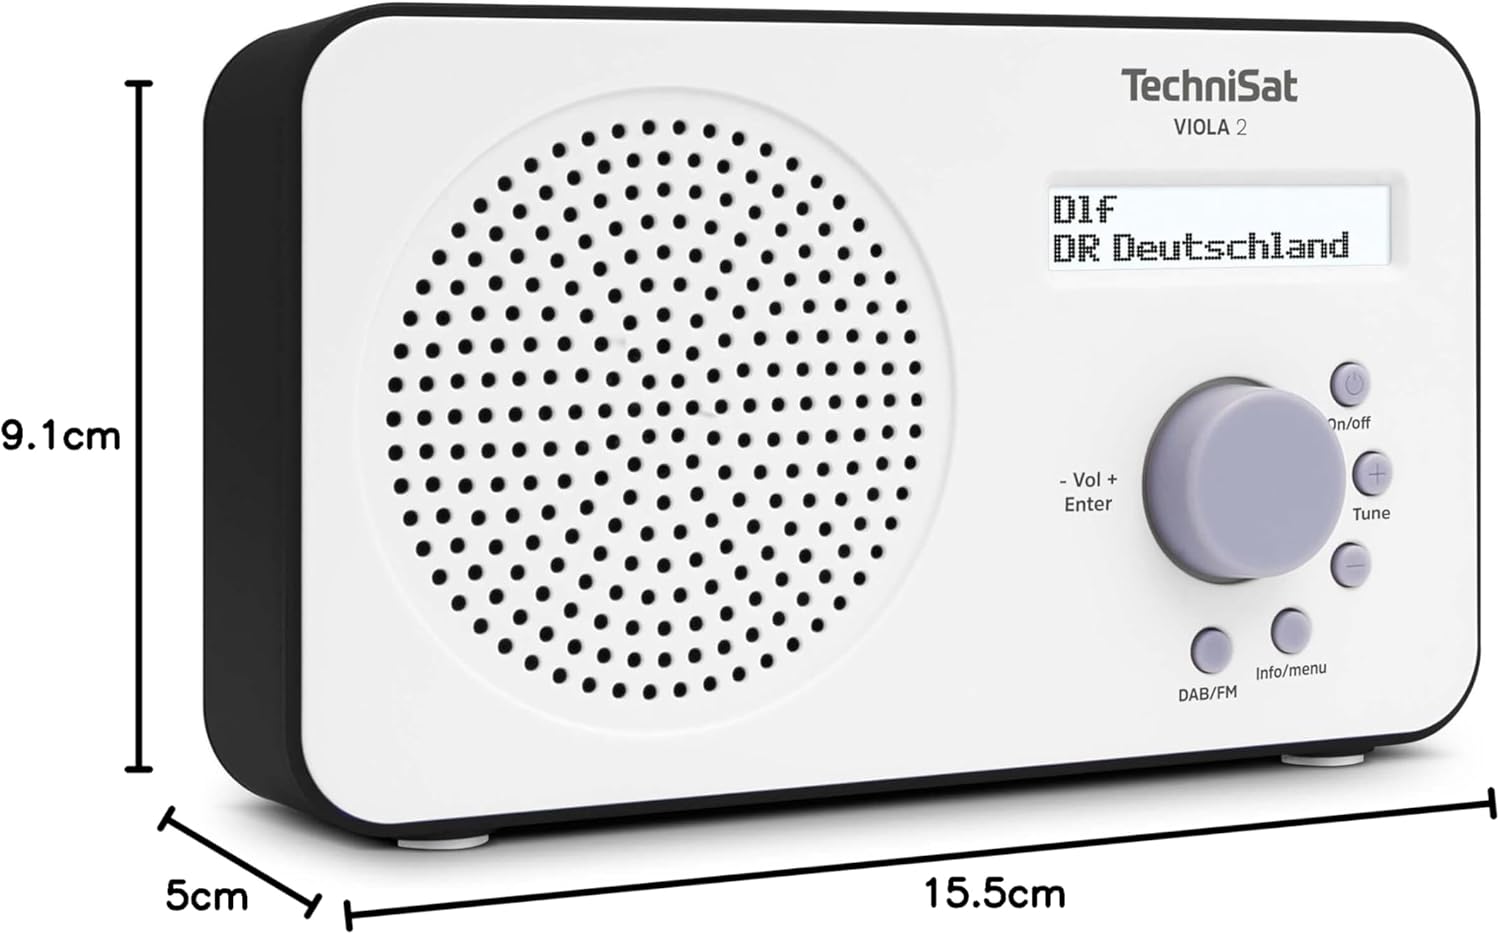
Image 9.1: The TechniSat VIOLA 2 radio with its physical dimensions indicated.
- Модел: VIOLA 2
- Өндүрүүчү: TechniSat
- Модель номери: 0000/3906
- Продукциянын өлчөмдөрү (W x D x Y): 15.5 x 5 x 9.1 см
- Салмагы: 338 г
- Колдоого алынган радио тилкелери: DAB+, FM (RDS жана PLL менен)
- Тюнер технологиясы: DAB / FM
- Динамиктин чыгышы: 1 Ватт RMS
- Дисплей: Two-line LCD with backlight
- Байланыш: 3.5mm Headphone Jack (AUX)
- Кубат булагы: Corded Electric (6V DC adapter) and Battery Powered
- Батареялар: 4 x AA-LR6 (not included)
- Өзгөчөлүктөр: Automatic station search, electronic volume control
- Келип чыккан өлкө: Кытай
10. Кепилдик жана колдоо
TechniSat products are designed for reliability and performance. For warranty information, please refer to the warranty card included with your purchase or visit the official TechniSat website. If you encounter any issues not covered in this manual, please contact TechniSat customer support for assistance.
You can find contact details and further support resources on the official TechniSat webсайт: www.technisat.com


