1. Киришүү
This manual provides detailed instructions for the proper setup, operation, and maintenance of your NEEWER TP-AAM521 Portable Desktop Mini Tripod. Please read this manual thoroughly before using the product to ensure optimal performance and longevity.
2. Продукт бүтүп калдыview
The NEEWER TP-AAM521 is a compact and durable aluminum alloy tripod designed for DSLR cameras, video camcorders, and other compatible devices. It features a 360-degree swivel ball head and adjustable legs for versatile shooting angles.

Figure 2.1: NEEWER TP-AAM521 Mini Tripod with a DSLR camera mounted, showcasing its compact size and portability when folded.
3. Компоненттер
Familiarize yourself with the main components of your tripod:

3.1-сүрөт: Детальдуу view of the tripod's components, including the QR Plate, QR Plate Lock Knob, Aluminum Ball Head, Ball Head Lock Knob, Angle Adjustment Knob, 3/8 Screw, 1/4 Thread, Center Column Lock Knob, and Height Adjustable Foot.
- Quick Release (QR) Plate: For attaching your camera.
- QR Plate Lock Knob: Secures the QR plate to the ball head.
- Aluminum Ball Head: Allows for 360-degree rotation and tilting.
- Ball Head Lock Knob: Secures the ball head in position.
- Бурчту жөндөө баскычы: Adjusts the leg angles.
- Center Column Lock Knob: Locks the telescopic center column.
- Height Adjustable Foot: Extends the leg sections.
- 1/4 inch Mounting Screw: Standard screw for camera attachment.
- 3/8 inch Bottom Thread: For mounting accessories or other tripod heads.
4. Орнотуу нускамалары
4.1 Штативди жайып салуу
To unfold the tripod, grasp the legs and extend them outwards until they click into one of the three available angle positions. The legs can be adjusted independently.

Figure 4.1: Illustration of the three adjustable leg angles: Low Angle (81°), Middle Angle (50°), and Normal Angle (21°).
4.2 Adjusting Leg Height
Each leg features 5 sections for height adjustment. To extend a leg section:
- Twist the Height Adjustable Foot counter-clockwise to unlock the section.
- Pull the leg section outwards to the desired length.
- Twist the Height Adjustable Foot clockwise to lock the section securely.
The tripod's height can be adjusted from 6.7 inches (17 cm) to 19.7 inches (50 cm).
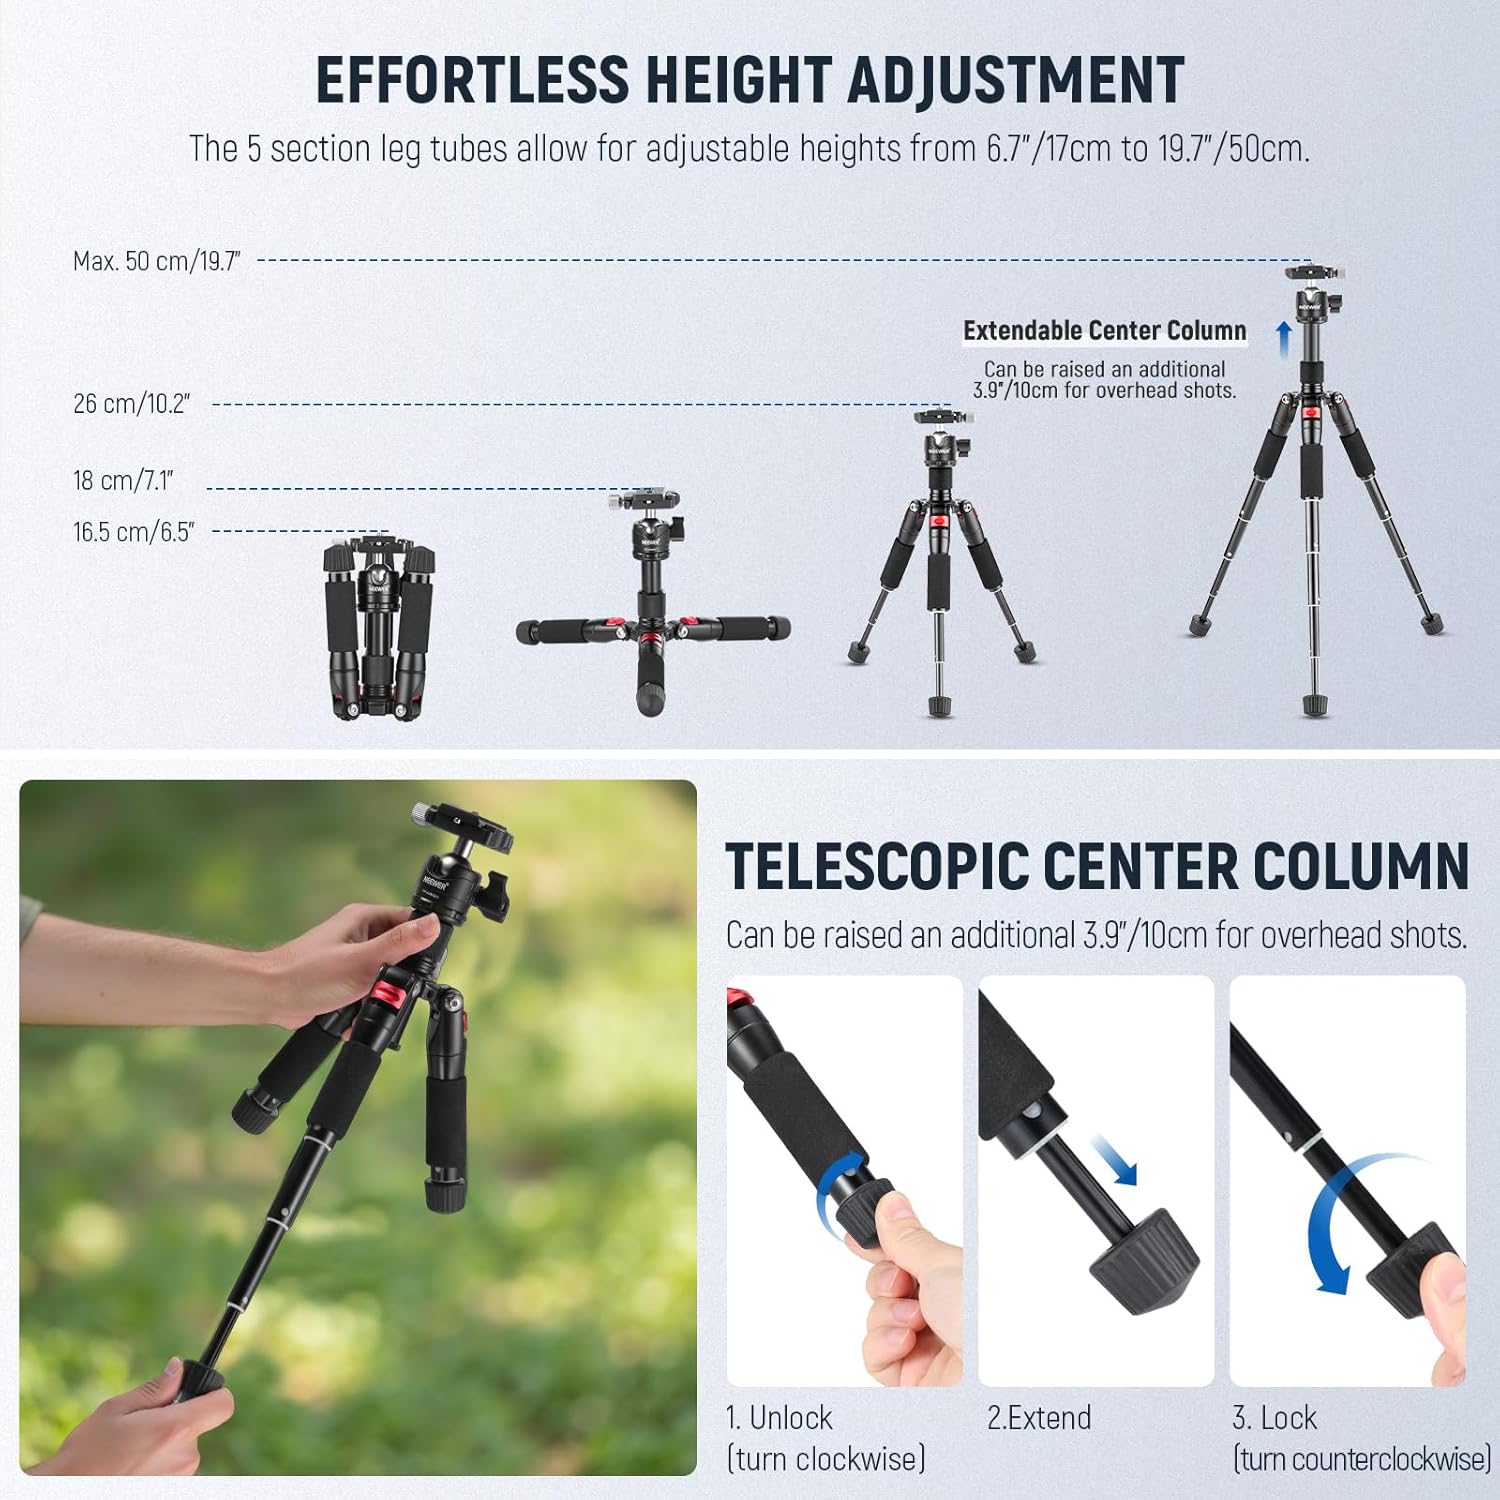
Figure 4.2: Visual guide for extending and locking the 5-section leg tubes, demonstrating height adjustments from 6.7 inches to 19.7 inches.
4.3 Extending the Center Column
The telescopic center column can be raised an additional 3.9 inches (10 cm) for overhead shots or increased height. To extend:
- Loosen the Center Column Lock Knob.
- Pull the center column upwards to the desired height.
- Tighten the Center Column Lock Knob to secure it.
4.4 Камераны орнотуу
- Ensure the QR Plate is securely attached to your camera's 1/4 inch tripod socket.
- Loosen the QR Plate Lock Knob on the tripod's ball head.
- Slide the QR Plate with your camera into the receiver on the ball head.
- Tighten the QR Plate Lock Knob to firmly secure your camera.
5. Иштөө нускамалары
5.1 Adjusting Ball Head Angle
The 360-degree swivel ball head allows for flexible positioning of your camera:
- Loosen the Ball Head Lock Knob.
- Adjust your camera to the desired angle (pan, tilt, or rotate).
- Tighten the Ball Head Lock Knob to secure the camera in place.
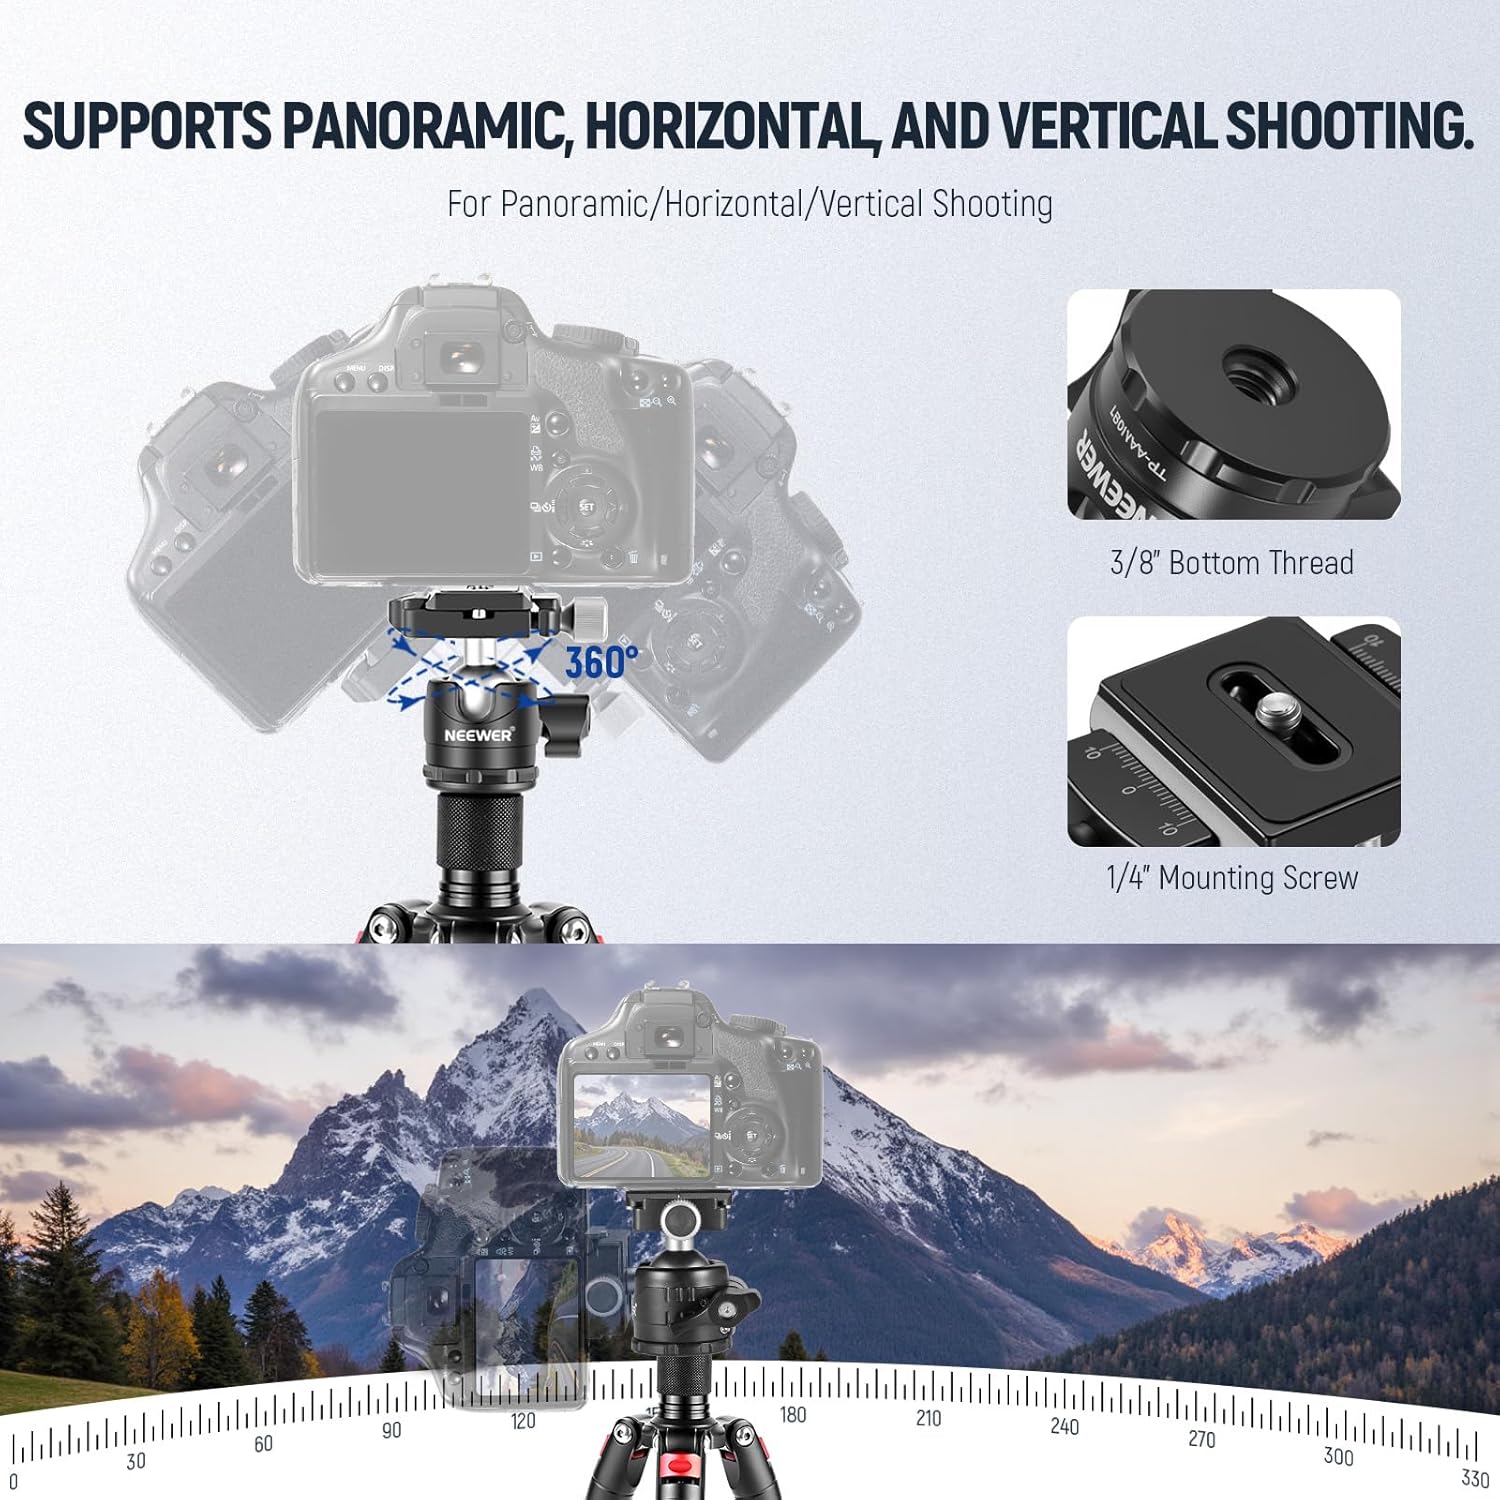
Figure 5.1: Demonstrates the 360-degree panoramic capabilities and the ability to switch between horizontal and vertical shooting orientations.
5.2 Low Angle Shooting (Inverted Center Column)
Өтө төмөн бурчтуу сүрөттөр үчүн, борбордук тилкени тескери бурууга болот:
- Борбордук мамычанын астындагы илгичти бурап чыгарып, борбордук мамычаны алып салыңыз.
- Re-insert the center column upside down and tighten the Center Column Lock Knob.
- Install your camera onto the inverted center column and re-attach the hook if desired.

Figure 5.2: Step-by-step guide for inverting the center column to achieve low-angle photography.
6. Техникалык тейлөө
To ensure the longevity and optimal performance of your tripod, follow these maintenance guidelines:
- Тазалоо: Wipe down the tripod with a soft, dry cloth after each use to remove dust, dirt, or moisture. For stubborn grime, use a slightly damp кездеме жана жумшак самын, андан кийин кылдат кургатуу.
- Майлоо: Periodically check the moving parts, such as the ball head and leg locks, for smooth operation. If necessary, apply a small amount of silicone-based lubricant. Avoid oil-based lubricants as they can attract dust.
- Сактагыч: Store the tripod in a dry, cool place away from direct sunlight and extreme temperatures. Use the provided carrying bag to protect it from scratches and impacts.
- Текшерүү: Regularly inspect all screws, knobs, and joints for tightness. Tighten any loose components to prevent accidental damage to your equipment.
7. Кыйынчылыктарды
If you encounter any issues with your tripod, consider the following common solutions:
- Camera Wobbles: Ensure the QR Plate is fully seated and the QR Plate Lock Knob is tightened. Check that the Ball Head Lock Knob is also secure.
- Legs Not Locking: Verify that the Height Adjustable Foot is twisted clockwise until snug. Ensure no debris is obstructing the leg sections.
- Ball Head Stiff: Loosen the Ball Head Lock Knob completely and gently move the ball head to free it. If still stiff, a small amount of lubricant may be needed (refer to Maintenance section).
- Штативдин туруксуздугу: Ensure all three legs are fully extended and locked, and the Angle Adjustment Knobs are set to a stable position. Avoid exceeding the maximum load capacity.
If problems persist, please contact NEEWER customer support.
8. Техникалык шарттар
| Өзгөчөлүк | Деталь |
|---|---|
| Материал | Алюминий эритмеси |
| Түс | Кара+Кызыл |
| Жүктөө жөндөмдүүлүгү | 11 фунт / 5 кг |
| Максималдуу бийиктик | 19.7 дюйм / 50 см |
| Стандарттык бурама | 1/4 дюйм |
| Таза Салмак | 24.7 унция / 700 г |
| Продукциянын өлчөмдөрү | 6.89 x 3.94 x 3.94 дюйм (бүктөлгөн) |
| Tripod баш түрү | Ball Head (360-degree swivel) |
9. Кепилдик жана колдоо
NEEWER products are designed for quality and reliability. For warranty information, product support, or service inquiries, please refer to the official NEEWER webсайтка же түздөн-түз кардарларды тейлөөгө кайрылыңыз. Кепилдик дооматтар үчүн сатып алуу дүмүрчөгүңүздү сактаңыз.


