Продукт бүттүview
The Lux Pro Model P111 is a non-programmable thermostat designed for straightforward and reliable temperature control in your home. It offers essential features for managing your heating and cooling systems with ease.

Figure 1: Lux Pro P111 Non-Programmable Thermostat. This image displays the front view of the thermostat, showing its LCD screen, fan and system mode switches, and temperature adjustment buttons.
- Оңой орнотуу: Designed for simple setup with clear instructions.
- Non-Programmable Operation: Provides direct temperature control without complex scheduling.
- Кош кубаттуулук: Operates on 2 AA alkaline batteries (included) or 24-volt system power.
- Арткы жарык дисплей: Оңой өзгөчөлүктөрү-view backlight for clear temperature readings.
- Жабдууларды коргоо: Includes a selectable 5- or 2-minute time delay to safeguard your HVAC equipment.
- Adjustable Limits: Allows setting of heating and cooling temperature limits.
- Температураны көрсөтүү параметрлери: Switch between Fahrenheit (℉) or Celsius (℃) display.

Figure 2: Key Features of Lux Pro P111 Thermostat. This graphic highlights features such as Keyboard Lockout, Adjustable Heating and Cooling Limits, Back-Lit Display, Dual Power, and a 5-Year Limited Warranty.
Системанын шайкештиги
The Lux Pro P111 thermostat is designed for compatibility with various HVAC systems. Please review the following compatibility chart to ensure it meets your system requirements.

Figure 3: System Compatibility Chart. This chart details which heating and cooling systems are compatible (e.g., Gas/Oil/Electric Furnace, Heat Pump without Auxiliary Heat, 2-wire Hydronic, 750 Millivolt, Gas Fireplaces, Single Stage Cooling) and which are not (e.g., Heat Pump Multistage, Radiant Ceiling Heat, Electric Baseboards, 3-wire Hydronic, Multistage systems, Portable space heaters, Plug-in air conditioners).
Орнотуу жана орнотуу
Proper installation is crucial for the optimal performance of your thermostat. If you are unsure about any steps, it is recommended to consult a qualified HVAC technician.
1. Power талаптар
The P111 thermostat can be powered by two (2) AA alkaline batteries or by a 24-volt system. Batteries are included for convenience and reliable operation.
2. Электр схемасы
Refer to the following diagrams for common wiring configurations. Ensure power to your HVAC system is turned off at the circuit breaker before beginning any wiring.
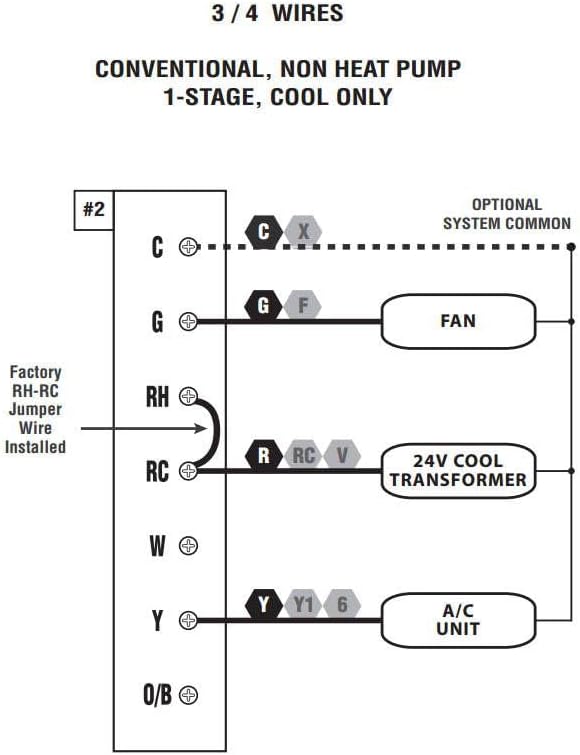
Figure 4: Wiring Diagram for 3/4 Wires. This diagram illustrates the wiring for a conventional, non-heat pump, 1-stage, cool-only system, showing connections for C (optional system common), G (FAN), RH (24V COOL TRANSFORMER), RC (24V COOL TRANSFORMER), and Y (A/C UNIT). A factory RH-RC jumper wire is installed.

Figure 5: Wiring Diagram for 4/5 Wires. This diagram shows the wiring for a conventional, non-heat pump, 1-stagэ жылуулук жана 1-сtage cool system, with connections for C (optional system common), G (FAN), RH (24V TRANSFORMER), RC (24V TRANSFORMER), W (HEATER), and Y (A/C UNIT). A factory RH-RC jumper wire is installed.

Figure 6: Wiring Diagram for 5/6 Wires. This diagram illustrates the wiring for a conventional, non-heat pump, 1-heat / 1-cool system with two transformers, showing connections for C (optional system common), G (FAN), RH (24V HEAT TRANSFORMER), RC (24V COOL TRANSFORMER), W (HEATER), and Y (A/C UNIT). The factory RH-RC jumper wire must be removed for this configuration.
3. Монтаждоо
The thermostat is designed for wall mounting. Use the provided screws and wall anchors for secure installation. Ensure the thermostat is level for accurate temperature readings.
Иштөө нускамалары
The Lux Pro P111 thermostat features an intuitive control panel for easy operation.

Figure 7: Control Panel Diagram. This diagram labels the key components of the thermostat's front panel: Fan Mode Switch (Fan Auto/On), System Mode Switch (Heat/Off/Cool), LCD Display Screen, SET Button, and UP and DOWN Buttons.
1. System Mode Switch
- ЖЫЛУУ: Жылытуу системасын иштетет.
- ӨЧҮК: Жылытуу жана муздатуу системаларын өчүрөт.
- БАРАКЕЛДЕ: Муздатуу системасын иштетет.
2. Fan Mode Switch
- АВТО: Вентилятор жылытуу же муздатуу системасы активдүү иштеп жатканда гана иштейт.
- КҮЙҮК: Жылытуу же муздатуу системасы активдүү экендигине карабастан, желдеткич тынымсыз иштейт.
3. Температураны тууралоо
колдонуу UP (▲) жана ылдый (▼) buttons to set your desired temperature. The current temperature will be displayed prominently on the LCD screen.
4. Арткы жарыкты активдештирүү
Press any button to activate the backlight for improved visibility in low-light conditions. The backlight will automatically turn off after a short period of inactivity.
5. Температураны көрсөтүү (Фаренгейт/Цельсий)
The thermostat allows you to switch between Fahrenheit (℉) and Celsius (℃) temperature displays. Refer to the full instruction manual for specific steps on how to change this setting, typically found in the advanced settings menu.
6. Equipment Protection Time Delay
The thermostat features a selectable 5- or 2-minute time delay for equipment protection. This delay prevents short cycling of your heating and cooling system, which can extend the lifespan of your equipment. This setting is usually configured during initial setup or in advanced settings.
7. Баскычтоптун кулпусу
To prevent unauthorized adjustments, the thermostat includes a keypad lockout feature. Consult the detailed manual for instructions on how to activate and deactivate this function.
Техникалык тейлөө
1. Батареяны алмаштыруу
When the battery indicator appears on the display, replace the two (2) AA alkaline batteries. Ensure proper polarity when inserting new batteries. The thermostat retains settings during battery replacement.
2. Тазалоо
Термостаттын сыртын жумшак, damp кездеме. Абразивдүү тазалагычтарды же эриткичтерди колдонбоңуз, анткени алар финишке же ички компоненттерге зыян келтириши мүмкүн.
Проблемаларды чечүү
If you encounter issues with your Lux Pro P111 thermostat, consider the following common solutions:
- No Display or Low Battery Indicator: Батареяларды жаңы AA щелочтуу батареялары менен алмаштырыңыз.
- System Not Responding (Heating/Cooling):
- Check that the system mode switch is set to HEAT or COOL.
- Ensure the fan mode switch is set to AUTO or ON.
- Verify that the circuit breaker for your HVAC system is not tripped.
- Confirm that the wiring connections are secure and correct according to the installation diagrams.
- Allow for the equipment protection time delay (5 or 2 minutes) to elapse before the system activates.
- Температураны туура эмес окуу: Термостаттын түз күн нуруна, шамалга же сенсорго таасир этиши мүмкүн болгон жылуулук булактарына дуушар болбогонун текшериңиз.
- Баскычтоп жооп бербейт: Check if the keypad lockout feature is active. Refer to the manual for deactivation steps.
For persistent issues, refer to the complete user manual or contact customer support.
Техникалык шарттар
| Өзгөчөлүк | Деталь |
|---|---|
| Бренд | LUX |
| Модель аты | P111 |
| Продукциянын өлчөмдөрү | 4"D x 7"W x 7"H |
| Controller Type | Push Button |
| Өзгөчөлүктөр | Lighted Display, Temperature Display |
| Түс | P111-white |
| Өзгөчө колдонуулар | Кондиционер, жылуулук насосу |
| Температураны көзөмөлдөө түрү | Manual |
| Камтылган компоненттер | Pro P111 Non-Programmable Thermostat; 1 Heat, 1 Cool |
| Power Source | Battery Powered (2 AA batteries required), 24V System Powered |
| Элемент Салмагы | 1.6 унция |
| Тtage | 24 вольт |
| Материал | Пластик |
| Монтаж түрү | Дубалга орнотуу |
| Стиль | Программаланбайт |
| Арткы жарык | Ооба |
| UPC | 021079141111 |
Кепилдик жана колдоо
Кепилдик маалымат
The Lux Pro P111 thermostat comes with a 5 жылдык чектелген кепилдик. Бул кепилдик нормалдуу колдонуудагы материалдардагы жана жасалгадагы кемчиликтерди камтыйт. Кепилдик дооматтары үчүн сатып алганыңыздын далилин сактап коюңуз.
Кардарларды колдоо
For technical assistance, troubleshooting not covered in this manual, or warranty inquiries, please contact Lux customer support. Refer to the product packaging or the official Lux webакыркы байланыш маалыматы үчүн сайт.
You can visit the official LUX Store for more information: Amazonдагы LUX дүкөнү


