1. Киришүү
Сатып алганыңыз үчүн рахматasing the Protmex PT3374 Wireless Weather Station. This multifunctional device provides accurate indoor and outdoor temperature and humidity readings, barometric pressure, and a weather forecast. It also functions as an alarm clock with a colorful display, enhancing your daily life with essential environmental data. Please read this manual carefully before use to ensure proper operation and to fully utilize all features.
2. Продукт бүтүп калдыview
The Protmex PT3374 consists of a main display unit and a wireless outdoor sensor. Familiarize yourself with the components and their functions.
2.1 Негизги түзүлүштүн өзгөчөлүктөрү
- Colorful LCD Display: Shows time, date, indoor/outdoor temperature and humidity, weather forecast, barometric pressure, and moon phase.
- Alarm Clock with Snooze: Set daily alarms with a convenient snooze function.
- Barometer: Displays atmospheric pressure and pressure tendency.
- Weather Forecast: Predicts weather conditions based on barometric pressure changes.
- Comfort Level Indicator: Provides a visual representation of indoor comfort.
- Temperature & Humidity Trend: Shows rising, falling, or steady trends for both indoor and outdoor conditions.
- Ice Alert: Notifies when outdoor temperature approaches freezing.
2.2 Зымсыз тышкы сенсор
The compact outdoor sensor wirelessly transmits temperature and humidity data to the main unit.
2.3 Компонентти идентификациялоо

Figure 2.1: Main Unit and Wireless Sensor with Labeled Parts
This image shows the front and back of the main weather station unit and the wireless outdoor sensor, with key components labeled for easy identification. Labels include display areas for weather forecasting, barometric pressure, outdoor and indoor temperature/humidity, time/calendar, and moon phase on the front. The back of the main unit shows buttons (DOWN, UP, ALARM, SET, MEMORY, HPA/INHG, ALERT, SNOOZE/LIGHT), a hook hole, battery compartment, support frame, and power supply socket.

Figure 2.2: Protmex PT3374 Weather Station Overview
А ачык view of the Protmex PT3374 main display unit and its accompanying wireless outdoor sensor. The main unit features a large, colorful display showing various weather parameters and time, while the compact outdoor sensor is designed for remote placement.
3. Орнотуу
3.1 Пакеттен чыгаруу
Carefully remove all components from the packaging. Ensure you have the main unit, wireless outdoor sensor, and power adapter.
3.2 Батареяны орнотуу
The main unit can be powered by the included AC adapter or by batteries (for backup). The outdoor sensor requires batteries.
- Негизги блок: Open the battery compartment on the back. Insert 3 x AAA batteries (not included) according to the polarity markings. For continuous backlight, connect the AC power adapter to the power supply socket on the back of the main unit and plug it into a wall outlet.
- Тышкы сенсор: Open the battery compartment. Insert 2 x AA batteries (not included) according to the polarity markings.
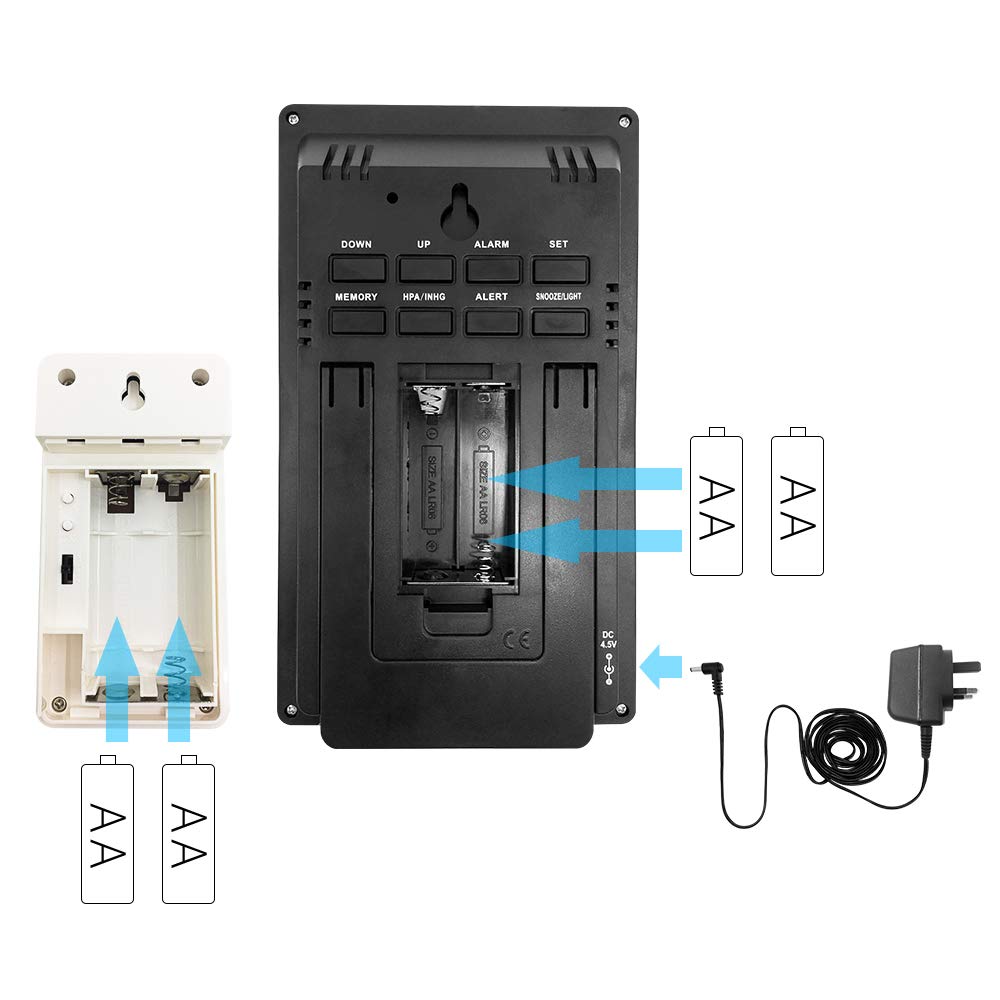
Сүрөт 3.1: Батареяны орнотуу
This diagram illustrates the correct insertion of AAA batteries into the main unit and AA batteries into the wireless outdoor sensor, showing the battery compartments and polarity indicators.
3.3 Сенсорду жупташтыруу
After installing batteries in both units, the main unit will automatically search for the outdoor sensor. Ensure both units are within range. If pairing fails, press and hold the "CHANNEL" button on the main unit to initiate a manual search.
3.4 Баштапкы орнотуулар
Upon first power-up or after a reset, you may need to set the time, date, and measurement units.
- Press the "SET" button to enter time setting mode.
- Use the "UP" or "DOWN" buttons to adjust values.
- Press "SET" again to confirm and move to the next setting (e.g., 12/24 hour format, hour, minute, year, month, day, temperature unit (°C/°F), pressure unit (hPa/inHg)).
- Press "SET" repeatedly until all settings are confirmed or the unit exits setting mode automatically.
4. Иштөө нускамалары
4.1 Time and Alarm Functions
- Ойготкуч орнотуу: Press the "ALARM" button to view alarm time. Press and hold "ALARM" to enter alarm setting mode. Use "UP" or "DOWN" to adjust, and "ALARM" to confirm.
- Ойготкучту иштетүү/өчүрүү: Press "ALARM" repeatedly to toggle the alarm on/off.
- Чырым Function: When the alarm sounds, press the "SNOOZE/LIGHT" button to activate snooze. The alarm will sound again after approximately 5 minutes.
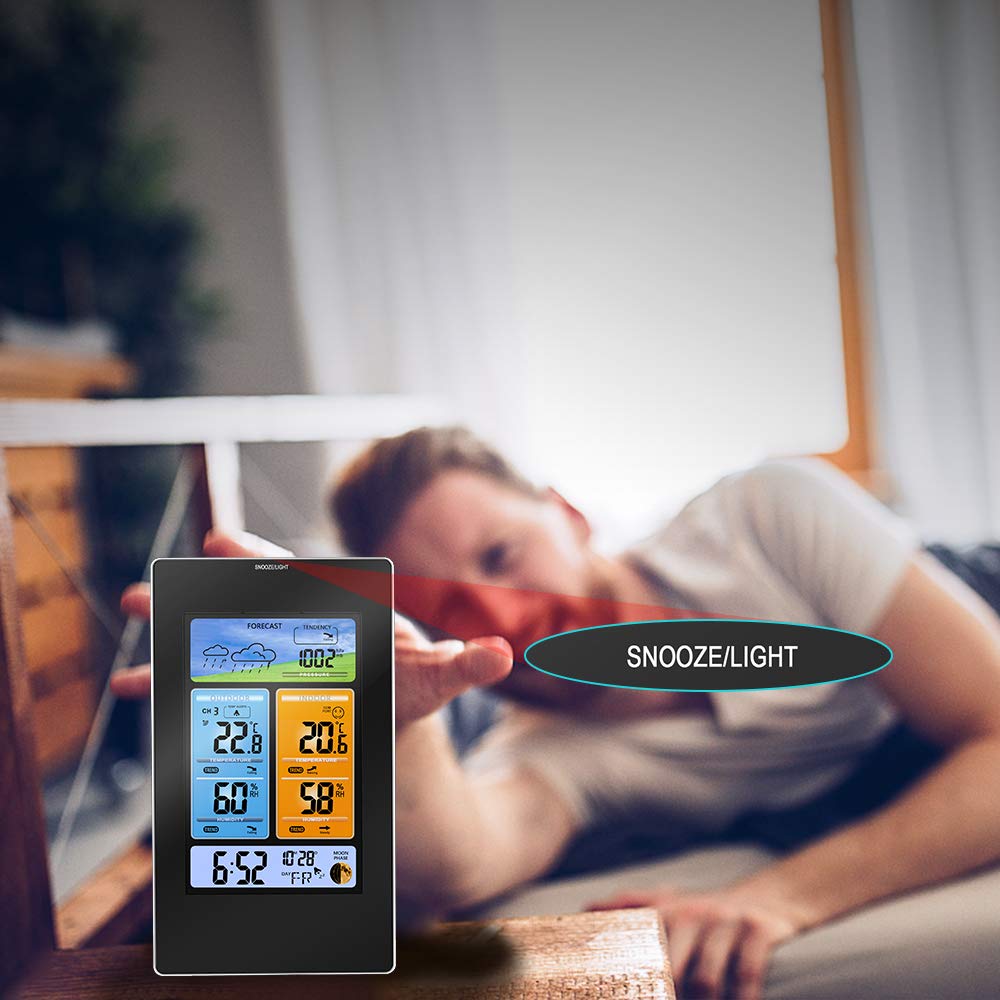
Figure 4.1: Snooze/Light Button Usage
This image demonstrates the use of the "SNOOZE/LIGHT" touch field, typically located at the top of the main unit, for activating the snooze function or temporarily illuminating the display backlight.
4.2 Weather Display and Forecast
The weather station provides a forecast for the next 12-24 hours based on barometric pressure changes.
- Прогноздун белгилери: The display shows icons for Sunny, Partly Cloudy, Cloudy, Rainy, and Snowy.
- Барометрдик басым: Displays current atmospheric pressure. Press "HPA/INHG" to switch between hPa and inHg units.
- Pressure Tendency: An arrow indicates if the pressure is rising, falling, or steady.

Figure 4.2: Weather Forecast Icons
This image illustrates the various weather forecast icons displayed on the main unit, including sunny, partly cloudy, cloudy, rainy, and snowy conditions, providing a visual prediction of upcoming weather.
4.3 Температура жана нымдуулук
- Indoor/Outdoor Readings: The display shows current indoor and outdoor temperature and humidity.
- Тренд көрсөткүчтөрү: Arrows next to temperature and humidity readings indicate if values are rising, falling, or stable.
- Муз эскертүүсү: An ice crystal icon appears when the outdoor temperature drops to a level indicating potential ice formation (typically below 3°C or 37.4°F).

Figure 4.3: Trend Indicators
This image highlights the trend indicators for temperature and humidity on the main display, showing arrows that signify whether the readings are rising, falling, or remaining steady.

Figure 4.4: Ice Alert Feature
An illustration of the ice alert icon appearing on the display when the outdoor temperature reaches a critical level, warning of potential freezing conditions.
4.4 Ыңгайлуулук деңгээлинин көрсөткүчү
The comfort level indicator provides a quick visual reference for indoor environmental comfort based on temperature and humidity.

Figure 4.5: Comfort Level Indicator
This image shows the comfort level indicator, represented by various facial expressions, which changes based on the indoor temperature and humidity to indicate whether the environment is comfortable, too dry, or too humid.
4.5 Сырткы сенсорду жайгаштыруу
For accurate outdoor readings, place the wireless sensor in a sheltered location away from direct sunlight and precipitation. Ensure it is within the main unit's transmission range (typically up to 60 meters/200 feet in open air).

Figure 4.6: Optimal Outdoor Sensor Placement
This image illustrates the recommended placement of the main unit indoors and the wireless outdoor sensor in a sheltered outdoor location, ensuring optimal signal transmission and accurate readings.
5. Техникалык тейлөө
- Тазалоо: Негизги блокту жана сенсорду жумшак менен сүртүңүз, damp кездеме. Абразивдүү тазалагычтарды же эриткичтерди колдонбоңуз.
- Батареяны алмаштыруу: Дисплейде батареянын заряды аз калганын көрсөткөн индикатор пайда болгондо, эки блоктун тең батареяларын алмаштырыңыз. Бардык батареяларды ар дайым бир убакта алмаштырыңыз.
- Сактагыч: Эгерде түзмөктү узак убакытка сактап койсоңуз, агып кетпеши үчүн бардык батарейкаларды алып салыңыз.
- Экологиялык шарттар: Avoid exposing the units to extreme temperatures, direct sunlight, or excessive moisture.
6. Кыйынчылыктарды
| Көйгөй | Мүмкүн себеп | Чечим |
|---|---|---|
| Сырткы температура/нымдуулук көрсөткүчү жок. | Сенсор диапазондон тышкары, сенсордун батареялары аз, тоскоолдук. | Move sensor closer to main unit. Replace sensor batteries. Relocate units away from electronic devices. Press and hold "CHANNEL" button on main unit to re-pair. |
| Туура эмес убакыт/дата. | Time not set correctly, power interruption. | Manually set time and date (refer to Section 3.4). Ensure AC adapter is connected for continuous power. |
| Дисплей күңүрт же бош. | Low main unit batteries, AC adapter not connected. | Replace main unit batteries. Connect AC adapter for continuous backlight. |
| Inaccurate weather forecast. | Weather forecast is a prediction, not always 100% accurate. | The forecast is based on barometric pressure trends and may not always match official forecasts. It provides a general indication. |
7. Техникалык шарттар
| Өзгөчөлүк | Деталь |
|---|---|
| Модель номери | PT3374 (Part No: PPT-WS010) |
| Элемент Салмагы | 540 г |
| Пакеттин өлчөмдөрү | 25 x 22.5 x 6 см |
| Power Type (Main Unit) | Battery (3 x AAA, not included), Power Cord (AC Adapter) |
| Power Type (Outdoor Sensor) | Battery (2 x AA, not included) |
| Макс Температура рейтинги | 60°C |
| Бренд | Protmex |
8. Кепилдик жана колдоо
Protmex products are designed for reliability and performance. For specific warranty details, please refer to the warranty card included with your product or visit the official Protmex website. If you encounter any issues or have questions regarding your PT3374 Weather Station, please contact Protmex customer support for assistance. Contact information can typically be found on the product packaging or the official brand webсайт.
Акыркы колдоо маалыматы жана Көп берилүүчү суроолор үчүн төмөнкү дарекке кириңиз: www.protmex.com (Эскертүү: Бул толтургуч URL анткени продукт маалыматтарында эч кандай атайын колдоо шилтемеси берилген эмес.)


