Introduction
Бул колдонмодо TFA Sphere 35.1148.01.IT зымсыз метеостанцияңызды орнотуу, иштетүү жана тейлөө боюнча кеңири көрсөтмөлөр берилген. Бул түзмөк үйдүн ичиндеги жана сыртындагы температураны жана нымдуулукту так өлчөө, ошондой эле динамикалык түстүү дисплей жана аба ырайын алдын ала айтуу мүмкүнчүлүктөрүн сунуштайт. Метеостанцияңыздын оптималдуу иштешин жана узак мөөнөттүү иштешин камсыз кылуу үчүн бул колдонмону кунт коюп окуп чыгыңыз.
Пакеттин мазмуну
Орнотууну улантуудан мурун, төмөндө көрсөтүлгөн бардык буюмдар пакетте бар экенин текшериңиз:
- 1 x TFA Sphere зымсыз метеорологиялык станциясы (негизги блок)
- 1 x Зымсыз сырткы сенсор
- Негизги блок үчүн 1 x кубат адаптери
- 4 x 1.5V AA батарейкалары (негизги блоктун камдык көчүрмөсү үчүн)
- 2 x 1.5V AA батарейкалары (сырткы сенсор үчүн)
- 1 x User Manual
Продукт бүттүview
TFA Sphere зымсыз метеорологиялык станциясы негизги дисплей блогунан жана алыстан башкарылуучу сырткы сенсордон турат. Негизги блок түстөрдү автоматтык түрдө өзгөртө турган же белгиленген түскө коюла турган жогорку контрасттуу "Color Sharp" дисплейине ээ. Ал имараттын ичиндеги температураны жана нымдуулукту, сырттагы температураны жана нымдуулукту, убакытты, датаны жана аба ырайынын божомолдорун көрсөтөт.

Бул сүрөттө TFA Sphere зымсыз метеостанциясынын негизги дисплей блогу көрсөтүлгөн. Дисплей көк түстө жарыктанып, имараттын ичиндеги температураны, сырткы температураны, нымдуулук деңгээлин, учурдагы убакытты жана графикалык аба ырайынын божомолун көрсөтөт.

Бул сүрөттө компакттуу, ак түстөгү сырткы сенсор блогу көрсөтүлгөн. Бул сенсор зымсыз түрдө сырткы температура жана нымдуулук маалыматтарын негизги метеостанцияга жөнөтөт.
Негизги өзгөчөлүктөрү
- Жогорку контрасттуу "Түстүү курч" дисплей: Интенсивдүү түстөргө жана мыкты окумдуулукка ээ.
- Динамикалык түс өзгөртүү: 600 түстүн өңүн автоматтык түрдө өзгөртүү же түстөрдү бекитилген тандоо (22 түс), анын ичинде сырткы температурага жараша түстөрдү көрсөтүү режими.
- Жөнгө салынуучу жарыктык: Дисплейдин жарыктыгынын үч деңгээли.
- Зымсыз маалыматтарды берүү: Сырткы температура жана нымдуулук маалыматтарын тышкы сенсордон зымсыз кабыл алат.
- Ички климатты көзөмөлдөө: Үйдүн температурасын жана нымдуулугун көрсөтөт.
- Максималдуу/Мин функциясы: Максималдуу жана минималдуу температура маанилерин жазып алат.
- Аба ырайы: Атмосфералык басымдын өзгөрүшүнө негизделген аба ырайынын божомолдорун берет.
- Аба басымынын тенденциясы: Акыркы 12 сааттагы атмосфералык басымдын өзгөрүшүнүн графикалык чагылдырылышы.
- Радио менен башкарылуучу саат: Убакыт жана датаны автоматтык түрдө синхрондоштуруу, ойготкуч функциясы жана убакыт алкагын орнотуу менен.
- WeatherHub шайкештиги: Смартфондорду интеграциялоо үчүн WeatherHub Gateway'ге кошумча туташуу (Gateway өзүнчө сатылат).
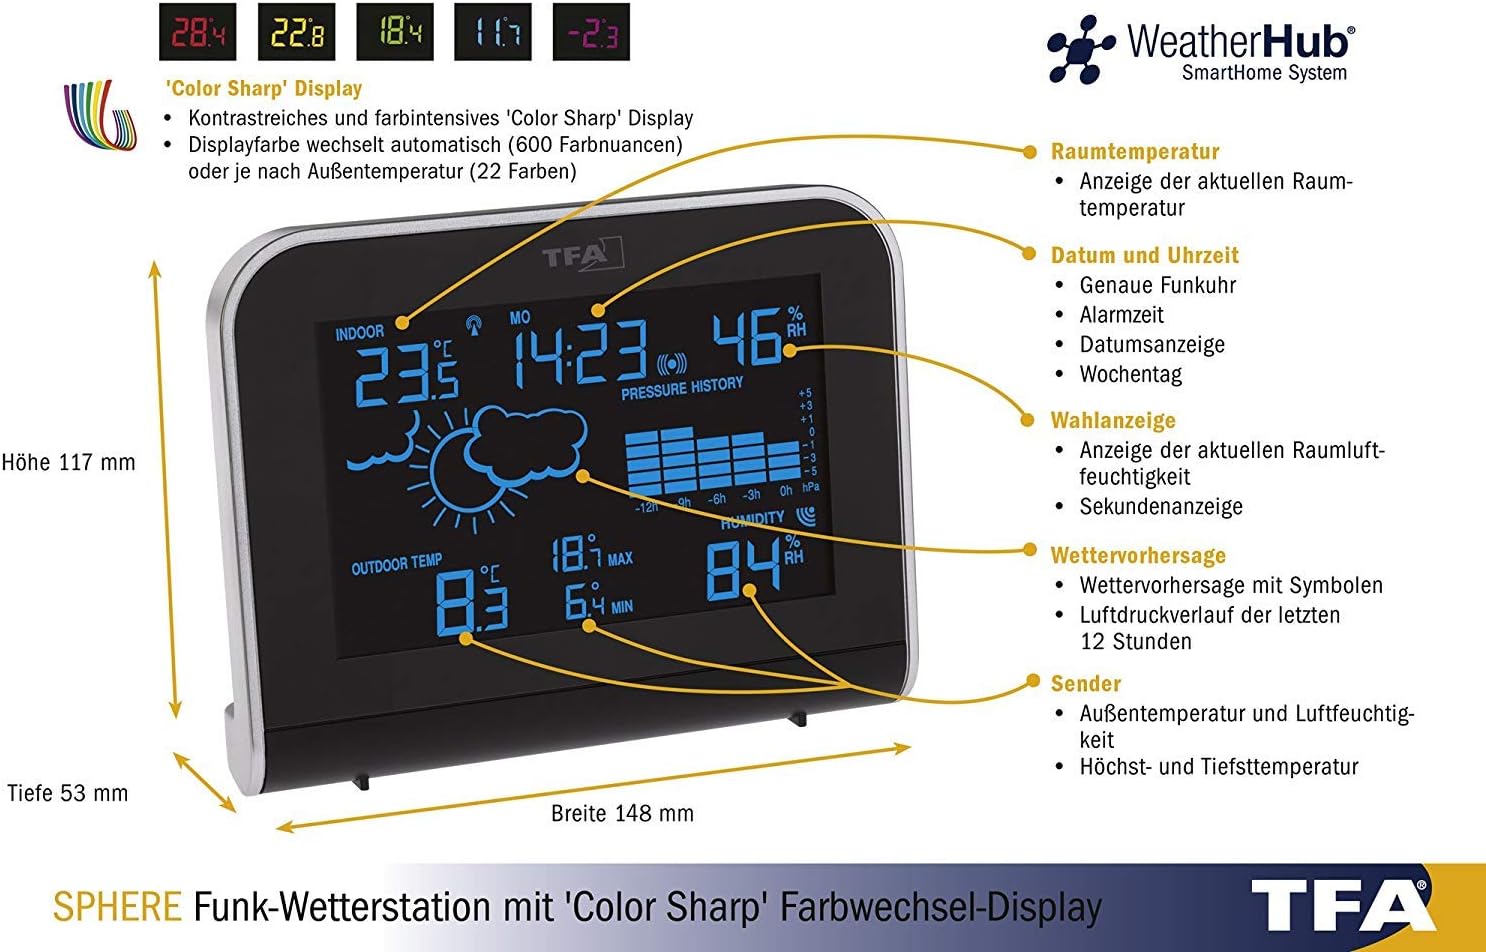
Бул деталдуу диаграммада метеостанциянын дисплейинин ар кандай бөлүмдөрү, анын ичинде имараттын ичиндеги температура, дата жана убакыт, нымдуулук, аба ырайынын божомолу, аба басымынын тенденциясы жана сырткы сенсорлордун маалыматтары көрсөтүлгөн. Ошондой эле, ал негизги блоктун өлчөмдөрүн көрсөтөт.


Бул сүрөттөрдө негизги блок кызгылт жана кызыл жарык менен көрсөтүлгөн, ыңгайлаштырылуучу дисплей түстөрү көрсөтүлгөн.
Орнотуу нускамалары
1. таңгактан чыгаруу
Бардык компоненттерди таңгактан этияттык менен алып чыгып, аларды тегиз, туруктуу бетке коюңуз. Таңгакты келечекте сактоо же ташуу үчүн сактап коюңуз.
2. Негизги блокту кубаттоо
- Берилген кубат адаптерин негизги блоктун кубат киргизүү портуна туташтырыңыз.
- Кубат адаптерин кадимки электр розеткасына сайыңыз. Дисплей күйөт.
- Резервдик кубат алуу үчүн, туура полярдуулукту сактап, негизги блоктун арткы жагындагы батарея бөлүмүнө 4 x 1.5V AA батарейкаларын салыңыз. Бул батарейкалар кубат өчүрүлгөн учурда жөндөөлөрдү сактайт.tages.
3. Сырткы сенсордук батареяларды орнотуу
- Сырткы сенсордун батарея бөлүмүн ачыңыз.
- Туура полярдуулукту камсыз кылып, 2 x 1.5V AA батарейкаларын салыңыз.
- Батарея отсегин бекем жабыңыз.
4. Сенсорду жана негизги блокту жупташтыруу
Негизги блок баштапкы күйгүзүлгөндө автоматтык түрдө сырткы сенсорго туташууга аракет кылат. Бул процесс бир нече мүнөткө созулушу мүмкүн. Сенсор негизги блоктун диапазонунда экенин текшериңиз (ачык жерлерде 100 метрге чейин). Эгерде туташуу автоматтык түрдө орнотулбаса, көйгөйлөрдү чечүү бөлүмүн караңыз.
5. Баштапкы жөндөөлөр (Убакыт, Дата, Убакыт алкагы)
Аба ырайын көзөмөлдөөчү станцияда убакытты жана датаны автоматтык түрдө орнотуучу радио менен башкарылуучу саат бар. Түзмөктүн радио сигналын кабыл алышы үчүн бир аз убакыт бериңиз. Эгерде кол менен жөндөө керек болсо, баскычтын белгилүү бир функциялары үчүн колдонуу боюнча нускамаларды караңыз.
Иштөө нускамалары
Дисплейview
Негизги дисплей бир караганда эле көп маалымат берет. Ар бир дисплей сегментинин деталдуу бөлүштүрүлүшү үчүн төмөндөгү диаграмманы караңыз.
Бул диаграмма метеостанциянын дисплейиндеги ар кандай көрсөткүчтөргө жана маалымат чекиттерине визуалдык көрсөтмө берет.
Дисплей жарыктыгын жөндөө
Дисплейдин үч жарыктык деңгээли бар. Айлана-чөйрөңүзгө ылайыктуу жарыктык жөндөөлөрүн өзгөртүү үчүн "DIM" баскычын (адатта түзмөктүн артында же капталында жайгашкан) колдонуңуз.
Дисплейдин түс режимин өзгөртүү
Метеостанция бир нече дисплей түс режимдерин сунуштайт:
- Түстү автоматтык түрдө өзгөртүү: Дисплей 600 түрдүү түстөрдүн өңүн өзгөртө алат.
- Бекитилген түс: 22 жеткиликтүү бир түстүн бирин тандаңыз.
- Сырткы температурага көз каранды түс: Дисплейдин түсү учурдагы сырткы температурага жараша автоматтык түрдө өзгөрөт.
Бул режимдердин ортосунда которулуу үчүн түзмөгүңүздөгү атайын баскычтарды (мисалы, 'ТҮС' же 'РЕЖИМ' баскычы) караңыз.
Аба ырайынын божомолун чечмелөө
Аба ырайынын божомолу графикалык символдор (мисалы, күн, булуттар, жамгыр) менен көрсөтүлөт жана атмосфералык басымдын өзгөрүшүнө негизделген. Бул божомолдор божомолдор болуп саналат жана дайыма эле 100% так боло бербеши мүмкүн.
Макс/Мин Температура жана Нымдуулук
Метеостанция имараттын ичиндеги жана сыртындагы температуранын жана нымдуулуктун максималдуу жана минималдуу маанилерин жазып алат. 'МАКСИМАЛДУУ/МИНУТ' баскычын басыңыз view бул жазылган маанилер. Аларды тазалоо же учурдагы көрсөткүчтөргө кайтуу үчүн кайра басыңыз.
Ойготкуч саат функциясы
Орнотулган ойготкуч саат күнүмдүк ойготкучту коюуга мүмкүндүк берет. Ойготкучту коюу жана иштетүү/өчүрүү үчүн баскычтын атайын көрсөтмөлөрүн (мисалы, 'ОЙГОТКУЧ' баскычы) караңыз.
WeatherHub байланышы (милдеттүү эмес)
TFA Sphere метеостанциясы TFA WeatherHub SmartHome системасы менен шайкеш келет. Бул функцияны колдонуу үчүн WeatherHub шлюзу (өзүнчө сатылат) талап кылынат. Туташкандан кийин, сиз аба ырайы тууралуу маалыматты смартфон тиркемеси аркылуу алыстан көзөмөлдөй аласыз.

Бул диаграммада кошумча WeatherHub байланышы түшүндүрүлүп, метеостанциянын WeatherHub шлюзу менен кантип интеграцияланып, смартфон тиркемесине маалыматтарды жөнөтө алары көрсөтүлгөн.
Техникалык шарттар
| Өзгөчөлүк | Спецификация |
|---|---|
| Жабык температура диапазону | -10 °Cден +60 °Cге чейин |
| Тышкы температура диапазону | -40 °Cден +60 °Cге чейин |
| Үй ичиндеги нымдуулук диапазону | 1% - 99% RH |
| Негизги бирдиктин өлчөмдөрү (L x W x Y) | 148 x 117 x 53 мм |
| Негизги блоктун кубаттуулугу | Кубат адаптери (кошулган), 4 x 1.5V AA батарейкалары (кошумча, кошулган) |
| Сырткы сенсордун кубаты | 2 x 1.5V АА батарейкалар (кошулган) |
| Зымсыз берүү жыштыгы | 868 МГц |
| Байланыш технологиясы | Зымсыз |
Техникалык тейлөө
Тазалоо
Негизги блокту жана сырткы сенсорду жумшак, d менен тазалаңызamp кездеме. Абразивдүү тазалоочу каражаттарды же эриткичтерди колдонбоңуз, анткени алар беттерге же электрондук компоненттерге зыян келтириши мүмкүн. Сырткы сенсордун ашыкча кирден же таштандылардан таза экенине ынаныңыз.
Батареяны алмаштыруу
Дисплейде батареянын заряды аз деген индикатор пайда болгондо, сырткы сенсордогу жана негизги блоктогу (резервдик) батареяларды алмаштырыңыз. Ар дайым комплекттеги бардык батареяларды ошол эле типтеги жаңылары менен алмаштырыңыз. Колдонулган батареяларды жергиликтүү эрежелерге ылайык жок кылыңыз.
Проблемаларды чечүү
- Сырткы температура/нымдуулук көрсөткүчү жок:
- Сырткы сенсордогу батарейкалардын туура орнотулганын жана түгөнбөгөнүн текшериңиз.
- Сырткы сенсор негизги блоктун таасир этүү диапазонунда экенин жана калың дубалдар же металл буюмдар менен тосулуп калбаганын текшериңиз.
- Батареяларды/кубатты алып, бир нече секунд күтүп, андан кийин алгач негизги блокту, андан кийин сырткы сенсорду кайра күйгүзүү менен эки блокту тең баштапкы абалга келтирип көрүңүз.
- Туура эмес окуулар:
- Сырткы сенсорду көлөкөлүү, жакшы желдетилген жерге, түз күн нурунан же жылуулук булактарынан алыс коюңуз.
- Так көрсөткүчтөр үчүн эки түзмөк тең орнотулгандан кийин кеминде 30 мүнөт турукташып калышы керек.
- Дисплей иштебейт:
- Кубат адаптери бекем туташтырылганын жана розетка иштеп турганын текшериңиз.
- Негизги блоктогу резервдик батареяларды текшериңиз.
- Радио сааты синхрондоштурулбай жатат:
- Негизги блокту терезенин жанына, тоскоолдук жаратышы мүмкүн болгон электрондук түзүлүштөрдөн алыс коюңуз.
- Баштапкы синхрондоштуруу үчүн 24 саатка чейин убакыт бериңиз.
Кепилдик жана колдоо
Кепилдик жөнүндө маалымат жана техникалык колдоо алуу үчүн, сатып алууңуз менен кошо берилген документтерди караңыз же расмий TFAга кайрылыңыз webсайт. Ар кандай кепилдик дооматтары үчүн сатып алганыңыздын далилин сактаңыз.


