1. Киришүү
This user manual provides detailed instructions for the operation and maintenance of your LOTUS Mini Portable Projector YG-300. Please read this manual thoroughly before using the projector to ensure proper functionality and to prevent damage.
The YG-300 is a compact and versatile video projection system designed for various applications, including presentations, conferences, training, and home theater setups. It projects light beams to display images and videos from compatible sources.
2. Пакеттин мазмуну
Кутучаны ачканда, төмөндө көрсөтүлгөн бардык буюмдар таңгагыңызда бар экенин текшериңиз:
- YG-300 Projector Unit
- Power Adapter (AC/DC 12V, 1.5A)
- Алыстан башкаруу
- Three-in-one AV Cable
- English User Manual

Figure 2.1: Included accessories with the YG-300 Mini Portable Projector.
3. Продукт бүтүп калдыview
3.1. Projector Front and Side View

Сүрөт 3.1: Алдыңкы view of the YG-300 projector, highlighting the projection lens and side ventilation.
3.2. Projector Top Panel Controls
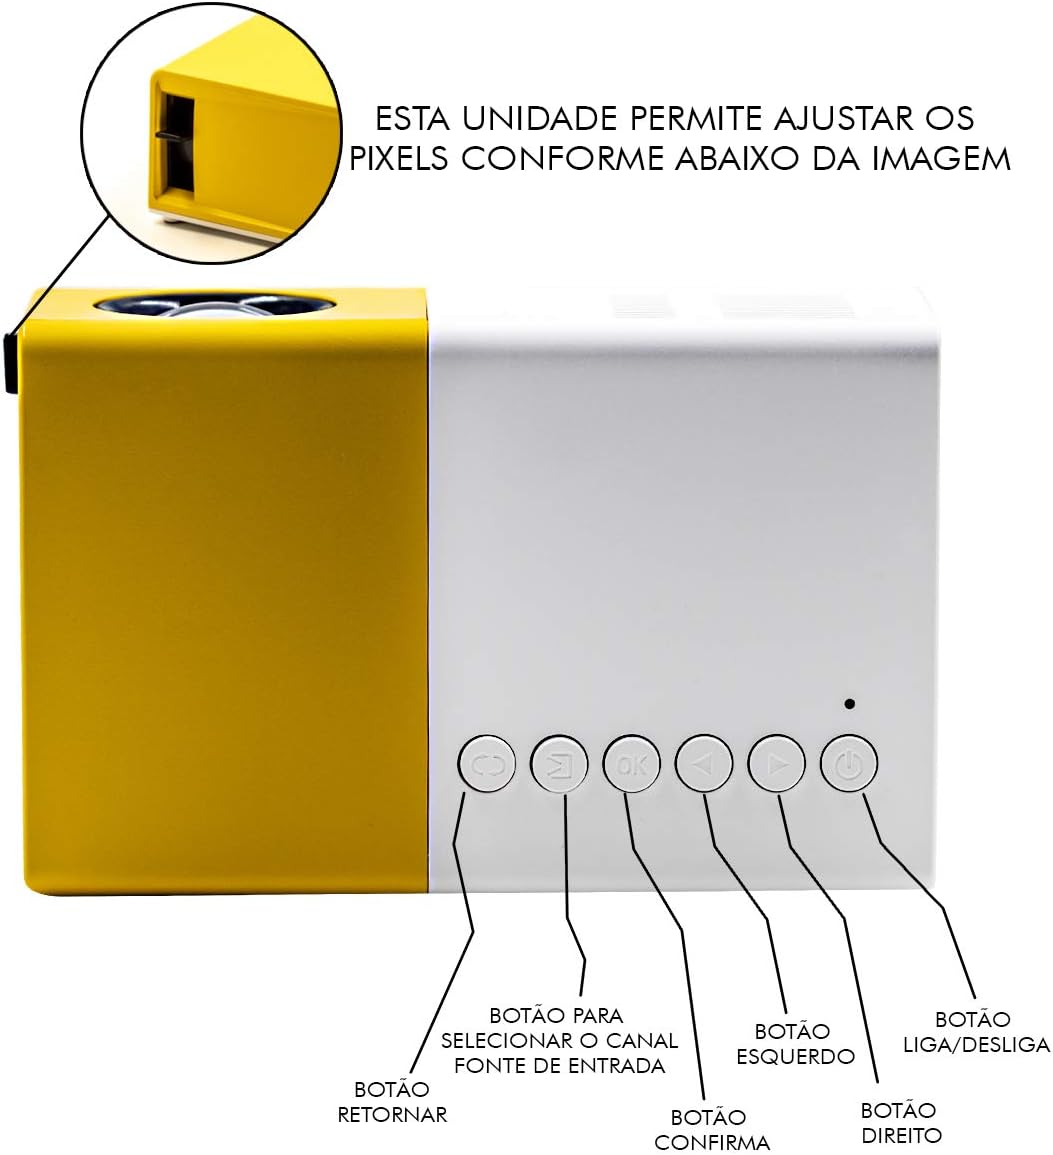
Figure 3.2: Top panel controls of the YG-300 projector. From left to right: Return button, Input Source selection button, OK (Confirm) button, Left navigation button, Right navigation button, and Power On/Off button.
3.3. Projector Rear Panel Ports
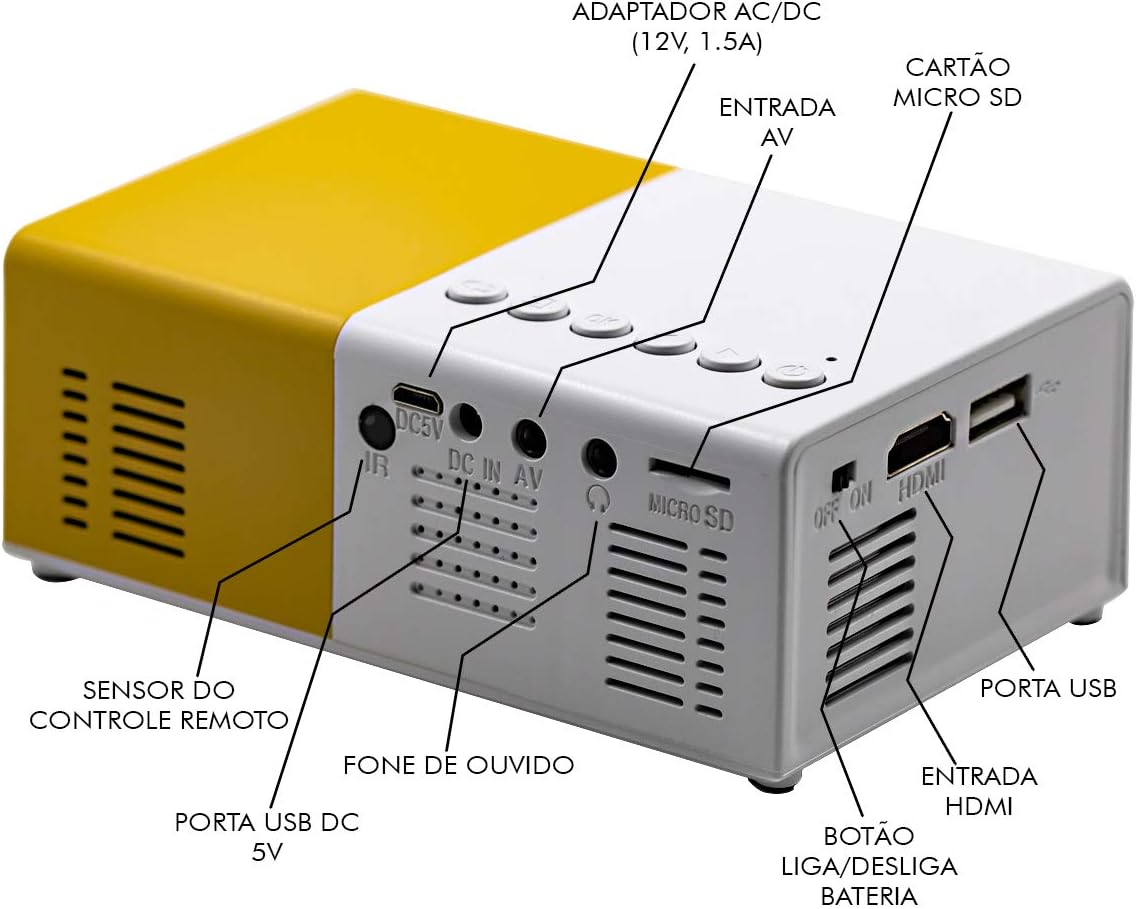
Figure 3.3: Rear panel of the YG-300 projector, detailing the connectivity options including USB, AV, Micro SD, HDMI, and audio output.
3.4. Алыстан башкаруу функциялары

Figure 3.4: Remote control for the YG-300 projector, showing buttons for power, menu access, source selection, directional navigation, OK, play/pause, volume control, and exit.
4. Орнотуу
4.1. Power Connection
- Connect the provided power adapter to the "DC IN AV" port on the rear of the projector.
- Кубат адаптерин стандарттуу электр розеткасына сайыңыз.
- Ensure the power switch (if present, often near the DC IN port) is in the "ON" position.
4.2. Positioning the Projector
Place the projector on a stable, flat surface. For optimal image quality, position the projector between 1.2 to 3 meters (approximately 4 to 10 feet) from the projection surface. This distance will yield an image size between 20 to 80 inches.

4.1-сүрөт: Мисample setup of the YG-300 projector for home use.
4.3. Киргизүү түзүлүштөрүн туташтыруу
The YG-300 supports multiple input sources:
- HDMI: Connect an HDMI cable from your device (e.g., laptop, game console, streaming stick) to the HDMI port on the projector.
- USB: Медиа ойнотуу үчүн USB флэш-дискти USB портуна салыңыз fileтүздөн-түз с.
- Микро SD: Insert a Micro SD card into the Micro SD slot to play media files.
- OF: Use the provided three-in-one AV cable to connect to devices with AV output (e.g., older DVD players, set-top boxes).
5. Иштөө нускамалары
5.1. Күйгүзүү / Өчүрүү
- Күйгүзүү үчүн, басыңыз Күйгүзүү/өчүрүү button on the projector's top panel or the remote control.
- Өчүрүү үчүн, басыңыз Күйгүзүү/өчүрүү кайра баскычын.
5.2. Киргизүү булагын тандоо
Күйгүзгөндөн кийин, колдонуңуз Булак алыстан башкаруудагы же Киргизүү булагын тандоо button on the projector's top panel to cycle through available input sources (HDMI, USB, Micro SD, AV).
5.3. Adjusting Image Focus
The projector features a manual focus adjustment. Rotate the focus ring located around the lens until the projected image appears clear and sharp.
5.4. Navigating Menus and Media
Use the directional buttons (Солго, Туура, Up, Төмөн) жана OK button on the remote control or projector to navigate through menus and select media fileс. The Кайтуу button will take you back to the previous screen.
5.5. Үндү башкаруу
Үнүн колдонуп, үнүн жөндөңүз Үндү көтөрүү жана Үндү төмөндөтүү buttons on the remote control. You can also connect external speakers or headphones to the 3.5mm audio jack for enhanced sound.
6. Техникалык тейлөө
6.1. Объективди тазалоо
Проектордун линзасын оптикалык беттер үчүн атайын жасалган жумшак, мамыксыз чүпүрөк менен акырын сүртүңүз. Абразивдүү тазалоочу каражаттарды же эриткичтерди колдонбоңуз.
6.2. Проектордун корпусун тазалоо
Wipe the exterior of the projector with a soft, dry cloth. Avoid using liquid cleaners directly on the device.
6.3. Вентиляция
Ensure that the ventilation grilles on the projector are not blocked to prevent overheating. Adequate airflow is crucial for the projector's longevity.
7. Кыйынчылыктарды
| Көйгөй | Мүмкүн себеп | Чечим |
|---|---|---|
| Сүрөт чагылдырылган жок |
|
|
| Сүрөт бүдөмүк |
|
|
| Үн жок |
|
|
| Проектор ысып, өчүп калат |
|
|
8. Техникалык шарттар
| Өзгөчөлүк | Деталь |
|---|---|
| Бренд | LOTUS |
| Модел | YG-300 |
| Өндүрүүчү | LEJIADA |
| Жарыктык | 600 Lumens |
| Native Resolution | 800 x 480 пиксель |
| Проекциялык аралык | 1.2 - 3 meters (approx. 4 - 10 feet) |
| Сүрөттүн өлчөмү | 20 - 80 дюйм |
| Экран катышы | 4:3 |
| Байланыш | HDMI, USB, 3.5mm Audio, Micro SD Card Slot |
| Продукциянын өлчөмдөрү | 12.5 x 8 x 5 см (4.9 x 3.1 x 2 дюйм) |
| Продукт Салмагы | 480 г (1.06 фунт) |

Figure 8.1: Dimensions of the YG-300 projector and its remote control.
9. Кепилдик жана колдоо
For warranty information and technical support, please refer to the contact details provided by your retailer or the manufacturer, LEJIADA. Keep your purchase receipt as proof of purchase for any warranty claims.
This product is designed for durability and performance. For any issues not covered in the troubleshooting section, please contact customer support.


