1. Киришүү
Сатып алганыңыз үчүн рахматasing the Mr. Coffee BVMC-DVX41 12-Cup Programmable Coffeemaker. This manual provides important information for the safe and efficient operation of your new appliance. Please read these instructions thoroughly before first use and retain them for future reference.
2. Маанилүү коргоо чаралары
Электр шаймандарын колдонууда өрт, электр тогуна урунуу жана/же адамдардын жаракат алуу коркунучун азайтуу үчүн негизги коопсуздук чараларын дайыма сактоо керек, анын ичинде төмөнкүлөр:
- Бул шайманды колдонуудан мурун бардык нускамаларды окуп чыгыңыз.
- ысык беттерге тийбеңиз. Туткаларды же туткаларды колдонуңуз.
- To protect against electric shock, do not place cord, plug, or coffeemaker in water or other liquids.
- Кандайдыр бир шайманды балдар же алардын жанында колдонуп жатканда, катуу көзөмөл керек.
- Колдонбогондо жана тазалоодон мурун розеткадан ажыратыңыз. Тетиктерди кийүүдөн же чечүүдөн мурун жана шайманды тазалоодон мурун муздатыңыз.
- Do not operate any appliance with a damaged cord or plug, or after the appliance malfunctions or has been damaged in any manner. Return appliance to an authorized service facility for examination, repair, or adjustment.
- Шаймандын өндүрүүчүсү сунуш кылбаган кошумча тиркемелерди колдонуу өрткө, электр шокуна же адамдардын жаракат алышына алып келиши мүмкүн.
- Сыртта колдонбоңуз.
- Шнур столдун же столдун четине илинип калышына же ысык беттерге тийбеңиз.
- Ыстык газ же электр мешине же ысытылган мештин жанына коюуга болбойт.
- Ажыратуу үчүн, каалаган башкаруу элементин "өчүрүү" абалына коюңуз, андан кийин сайгычты розеткадан сууруп алыңыз.
- Шайманды максаттуу колдонуудан башка максатта колдонбоңуз.
- Графин ушул шайман менен гана колдонууга ылайыкташтырылган. Ал эч качан жогорку чекте колдонулбашы керек.
- Ысык графинди нымдуу же муздак жерге коюуга болбойт.
- Жарака кеткен графинди же туткасы бош же алсыраган графинди колдонбоңуз.
- Графини тазалоочу каражаттар, болоттон жасалган жүндөр же башка абразивдүү материалдар менен тазалабаңыз.
- Капкакты кайнатуу циклинде алып салсаңыз, күйүп кетиши мүмкүн.
3. Parts of Your Coffeemaker
Familiarize yourself with the components of your Mr. Coffee BVMC-DVX41 coffeemaker before operation.

1-сүрөт: Фронт view of the Mr. Coffee BVMC-DVX41 coffeemaker. This image shows the control panel with digital display, buttons for programming and brewing, the brew basket area, and the glass carafe on the warming plate.
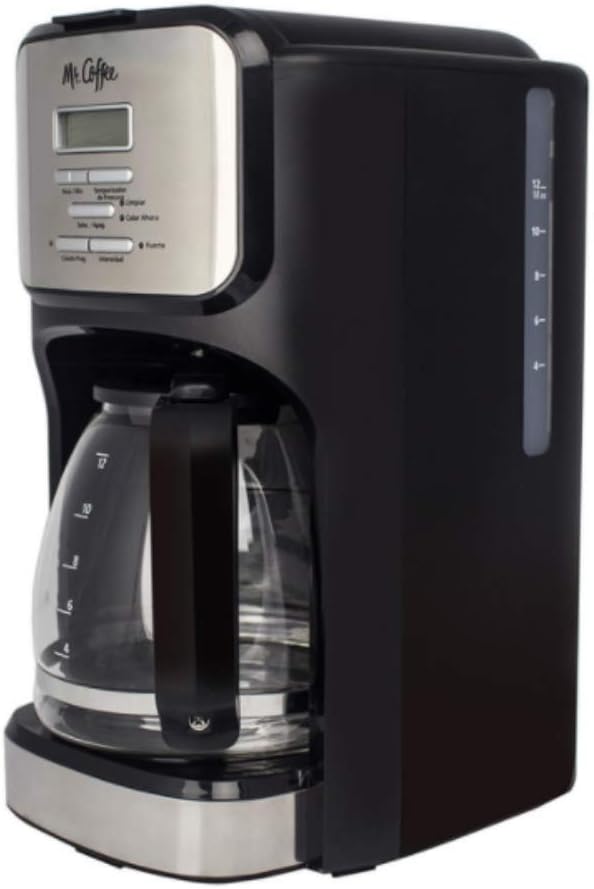
2-сүрөт: Side view of the Mr. Coffee BVMC-DVX41 coffeemaker. This image highlights the water reservoir with its clear water level indicator, allowing users to easily see how much water is added.
- Капкак: Covers the water reservoir and brew basket.
- Суу сактагыч: Holds water for brewing. Features a clear level indicator.
- Brew себет: Holds the coffee filter and ground coffee. Removable for easy cleaning.
- Башкаруу панели: Includes a digital clock/timer display and various function buttons.
- Айнек графин: 12-cup capacity carafe with handle and lid.
- Жылытуу плитасы: Keeps brewed coffee hot.
- Электр кабели: Электр розеткасына туташтыруу үчүн.
4. Орнотуу жана биринчи колдонуу
4.1 Биринчи колдонуудан мурун
Before brewing your first pot of coffee, it is recommended to clean the coffeemaker to remove any dust or manufacturing residues.
- Wash the carafe and brew basket in warm, soapy water. Rinse thoroughly and dry.
- Суу резервуарын 12 стакан белгисине чейин таза, муздак суу менен толтуруңуз.
- Place an empty paper filter (basket-style) into the brew basket.
- Place the brew basket into its housing and close the lid.
- Бош графинди жылыткыч табакка салыңыз.
- Кофе кайнаткычты электр розеткасына сайыңыз.
- Run a full brewing cycle with only water and the paper filter. Discard the water from the carafe and the used filter.
- Repeat this process once more for optimal cleaning.
4.2 Саатты орнотуу
The coffeemaker features a programmable clock. Set the current time for accurate programming.
- Plug in the coffeemaker. The display will flash "12:00".
- Press the "HOUR" button repeatedly until the correct hour is displayed. Pay attention to the AM/PM indicator.
- Press the "MINUTE" button repeatedly until the correct minute is displayed.
- The clock is now set. If you do not press any button for 5 seconds, the time will be set automatically.
5. Иштөө нускамалары
5.1 Кофе кайнатуу
- Ensure the coffeemaker is plugged in and the clock is set.
- Fill the water reservoir with fresh, cold water to your desired number of cups, using the water level indicator on the side. Do not exceed the 12-cup maximum fill line.
- Place a basket-style paper filter into the brew basket.
- Фильтрге майдаланган кофенин керектүү көлөмүн кошуңуз. Жалпы көрсөтмө бир чыныга бир аш кашык майдаланган кофе, бирок табитиңизге ылайыкташыңыз.
- Slide the brew basket into its housing and close the lid securely.
- Place the empty carafe with its lid on the warming plate. Ensure it is seated correctly to activate the "Pause 'n Serve" feature.
- Press the "ON/OFF" button to start the brewing cycle. The indicator light will illuminate.
- Once brewing is complete, the coffeemaker will automatically switch to the "Keep Warm" mode. The warming plate will keep the coffee hot for approximately 2 hours before automatically shutting off.
5.2 Programmable Brewing (Delay Brew)
Set your coffeemaker to brew automatically at a later time.
- Follow steps 1-6 from "5.1 Brewing Coffee".
- Press the "PROGRAM" button. The display will show "PROGRAM" and flash "12:00".
- Press the "HOUR" and "MINUTE" buttons to set the desired brew time. Remember to observe the AM/PM indicator.
- Once the desired time is set, press the "PROGRAM" button again to confirm. The "PROGRAM" indicator light will illuminate.
- The coffeemaker will now start brewing automatically at the programmed time.
- To cancel the programmed brew, press the "ON/OFF" button.
5.3 Pause 'n Serve Feature
Бул функция сизге демдөө цикли бүтө электе бир чыны кофе куюуга мүмкүндүк берет.
- During the brewing cycle, you can temporarily remove the carafe from the warming plate. The flow of coffee will automatically stop.
- Pour your cup of coffee.
- Immediately return the carafe to the warming plate. If the carafe is not returned within 30 seconds, the brew basket may overflow.
6. Кароо жана тейлөө
6.1 Күнүмдүк тазалоо
Regular cleaning helps maintain the performance and longevity of your coffeemaker.
- Кофе кайнаткычты тазалоодон мурун ар дайым розеткадан сууруп, толугу менен муздаганча күтүңүз.
- Remove the brew basket and discard the used coffee filter and grounds.
- Wash the carafe and brew basket in warm, soapy water. These parts are not dishwasher safe. Rinse thoroughly.
- Кофе кайнаткычтын сыртын жумшак, г менен сүртүңүзamp кездеме. Абразивдүү тазалагычтарды же тазалоочу жайларды колдонбоңуз.
- Do not immerse the coffeemaker in water or any other liquid.
6.2 Кабыкты тазалоо (минералдык катмарларды алып салуу)
Mineral deposits (calcium and lime) can build up in your coffeemaker over time, affecting its performance. Descale your coffeemaker every 80 brew cycles or every 2-3 months, depending on water hardness.
- Pour 4 cups of undiluted white household vinegar into the water reservoir.
- Place an empty paper filter into the brew basket.
- Бош графинди жылыткыч табакка салыңыз.
- Press the "ON/OFF" button to start a brewing cycle. Allow half of the vinegar solution to brew into the carafe, then press "ON/OFF" to turn off the coffeemaker.
- Let the coffeemaker soak for at least 15 minutes to allow the vinegar to clean the internal components.
- After soaking, press "ON/OFF" again to complete the brewing cycle with the remaining vinegar solution.
- Discard the vinegar solution from the carafe and the used filter.
- Fill the water reservoir with fresh, cold water (12 cups) and run two full brewing cycles with only water to rinse out any remaining vinegar taste.
7. Көйгөйлөрдү чечүү боюнча колдонмо
Review the following common issues and their solutions before contacting customer service.
| Көйгөй | Мүмкүн себеп | Чечим |
|---|---|---|
| Кофе жасоочу күйгүзүлбөйт. | розеткага кошулбаган; күч уtagд; туура эмес розетка. | Ensure the coffeemaker is securely plugged into a working electrical outlet. Check your circuit breaker. |
| Кофе кайнатылган эмес. | Water reservoir empty; brew cycle not started; carafe not on warming plate. | Fill water reservoir. Press "ON/OFF" button. Ensure carafe is properly seated on the warming plate. |
| Кофенин даамы алсыз же өтө күчтүү. | Кофе-суунун туура эмес катышы; кофе майдалоо өтө орой/майда. | Adjust the amount of ground coffee. Use a medium grind for drip coffeemakers. |
| Сыра себет толуп жатат. | Too much coffee grounds; filter not seated correctly; carafe removed too long during Pause 'n Serve; coffeemaker needs descaling. | Reduce coffee grounds. Ensure filter is properly seated. Return carafe quickly. Descale the coffeemaker. |
| Кофе жетиштүү ысык эмес. | Warming plate not functioning; coffeemaker needs descaling. | Ensure the warming plate is on. Descale the coffeemaker to improve heating efficiency. |
8. Продукттун спецификациялары
- Модель номери: BVMC-DVX41
- Бренд: Кофе мырза
- Сыйымдуулугу: 12 чөйчөкчө
- Кофе кайнаткыч түрү: Тамчылатып кофе машинасы
- Өзгөчө өзгөчөлүгү: Программалануучу
- Тtage: 120 вольт
- Иштөө режими: Толугу менен автоматтык
- Камтылган компоненттер: Куфран, чыпка
- Продукциянын өлчөмдөрү: 15 x 14 x 9 дюйм (болжол менен)
- Элемент Салмагы: 5.06 фунт (болжол менен)
- Тышкы жасалгалоо: Metallic
- Адам интерфейсинин киргизүүсү: Buttons
- Идиш жуугучта коопсузбу: No (for main unit, carafe and brew basket are hand-wash only)
9. Кепилдик жана Кардарларды колдоо
For detailed warranty information, please refer to the warranty card included with your product packaging or visit the official Mr. Coffee website. If you experience any issues not covered in this manual, or require further assistance, please contact Mr. Coffee customer support.
Онлайн колдоо: Visit the official Mr. Coffee webКөп берилүүчү суроолор жана колдоо булактары үчүн сайт.
Телефондук колдоо: Продуктуңуздун таңгагына же расмий өкүлгө кайрылыңыз webучурдагы байланыш номерлери үчүн сайт.


