1. Киришүү
This manual provides essential instructions for the safe and effective use of your Sony a6400 Mirrorless Camera Body and DJI RS 3 Mini Gimbal Stabilizer Kit. Please read this manual thoroughly before operating the products and retain it for future reference.
2. Пакеттин мазмуну
Төмөндө тизмеленген нерселердин баары пакетиңизге камтылганын текшериңиз. Эгерде кандайдыр бир буюмдар жок же бузулуп калса, сатуучуга кайрылыңыз.
- Sony a6400 Mirrorless APS-C Interchangeable-Lens Camera Body (ILCE-6400)
- AC Adaptor AC-UUE12
- NP-FW50 кайра заряддалуучу батареясы
- Аксессуар бут кийиминин баш кийими
- Дене капкагы
- Окулярдык чөйчөк
- Микро USB кабели
- Электр кабели
- Погон
- DJI RS 3 Mini Lightweight Travel Ronin Gimbal Stabilizer
- USB-C Charging Cable (for Gimbal)
- Multi-Camera Control USB-C Cable (for Gimbal)
- Quick-Release Plate (for Gimbal)
- Mini Tripod (for Gimbal)
- Screw Kit (for Gimbal)
- Deco Gear Photography Backpack
- Lexar 64GB Professional 1800x UHS-II SDXC Memory Card
- Corel Paint Shop Pro Software (Digital Download)
- VideoStudio SE Software (Digital Download)
3. Камера бүткөнview
Familiarize yourself with the main components and controls of the Sony a6400 camera body.


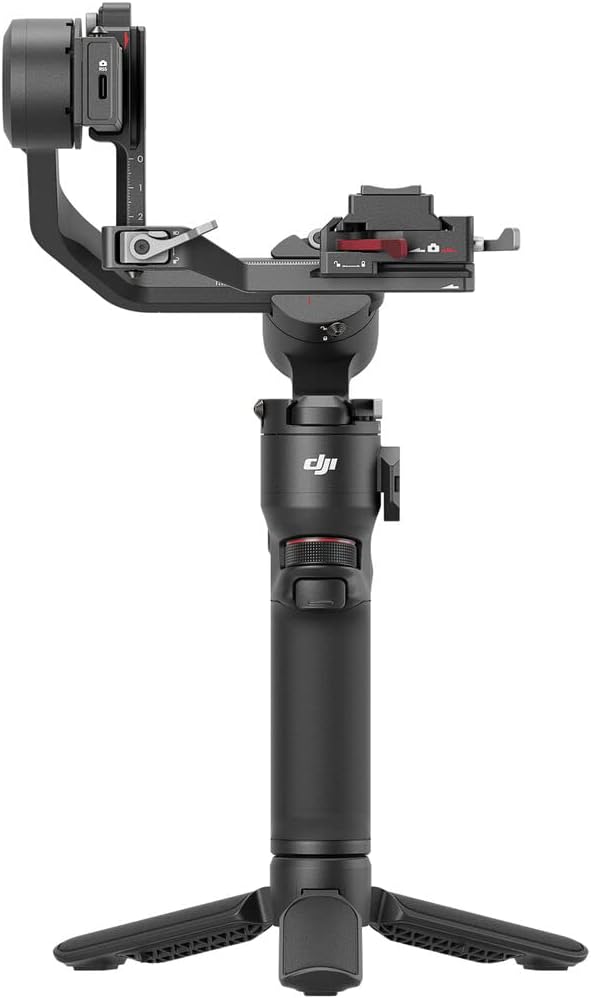
4. DJI RS 3 Mini Gimbal Overview
Understand the components of your DJI RS 3 Mini Gimbal Stabilizer.

5. Орнотуу
5.1 Камераны орнотуу
- Батареяны заряддоо: Insert the NP-FW50 battery into the AC Adaptor and plug it into a power outlet. The charging indicator will illuminate.
- Эстутум картасын салыңыз: Open the memory card slot cover and insert the Lexar 64GB SDXC card with the label facing the front of the camera until it clicks into place.
- Линзаны бекитүү: Remove the body cap from the camera and the rear lens cap from your E-mount lens. Align the white index marks on the lens and camera body, then rotate the lens clockwise until it locks.
- Баштапкы күйгүзүү: Turn the camera's power switch to 'ON'. Follow the on-screen prompts to set the language, date, and time.
5.2 Gimbal Setup
- Гимбалды заряддоо: Connect the USB-C Charging Cable to the gimbal and a power source.
- Assemble Gimbal: Attach the mini tripod to the bottom of the gimbal handle. Unfold the gimbal arms.
- Камераны орнотуу: Secure the camera to the quick-release plate using the provided screw. Attach the quick-release plate with the camera to the gimbal.
- Balance the Gimbal: Carefully adjust each axis of the gimbal until the camera remains stable in any position without power. Refer to the DJI RS 3 Mini user guide for detailed balancing instructions.
- Камераны туташтыруу: Use the Multi-Camera Control USB-C Cable to connect the camera to the gimbal for control functions.
6. Камераны иштетүү
The Sony a6400 offers advanced features for both photography and videography.
6.1 Негизги атуу режимдери
Use the mode dial on top of the camera to select your desired shooting mode:
- АВТО: Камера оптималдуу натыйжаларга жетүү үчүн жөндөөлөрдү автоматтык түрдө тууралайт.
- P (Автоматтык программа): Камера диафрагманы жана жабуунун ылдамдыгын орнотот, бирок сиз башка жөндөөлөрдү тууралай аласыз.
- A (Апертура артыкчылыгы): Сиз диафрагманы орнотосуз, камера жабуу ылдамдыгын орнотот.
- S (жабык приоритети): Сиз жабуунун ылдамдыгын, камера диафрагманы орнотот.
- M (Кол менен экспозиция): Сиз диафрагманы жана жабуунун ылдамдыгын көзөмөлдөйсүз.
- Кино режими: Видео жаздыруу үчүн атайын режим.
6.2 Autofocus Features
The a6400 features a fast and precise autofocus system:
- Real-time Eye AF: Automatically detects and tracks human eyes for sharp portraits.
- реалдуу убакытта көз салуу: Utilizes AI-based object recognition to maintain focus on moving subjects.
- 425 Phase-detection AF points: Covers approximately 84% of the image area for wide and accurate focusing.
6.3 Видео жаздыруу
The camera supports high-resolution 4K HDR movie recording with full pixel readout and no pixel binning. This ensures detailed and vibrant video footage.
Видео 6.1: An official video introducing the Sony a6400 Mirrorless APS-C 4K Camera, highlighting its key features and capabilities.
6.4 Байланыш
The a6400 includes Wi-Fi, NFC, and QR code functionality for easy file transfer to smart devices and remote control of the camera.
7. Operating the DJI RS 3 Mini Gimbal
The DJI RS 3 Mini is designed for smooth, stabilized footage.
7.1 Күйгүзүү/өчүрүү
Press and hold the power button on the gimbal to turn it on or off. Ensure the camera is securely mounted and balanced before powering on.
7.2 Гимбалдын режимдери
The gimbal offers various operating modes (e.g., Pan Follow, Tilt Lock, FPV) accessible via the mode button. Refer to the DJI RS 3 Mini user manual for detailed explanations and controls for each mode.
7.3 Камераны башкаруу
Once connected via the Multi-Camera Control USB-C Cable, you can control certain camera functions (e.g., record start/stop, photo capture) directly from the gimbal's controls.
8. Техникалык тейлөө
Proper maintenance ensures the longevity and optimal performance of your camera and gimbal.
- Тазалоо: Use a soft, lint-free cloth to clean the camera body and gimbal. For lenses, use a specialized lens cleaning solution and cloth. Avoid harsh chemicals.
- Батареяга кам көрүү: Store batteries in a cool, dry place. Do not expose them to extreme temperatures. Fully charge batteries before extended storage and periodically recharge them to prevent deep discharge.
- Программалык камсыздоонун жаңыртуулары: Periodically check the Sony and DJI websites for firmware updates for your camera and gimbal. Updates can improve performance and add new features.
- Сактагыч: When not in use, store the camera and gimbal in the provided photography backpack or a dry, dust-free environment.
9. Кыйынчылыктарды
Бул бөлүм сиз кабылышы мүмкүн болгон жалпы көйгөйлөрдү карайт.
| Көйгөй | Мүмкүн себеп | Чечим |
|---|---|---|
| Камера күйбөйт. | Батарея түгөнүп калган же туура эмес салынган. | Батареяны толук заряддап, анын туура салынганын текшериңиз. |
| Сүрөттөр бүдөмүк. | Туура эмес фокус, камеранын солкулдашы же кир линза. | Check autofocus settings, use a faster shutter speed, or clean the lens. |
| Gimbal is unstable. | Improper balancing or incorrect payload. | Re-balance the gimbal with the camera mounted. Ensure camera weight is within gimbal's supported range. |
| Которуу мүмкүн эмес files via Wi-Fi. | Incorrect Wi-Fi settings or app not connected. | Ensure Wi-Fi is enabled on both devices and the Imaging Edge Mobile app is correctly connected. |
10. Техникалык шарттар
Key technical specifications for the Sony a6400 camera body.
- Сүрөт сенсору: 24.2 MP APS-C Exmor CMOS
- Сүрөт процессору: BIONZ X
- Автофокус: 425 Phase-detection and Contrast-detection AF points
- AF Acquisition Speed: 0.02 секунд
- ISO диапазону: 100-32000 (Expanded: 102400)
- Үзгүлтүксүз атуу: Up to 11 fps (mechanical shutter) / 8 fps (silent shooting)
- Видеонун чечилиши: 4K (2160p) with full pixel readout, 1080p
- Дисплей: 3-inch 921,600-dot Tilting LCD Touch Screen
- Viewтапкыч: Электрондук (XGA OLED Tru-Finder)
- Байланыш: Wi-Fi, NFC, USB
- Линзаны орнотуу: Sony E-mount
- Gimbal Payload: Up to 4.4 lbs (DJI RS 3 Mini)
11. Кепилдик жана колдоо
Your Sony a6400 camera body is covered by a Sony USA Authorized Warranty. For specific warranty details, please refer to the warranty card included in your package or visit the official Sony support webсайт.
For technical support, troubleshooting, or service inquiries regarding the Sony a6400 camera, please visit the official Sony support webсайт: www.sony.com/electronics/support
For support related to the DJI RS 3 Mini Gimbal, please visit the official DJI support webсайт: www.dji.com/support


