1. Киришүү
This manual provides essential information for the setup, operation, maintenance, and troubleshooting of your Artillery Sidewinder X1 3D Printer. Please read this manual thoroughly before operating the device to ensure proper use and to prevent damage.

Figure 1.1: The Artillery Sidewinder X1 3D Printer, showcasinанын дизайны жанаampбасып чыгаруу.
2. Негизги өзгөчөлүктөрү
- Ultra-Quiet Stepper Driver: Designed for reduced heat dissipation and higher torque, contributing to quieter operation.
- Synchronized Dual Z System: Ensures consistent and parallel movement of the X-carriage relative to the build plate, even if one Z-stepper encounters an issue.
- Түз жетектүү экструдер: Enhances reliability, particularly when printing with flexible filaments.
- AC Heating Platform: Provides rapid heating of the build plate. The lattice glass surface offers excellent adhesion when heated and allows for easy removal of prints once cooled.
- Электр кубаты үзүлүүдөн коргоо: Enables the printer to resume printing from the last recorded position after a power interruption.
- Filament Runout Sensor: Automatically pauses printing and prompts for filament feeding when the material runs out.
- Толук сенсордук экран: Provides clear instructions and intuitive control.

Figure 2.1: Visual representation of the Artillery Sidewinder X1's key features, including quiet operation, heated bed, and various sensors.
3. Кутуда эмне бар
Upon unboxing, verify that all components listed below are present and undamaged:
- 1 x Artillery Sidewinder X1 3D Printer
- 1 x монтаждоо куралдары комплекти
- 1 x Жыйноо боюнча нускама
- 1 x Assembly Guide (likely a quick start guide or visual aid)

3.1-сүрөт: Детальдуу view of the included assembly tool kit, showing various tools and spare parts.
4. Орнотуу жана чогултуу
The Artillery Sidewinder X1 comes 95% pre-assembled. Follow the included Assembly Instruction Manual for detailed steps. Key assembly points include:
- Пакеттен чыгаруу: Бардык компоненттерди таңгактан кылдаттык менен алып салыңыз.
- Портал орнотуу: Secure the gantry to the base unit. Ensure all connections are firm.
- Filament Holder: Attach the filament spool holder to the top of the gantry.
- Кабелдик байланыштар: Connect all necessary cables, paying attention to proper routing to avoid interference with moving parts.
- Кубат туташуу: Connect the power supply unit. Ensure the correct voltage (110V) is selected if applicable.
4.1 Баштапкы деңгээлдөө
Accurate bed leveling is crucial for successful prints. The Sidewinder X1 features large leveling knobs for easier adjustment.
- Heat the build plate to your typical printing temperature (e.g., 60°C for PLA) before leveling.
- Use the touch screen to move the nozzle to each corner and the center of the build plate.
- Adjust the leveling knobs until a piece of paper can slide with slight friction between the nozzle and the build plate.

Figure 4.1: Components facilitating setup and operation, including the direct drive extruder, large leveling knob, synchronized dual Z system, and inductive endstop sensors.
5. Иштөө нускамалары
5.1 Жүктөө Filament
To load filament, gently press the extruder arm and insert the filament into the direct drive extruder until it catches. Use the touch screen controls to extrude a small amount of filament to ensure it is flowing correctly through the nozzle.
5.2 Printing from SD Card/USB Stick
The Sidewinder X1 supports printing directly from a TF Card or USB Stick.
- Prepare your 3D model using a slicing software (e.g., Cura, PrusaSlicer, Simplify3D) and save the G-code file to your TF Card or USB Stick.
- Insert the storage device into the designated slot on the printer.
- Navigate the full touch screen interface to select your desired G-code file and initiate the print.
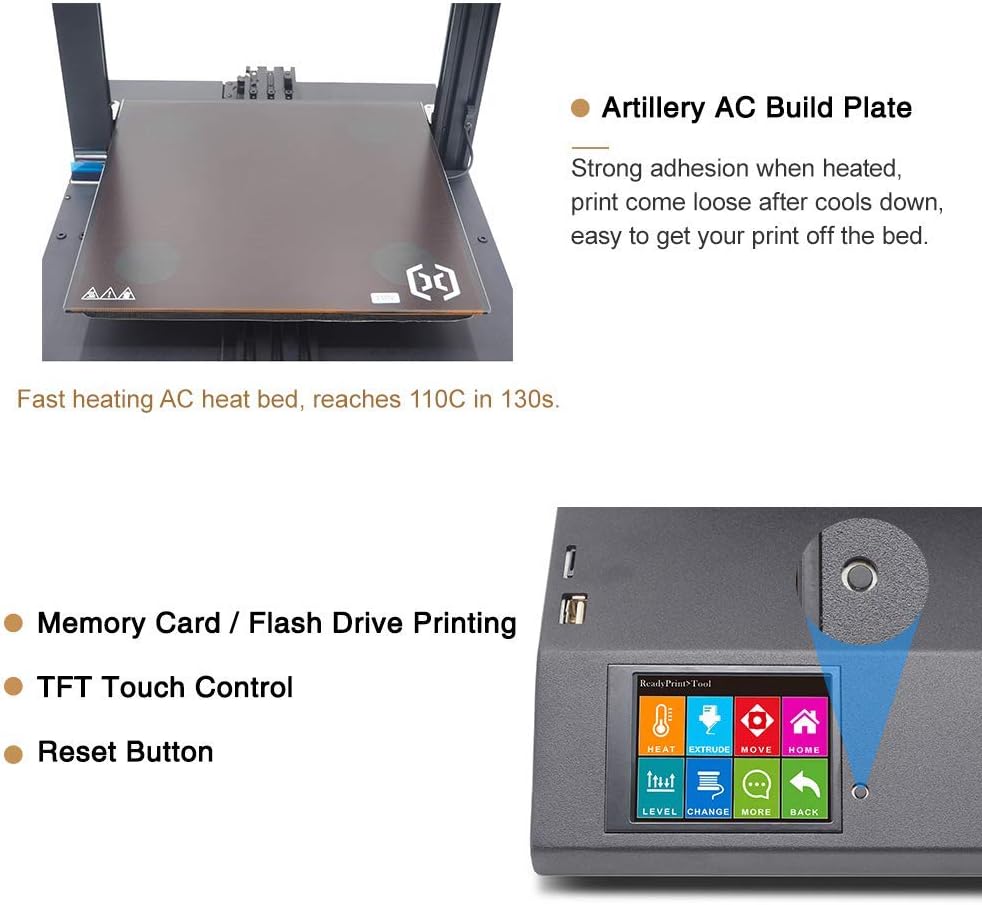
Figure 5.1: The Artillery AC Build Plate, known for its strong adhesion when heated, and the intuitive TFT Touch Control screen with a reset button for easy operation.
6. Техникалык тейлөө
Үзгүлтүксүз тейлөө 3D принтериңиздин оптималдуу иштешин жана узак иштөөсүн камсыздайт.
- Курулуш плитасын тазалаңыз: After each print, allow the build plate to cool completely before removing the print. Clean the surface with isopropyl alcohol to remove any residue.
- Соплолорду тазалоо: Periodically check the nozzle for clogs. Use the included needle or a brass brush to clean any filament buildup.
- Майлоо: Apply a small amount of lubricant to the Z-axis lead screws and smooth rods every few months or as needed.
- Кур чыңалуу: X жана Y огунун курлары туура тартылганын текшериңиз. Алар тартылып турушу керек, бирок өтө катуу болбошу керек.
- Программалык камсыздоонун жаңыртуулары: Расмий артиллерияны текшериңиз webиштин натыйжалуулугун жогорулатуу же жаңы функцияларды кошуу үчүн жеткиликтүү болгон программалык камсыздоонун жаңыртуулары үчүн сайт.
7. Кыйынчылыктарды
Бул бөлүм сиз кабылышы мүмкүн болгон жалпы көйгөйлөрдү карайт.
7.1 Басып чыгаруудагы кеңири таралган көйгөйлөр
- Биринчи катмардын начар адгезиясы:
- Курулуш плитасынын туура тегизделгенин текшериңиз.
- Verify the correct bed temperature for your filament type.
- Clean the build plate surface thoroughly.
- Filament Extruding эмес:
- Check for a clogged nozzle.
- Жип туура жүктөлгөнүн жана экструдердин тиштүү дөңгөлөгү аны бекем кармап турганын текшериңиз.
- Verify the hotend temperature is appropriate for the filament.
- Катмарды которуу:
- Check belt tension on X and Y axes.
- Ensure the printer is on a stable surface.
- Reduce print speed if necessary.
7.2 Электр энергиясынын үзгүлтүккө учурашын калыбына келтирүү
The Sidewinder X1 features power failure recovery. If power is interrupted during a print, the printer will attempt to resume from the last position once power is restored.

Figure 7.1: The printer's power failure detection system, which allows it to resume printing after a power outage, preventing print job ruin.
8. Техникалык шарттар
| Параметр | Нарк |
|---|---|
| Layer Resolution | 0.1мм |
| Frame | Алюминий экструзиясы |
| XYZ Positioning Accuracy | 0.05мм, 0.05мм, 0.1мм |
| Басма жип | PLA, ABS, TPU, ийкемдүү материалдар |
| Filament диаметри | 1.75мм |
| Сопло диаметри | 0.4мм |
| Максималдуу басып чыгаруу ылдамдыгы | 150 мм/с |
| Сапардын максималдуу ылдамдыгы | 250мм/сек |
| Build Volume | 300x300x400 мм |
| Экструдер түрү | Түздөн-түз Drive Extruder |
| Maximum Build Plate Temperature | 130°C |
| Power талап | 110V |
| Байланыш | USB, TF Card, USB Stick |
| Башкаруу кеңеши | MKS Gen L |
| Сорпо түрү | Вулкан |
| Машинанын өлчөмдөрү | 550x405x640 mm (550x405x870 mm with spool holder) |
| Элемент Салмагы | 17.3 килограмм (38.1 фунт) |
| Колдоого алынган File Формат | slicer, prusaslicer, cura, kisslicer, ideamaker, slic3r, simplify3d |

Figure 8.1: A visual summary of the Artillery Sidewinder X1's technical specifications and dimensions.
9. Колдоо жана кепилдик
For any assistance, questions, or warranty inquiries, please contact Artillery customer support. You can typically find contact information on the official Artillery webсайт же продукт сатылып алынган сатуучу аркылуу.
As per the product description, for help or questions, contact "Rxlife" (the seller) by clicking "Ask a question" behind "sold by".


