Introduction
The Argo Relax Style portable air conditioner is designed for efficient and compact cooling. Featuring a vertical design concept (VDC), this unit offers powerful performance in a sleek, modern form factor. It combines a high-gloss front finish with matte side panels for an ergonomic grip and contemporary aesthetic.
This appliance provides three primary functions: cooling, ventilation, and dehumidification. It also offers three fan speeds, including an automatic speed setting, to suit various comfort needs. The unit incorporates automatic condensation vaporization during cooling operation and allows for continuous condensate drainage in dehumidification mode. It utilizes a refrigerant gas with a Global Warming Potential (GWP) close to zero, reflecting an environmentally conscious design.

Сүрөт 1: Алдыңкы view of the Argo Relax Style Portable Air Conditioner.
Коопсуздук маалыматы
Сураныч, шайманды иштетүүдөн мурун бардык коопсуздук нускамаларын кылдат окуп чыгыңыз. Бул нускамаларды аткарбоо электр шокуна, өрткө же олуттуу жаракатка алып келиши мүмкүн.
- электр менен жабдууну камсыз кылуу voltage бирдиктеги рейтинг белгисине дал келет.
- Электр шнурунун же сайгычтын бузулушу менен аппаратты иштетпеңиз.
- Аба кирүүчү же чыгуучу жерлерди жаап албаңыз. Аба агымынын туура агымы үчүн аппараттын айланасында тийиштүү боштукту сактаңыз.
- Аба чыгаруучу тешиктерге нерселерди салбаңыз.
- Аппаратты тез күйүүчү материалдардан жана жылуулук булактарынан алыс кармаңыз.
- Тазалоодон же техникалык тейлөөдөн мурун ар дайым розеткадан ажыратыңыз.
- Бул шайман физикалык, сезүү же акыл-эс жөндөмү начар же тажрыйбасы жана билими жок адамдар (анын ичинде балдар) үчүн, эгерде алардын коопсуздугуна жооптуу адам тарабынан көзөмөлсүз же шайманды колдонуу боюнча көрсөтмө болбосо, колдонууга арналбайт.
- Балдар шайман менен ойнобошу үчүн аларды көзөмөлгө алуу керек.
Продукт компоненттери
The Argo Relax Style portable air conditioner comes with several components necessary for its operation and installation. Familiarize yourself with these parts before setup.
- Негизги кондиционер
- Ийкемдүү соргуч шланг
- Window Adapter Kit (for exhaust hose)
- Multi-function Remote Control with LED screen
- Drainage Hose (for continuous dehumidification)
- Air Filter (removable for cleaning)
- Multi-directional Wheels and Handle for portability

Figure 2: Included components: flexible hose, window adapter, remote control, and drainage hose.
Жайгашуу
1. таңгактан чыгаруу
Кондиционерди жана бардык аксессуарларды таңгактан этияттык менен алып салыңыз. Келечекте сактоо же ташуу үчүн баштапкы таңгакты сактап коюңуз.
2. Жайгаштыруу
Place the unit on a flat, stable surface. Ensure there is at least 30 cm (12 inches) of space around the unit for proper air circulation. Position the unit near a window or opening where the exhaust hose can be vented to the outside.

3-сүрөт: Мисample placement of the air conditioner in a room.
3. Чыгаруучу түтүктү орнотуу
- Attach one end of the flexible exhaust hose to the air outlet on the back of the unit.
- Connect the window adapter to the other end of the exhaust hose.
- Open a window or sliding door and place the window adapter securely in the opening to vent hot air outside. For fixed glass installations, use the provided kit. Ensure the hose is as straight and short as possible to maximize efficiency.
4. Drainage (Dehumidification Mode)
For continuous dehumidification, connect the drainage hose to the continuous drainage port on the unit and direct the other end to a suitable drain or container. In cooling mode, condensation is automatically vaporized.
5. Power Connection
Plug the power cord into a grounded electrical outlet. Ensure the outlet meets the electrical requirements specified in the 'Specifications' section.
Иштөө нускамалары
Башкаруу панелиview
Башкаруу панели түзмөктүн үстүнкү жагында жайгашкан жана LED дисплей жана ар кандай баскычтар менен жабдылган.

Figure 4: Top control panel of the unit.
- Күйгүзүү/өчүрүү баскычы: Аппаратты күйгүзөт же өчүрөт.
- Режим баскычы: Cycles through Cooling, Fan, and Dehumidification modes.
- Temperature/Timer Adjustment Buttons (+/-): Adjusts desired temperature or sets timer duration.
- Желдетүүчү ылдамдык баскычы: Желдетүүчү ылдамдыкты тандайт (Төмөн, Орто, Жогорку, Авто).
- Селкинчек баскычы: Activates or deactivates the automatic oscillation of the motorized louvers.
- Уйку баскычы: Activates sleep mode for quieter operation and gradual temperature adjustment.
- Таймер баскычы: Sets the 24-hour programmable timer for automatic on/off.
Алыстан башкаруу
The unit can be operated using the included multi-function remote control, which mirrors the functions of the control panel.
Иштөө режимдери
- Муздатуу режими: Reduces room temperature. Set desired temperature using the +/- buttons. The unit will cool until the set temperature is reached.
- Күйөрман режими: Circulates air without cooling. Select desired fan speed.
- Нымсыздандыруу режими: Removes excess moisture from the air. Connect the continuous drainage hose for optimal performance in this mode.
Атайын функциялар
- 24 сааттык программалануучу таймер: Allows you to set a specific time for the unit to turn on or off automatically.
- Уйку функциясы: Optimizes operation for nighttime comfort, typically by gradually increasing the set temperature and reducing fan speed.
- Эстутум функциясы: The unit retains your last settings when powered off and on.
- Auto-Diagnosis: The unit can perform self-diagnosis to identify potential issues.
- Motorized Louvers: The discharge fins are motorized and can be oriented horizontally and vertically with automatic oscillation for better air distribution.
Техникалык тейлөө
Regular maintenance ensures optimal performance and extends the lifespan of your air conditioner. Always unplug the unit before cleaning or maintenance.
1. Аба чыпкасын тазалоо
The air filter should be cleaned regularly, typically every two weeks, or more frequently depending on usage and air quality. A dirty filter can reduce cooling efficiency and airflow.
- Locate the air filter, usually on the back or side of the unit. It is easily removable.
- Фильтрди акырын тартып чыгарыңыз.
- Clean the filter using a vacuum cleaner to remove dust, or wash it with lukewarm water and a mild detergent.
- Чыпканы жакшылап чайкап, аны кайра аппаратка салуудан мурун толугу менен кургатыңыз.

5-сүрөт: Каптал view indicating air intake vents where the filter is located.
2. Конденсат дренажы
While the unit features automatic condensation vaporization in cooling mode, it's important to be aware of drainage for dehumidification or if the internal tank fills up.
- Automatic Vaporization: In cooling mode, most condensation is evaporated and expelled with the hot air.
- Үзгүлтүксүз дренаж: For prolonged dehumidification or in very humid conditions, connect the provided drainage hose to the continuous drainage port to allow water to drain directly.
- Кол менен кургатуучу дренаж: If the internal tank becomes full (indicated by an error code or indicator light), turn off the unit, unplug it, and carefully move it to a location where water can be drained from the bottom drainage plug into a shallow pan.
3. Агрегатты тазалоо
Агрегаттын сыртын жумшак менен сүртүңүз, гamp кездеме. Катуу химиялык заттарды, абразивдерди же эриткичтерди колдонбоңуз, анткени алар бетке зыян келтириши мүмкүн.
4. Сактоо
Before storing the unit for an extended period (e.g., off-season):
- Ensure all water has been drained from the unit.
- Аба чыпкасын тазалаңыз.
- Электр шнурунун розеткасын сууруп, аны тыкан ороп алыңыз.
- Store the unit in a cool, dry place, preferably in its original packaging, to protect it from dust and damage.
- If the unit has been stored horizontally, allow it to stand upright for at least 4 hours before restarting operation.
Проблемаларды чечүү
Кардарларды колдоо кызматына кайрылуудан мурун, төмөнкү жалпы көйгөйлөрдү жана аларды чечүү жолдорун караңыз:
| Көйгөй | Мүмкүн себеп | Чечим |
|---|---|---|
| Түзмөк күйбөйт. | Электр кубаты жок, шнур ажыратылган, өчүргүч өчүрүлгөн. | Электр кубатына туташууну текшериңиз, розетка иштеп жатканын текшериңиз, автоматтык өчүргүчтү баштапкы абалга келтириңиз. |
| Аппарат иштеп жатат, бирок муздабайт. | Exhaust hose not properly vented, room too large, windows/doors open, dirty air filter, temperature setting too high. | Ensure exhaust hose is vented outside, close windows/doors, clean air filter, lower temperature setting. |
| Агрегат ызы-чуу. | Normal operating noise (fan/compressor), unit not on a level surface, internal components vibrating. | Ensure unit is on a flat, stable surface. Some operating noise is normal for portable units. |
| Суунун агып чыгышы. | Drainage plug not secured, continuous drainage hose blocked or disconnected, internal water tank full. | Check drainage plug, ensure hose is properly connected and clear, drain internal tank if full. |
| Пульт иштебей жатат. | Batteries dead or incorrectly inserted, obstruction between remote and unit. | Replace batteries, ensure clear line of sight to the unit's receiver. |
Бул чечимдерди колдонуу аракетинен кийин көйгөй чечилбесе, кардарларды колдоо кызматына кайрылыңыз.
Техникалык шарттар
The following table provides detailed technical specifications for the Argo Relax Style portable air conditioner:
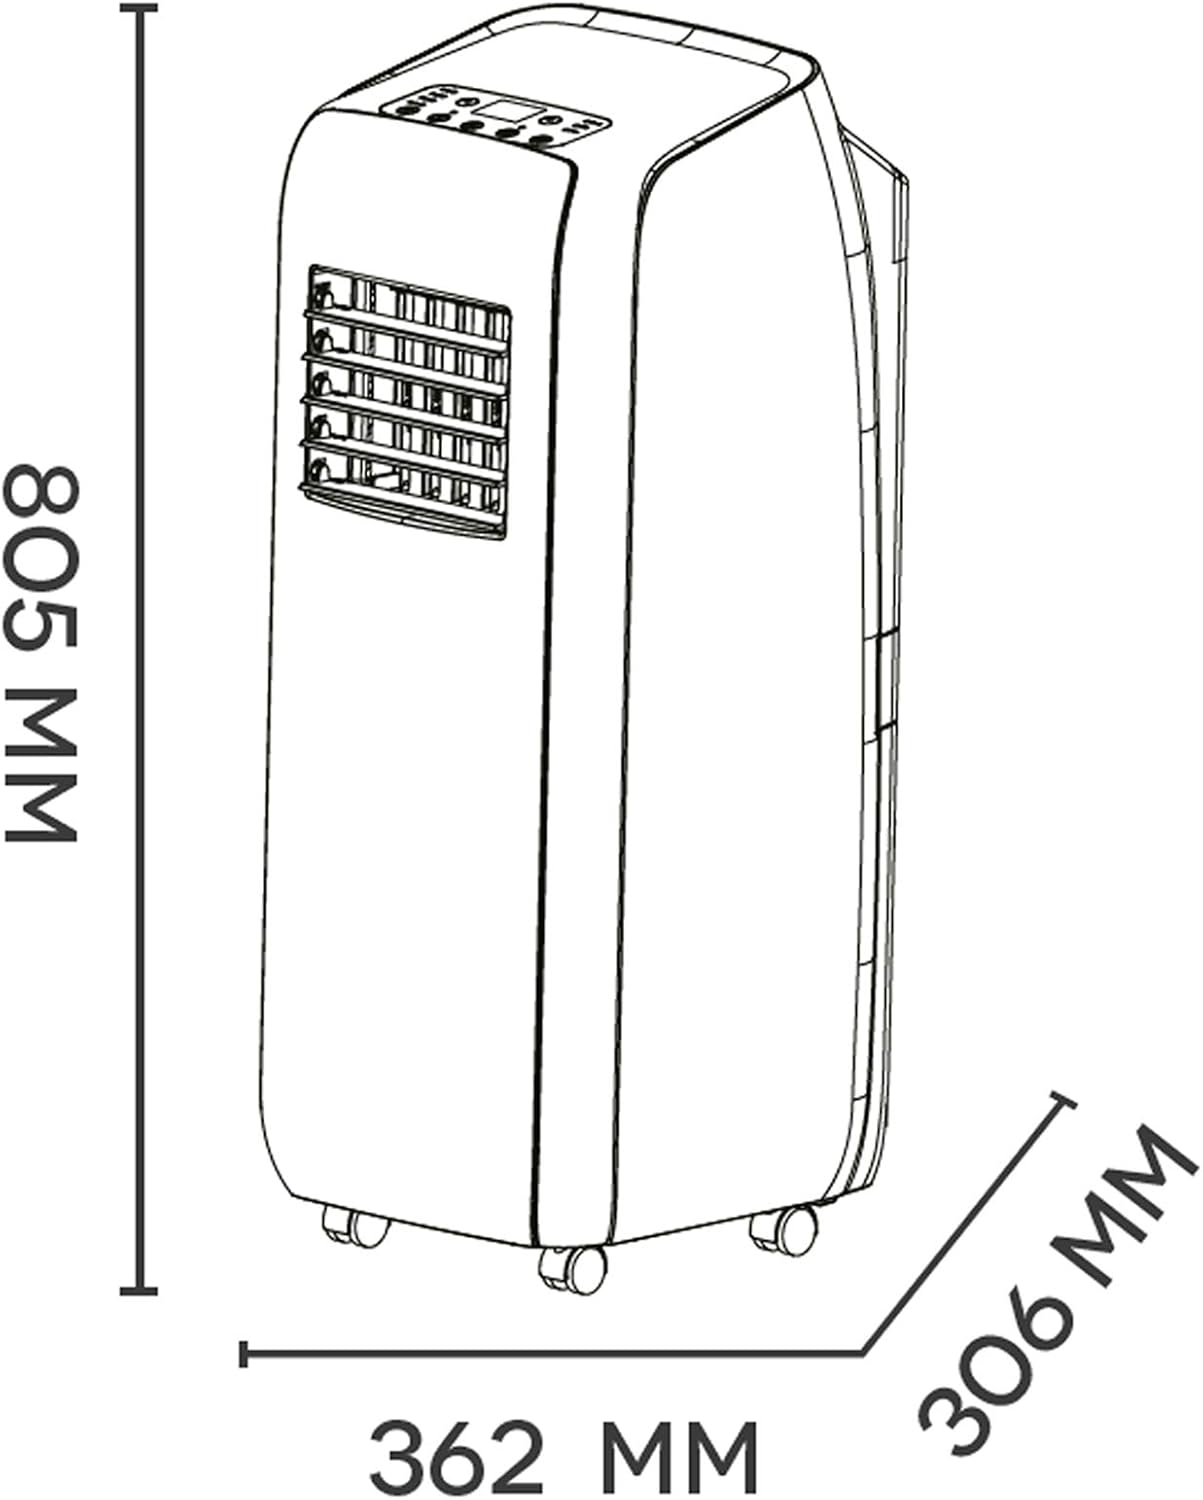
Figure 6: Dimensions of the unit.
| Өзгөчөлүк | Спецификация |
|---|---|
| Бренд | Арго |
| Модель номери | RELAX STYLE |
| Продукциянын өлчөмдөрү (L x W x Y) | 36.2 x 30.6 x 80.5 см (14.25 x 12.05 x 31.69 дюйм) |
| Салмагы | 28 кг (61.7 фунт) |
| Энергия эффективдүүлүгү классы | A |
| Муздатуу кубаттуулугу | 10000 2.6 BTU/h (XNUMX кВт) |
| Ызы-чуу деңгээли | 64 дБ |
| Тtage | 230 вольт |
| Энергияны керектөө | 2600 Ватт |
| Орнотуу түрү | Portable |
| Камтылган компоненттер | Product, manual, remote control, warranty, flexible hose, window adapter, fixed glass installation kit |
Кепилдик жана колдоо
For warranty information, please refer to the warranty card included with your product or visit the official Argo webсайт. Сатып алганыңыздын далили катары сатып алуу дүмүрчөгүңүздү сактаңыз.
For technical support, spare parts, or service inquiries, please contact Argo customer service. Contact details can typically be found in the product packaging or on the manufacturer's official webсайт.
Маанилүү: Do not attempt to repair the unit yourself. Unauthorized repairs will void the warranty and may pose safety risks.


