1. Киришүү
This manual provides detailed instructions for the safe and effective operation of the AOPUTTRIVER AP-570T-APP Bluetooth Digital Clamp Multimeter. This device is designed for measuring AC/DC voltage, AC/DC current, resistance, capacitance, frequency, duty cycle, and temperature. It also features diode testing, continuity testing, and a data hold function. The integrated Bluetooth connectivity allows for remote monitoring and data logging via a dedicated mobile application.

Figure 1: AOPUTTRIVER AP-570T-APP Digital Clamp Multimeter. This image shows the front view of the multimeter, highlighting its display and rotary switch.
2. Коопсуздук маалыматы
To ensure safe operation, please read and understand all safety warnings and operating instructions before using this instrument. Failure to observe these warnings can result in severe injury or death.
- Ар дайым жергиликтүү жана улуттук коопсуздук эрежелерин сактаңыз.
- Эгерде ал бузулуп калса же сыноо өткөргүчтөрүнүн изоляциясы бузулса, эсептегичти колдонбоңуз.
- Эсептегичтин белгилүү бир вольтто иштешин текшериңизtagколдонуудан мурун электрондук булактан окуңуз.
- Баалангандан ашык колдонбоңузtage, as marked on the meter, between the terminals or between any terminal and ground.
- Том менен иштөөдө этият болуңузtag30V AC RMS, 42V пик же 60V DC жогору. Бул томtagшок коркунучун жаратат.
- Ар дайым чынжырдагы кубатты ажыратып, бардык жогорку көлөмдү чыгарыңызtagкаршылыкты, үзгүлтүксүздүктү, диодду же сыйымдуулукту өлчөөдөн мурун e конденсаторлор.
- Өлчөө учурунда манжаларды сыноо зонддорунун манжаларынын артына кармаңыз.
- Батареянын аз көрсөткүчү так көрсөткүчтөрдү камсыз кылуу үчүн дароо батареяны алмаштырыңыз.
- The device is rated IEC 61010-1, CAT IV 600 V, CAT III 1000 V, Class 2, with double insulation.
3. Продукциянын өзгөчөлүктөрү
The AOPUTTRIVER AP-570T-APP offers a range of features for comprehensive electrical testing:
- Digital Multimeter Functions: 4000 counts, optional auto/manual range for AC current. Auto range for DC current, AC/DC voltage, resistance, capacitance, frequency, and duty cycle. Backlit display, data hold, temperature (℃/℉), diode test, relative value, continuity test with audible alarm.
- Температураны өлчөө: Measures temperature in Celsius (℃) and Fahrenheit (℉) with an included thermocouple probe, ranging from -20℃ to 1000℃.
- Bluetooth байланышы: Connects to Android/iOS phones for remote control, monitoring, continuous testing, and data logging. Data can be saved in TXT or Excel formats.
- High Precision Clamp Метр: Offers 1A resolution for AC/DC current from 1A to 1000A, suitable for high and low current measurements. Jaw opening of 45mm.
- Туруктуу дизайн: Engineered to withstand drops and harsh work site conditions, meeting IEC 61010-1 safety standards.
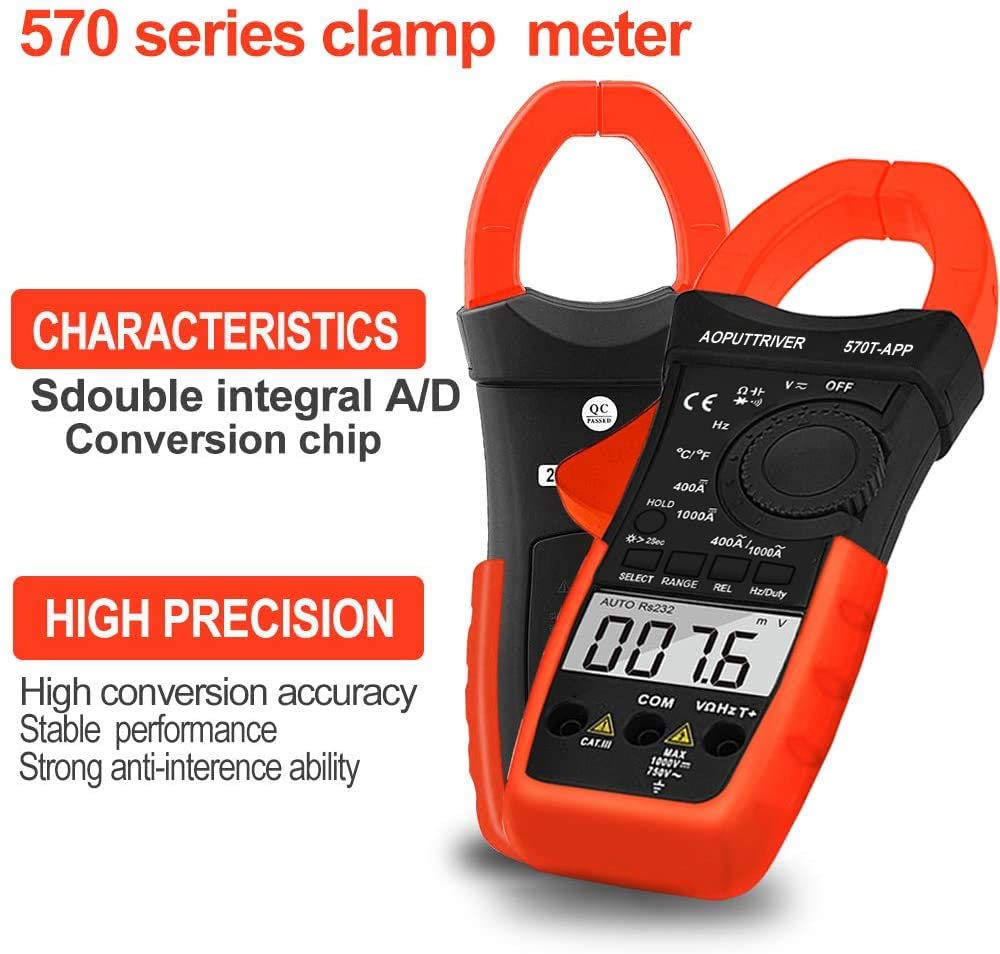
Figure 2: Key characteristics of the AP-570T-APP clamp meter, highlighting its double integral A/D conversion chip and high precision for stable performance.
4. Компоненттер жана башкаруу элементтери
Familiarize yourself with the parts of your AP-570T-APP multimeter:
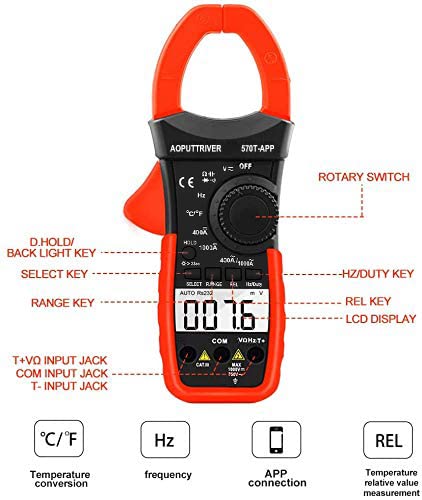
Figure 3: Diagram illustrating the main controls and input jacks of the AP-570T-APP multimeter.
- Айлануучу которгуч: Used to select measurement functions (e.g., V~, V-, A~, A-, Ω, Hz, ℃/℉, Diode, Continuity).
- LCD дисплей: Өлчөө көрсөткүчтөрүн, бирдиктерин жана функциянын көрсөткүчтөрүн көрсөтөт.
- D.HOLD / Backlight Key: Press briefly to hold the current reading; press and hold to activate/deactivate the backlight.
- ТАНДОО Ачкычын: Функциянын ичиндеги ар кандай өлчөө режимдеринин ортосунда которулат (мисалы, AC/DC көлөмү,tage, Диод/Үзгүлтүксүздүк).
- RANGE ачкычы: Switches between auto-ranging and manual-ranging modes.
- REL ачкычы: Activates the relative measurement function.
- Hz/Кызмат баскычы: Жыштыкты же жумуш циклин өлчөөнү тандайт.
- Киргизүү уячалары:
- COM: Common input jack for all measurements.
- VΩHzT+: Positive input jack for voltage, resistance, frequency, and temperature measurements.
- T-: Negative input jack for temperature measurements (used with thermocouple).
- Clamp Жаак: Used for non-contact AC/DC current measurement. Maximum opening: 45mm.

Сүрөт 4: Жакын пландан view учурдагы clamp jaw, showing its 45mm opening and the secure closure mechanism.
5. Орнотуу
5.1 Батареяны орнотуу
Мультиметр бир 9V батарейканы талап кылат (кошулган). Батареяны орнотуу же алмаштыруу үчүн:
- Мультиметр өчүрүлгөнүн текшериңиз.
- Аппараттын артындагы батарея бөлүкчөсүнүн капкагын табыңыз.
- Use a small screwdriver (included) to loosen the screw securing the cover.
- Капкакты алып салыңыз.
- 9V батареяны туура полярдуулукту сактап, батареянын кыскычтарына туташтырыңыз.
- Батареяны бөлүккө салып, капкакты буроо менен бекитип, ордуна коюңуз.
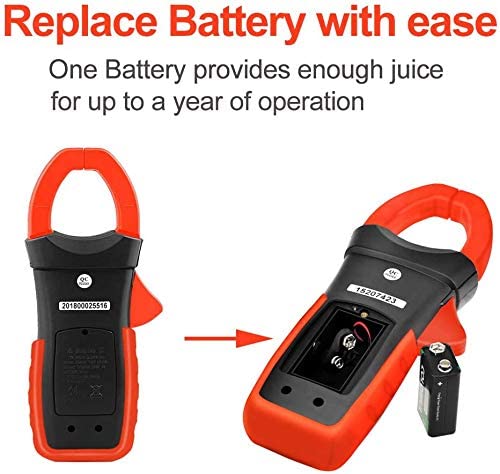
Figure 5: Illustration of how to access and replace the 9V battery in the AP-570T-APP multimeter.
5.2 Mobile App Connection (Bluetooth)
The AP-570T-APP can connect to your smartphone via Bluetooth for enhanced functionality.
- Download the "AP-570T-APP" application from your device's app store (Android/iOS).
- Смартфонуңузда Bluetooth иштетилгенин текшериңиз.
- Turn on the AOPUTTRIVER AP-570T-APP multimeter.
- Open the downloaded application on your phone.
- The app should automatically detect and connect to the multimeter. Follow any on-screen prompts if pairing is required.
- Туташкандан кийин, мүмкүн view real-time measurements, log data, and control certain functions remotely.

Figure 6: The AP-570T-APP multimeter displayed alongside a smartphone showing its connected application interface, demonstrating remote monitoring capabilities.
6. Иштөө нускамалары
Always ensure the meter is set to the correct function and range before making any measurements. Connect test leads to the appropriate input jacks.
6.1 AC/DC Voltage Өлчөө
- Insert the red test lead into the VΩHzT+ jack and the black test lead into the COM jack.
- Айланма которгучту V~ (AC Voltagд) же V- (ТК көлөмүtagд) кызмат орду.
- If measuring AC voltage, press the SELECT button to toggle between AC and DC if necessary (for combined V~ / V- position).
- Сыноо зонддорун текшерилип жаткан схемага же компонентке параллель туташтырыңыз.
- Томду окуңузtage дисплейдеги e мааниси.

7-сүрөт: Мисample of performing a DC current test using the clamp function on electrical wiring.
6.2 AC/DC Ток өлчөө (Clamp)
Учурдагы өлчөөлөр үчүн cl колдонуңузamp жаак. Токту өлчөө үчүн сыноо өткөргүчтөрүн колдонбоңузamp функция.
- Turn the rotary switch to the 400A/1000A~ (AC Current) or 400A/1000A- (DC Current) position.
- cl ачыңызamp jaw and enclose only one conductor of the circuit. Ensure the jaw is fully closed.
- ЖК дисплейдеги учурдагы маанини окуңуз.
6.3 Каршылыкты өлчөө
- Insert the red test lead into the VΩHzT+ jack and the black test lead into the COM jack.
- Айлануучу которгучту Ω абалына буруңуз.
- Ensure the circuit is de-energized before connecting the probes.
- Сыноо зонддорун өлчөй турган компонентке туташтырыңыз.
- ЖК дисплейдеги каршылыктын маанисин окуңуз.
6.4 Үзгүлтүксүздүк тести
- Insert the red test lead into the VΩHzT+ jack and the black test lead into the COM jack.
- Turn the rotary switch to the Ω position. Press SELECT until the continuity symbol (speaker icon) appears.
- Схема кубаты өчүрүлгөнүн текшериңиз.
- Сыноо зонддорун компонент же чынжыр жолу аркылуу туташтырыңыз.
- Эгерде үзгүлтүксүздүк бар болсо (каршылык болжол менен 50Ω төмөн), эсептегич үн чыгарат.
6.5 Диоддун сыноосу
- Insert the red test lead into the VΩHzT+ jack and the black test lead into the COM jack.
- Turn the rotary switch to the Ω position. Press SELECT until the diode symbol (triangle with line) appears.
- Схема кубаты өчүрүлгөнүн текшериңиз.
- Кызыл зондду анодго, ал эми кара зондду диоддун катодуна туташтырыңыз. Алдыга вольтtage drop (e.g., 0.5V to 0.8V) will be displayed.
- Зонддорду тескери буруңуз. Жакшы диод үчүн дисплейде "OL" (Open Loop) көрсөтүлүшү керек.
6.6 Сыйымдуулукту өлчөө
- Insert the red test lead into the VΩHzT+ jack and the black test lead into the COM jack.
- Turn the rotary switch to the capacitance symbol (capacitor icon).
- Сыноодон мурун конденсатордун толук зарядсыздангандыгын текшериңиз.
- Сыноочу зонддорду конденсатордун терминалдарына туташтырыңыз.
- ЖК дисплейдеги сыйымдуулуктун маанисин окуңуз.
6.7 Жыштык жана кызматтык циклди өлчөө
- Insert the red test lead into the VΩHzT+ jack and the black test lead into the COM jack.
- Айлануучу которгучту Гц абалына буруңуз.
- Press the Hz/Duty key to toggle between frequency (Hz) and duty cycle (%).
- Connect the test probes in parallel to the circuit where the frequency or duty cycle is to be measured.
- LCD дисплейиндеги маанини окуп чыгыңыз.
6.8 Температураны өлчөө
- Ensure the multimeter is OFF.
- Insert the thermocouple probe into the VΩHzT+ (positive) and T- (negative) jacks. Observe polarity.
- Turn the rotary switch to the ℃/℉ position.
- Press the SELECT button to toggle between Celsius and Fahrenheit.
- Place the tip of the thermocouple probe on or near the object whose temperature is to be measured.
- ЖК дисплейдеги температуранын маанисин окуңуз.
7. Техникалык тейлөө
Туура тейлөө мультиметриңиздин узак мөөнөттүү жана тактыгын камсыздайт.
- Тазалоо: Ишти жарнама менен сүртүңүзamp кездеме жана жумшак жуугуч. Абразивдерди же эриткичтерди колдонбоңуз.
- Батареяны алмаштыруу: Дисплейде батареянын заряды аз калганын көрсөткөн индикатор пайда болгондо, 9V батареяны алмаштырыңыз. Нускамаларды 5.1-бөлүмдөн караңыз.
- Сактагыч: If the meter is not used for an extended period, remove the battery to prevent leakage. Store in a cool, dry place away from direct sunlight.
- Калибрлөө: Кесипкөй колдонуу үчүн, тактыкты сактоо үчүн квалификациялуу техник тарабынан мезгил-мезгили менен калибрлөө сунушталат.
8. Кыйынчылыктарды
If you encounter issues with your AP-570T-APP multimeter, refer to the table below:
| Көйгөй | Мүмкүн себеп | Чечим |
|---|---|---|
| Эсептегич күйбөйт. | Өлүк же туура эмес орнотулган батарея. | Check battery polarity; replace battery if dead. |
| "OL" (Ашыкча жүктөө) көрсөтүлөт. | Өлчөө тандалган диапазондон же метрдин максималдуу сыйымдуулугунан ашып кетти. | Select a higher range or ensure the measurement is within the meter's specifications. |
| Туура эмес окуулар. | Low battery, incorrect function/range, or poor test lead connection. | Replace battery, verify function/range, ensure secure test lead connection. |
| Bluetooth тез -тез ажыратылат. | Interference, distance from phone, or app issue. | Reduce distance to phone, minimize interference, restart multimeter and app. |
| Үзгүлтүксүздүк сигналы жок. | Circuit resistance too high, or continuity function not selected. | Ensure continuity function is active; check for open circuit. |
9. Техникалык шарттар
| Параметр | Нарк |
|---|---|
| Модель номери | AP-570CAPP-UK |
| Дисплей | Арткы жарыгы бар 4000 LCD дисплей |
| AC/DC ток диапазону | 1A to 1000A (1A resolution) |
| AC/DC Voltage Диапазон | Auto колому |
| Каршылык диапазону | Auto колому |
| Кубаттуулук диапазону | Auto колому |
| Жыштык диапазону | Auto колому |
| Температура диапазону | -20℃ to 1000℃ (or -4℉ to 1832℉) |
| Жаак ачуу | 45 мм |
| Коопсуздук рейтинги | IEC 61010-1, CAT IV 600 V, CAT III 1000 V, Class 2, Double Insulation |
| Power Source | 1 x 9V батарея |
| Продукциянын өлчөмдөрү (L x W x Y) | 22.5 x 9.7 x 4 см |
| Салмагы | 600 грамм |
| UPC | 778469101803 |
10. Кепилдик жана колдоо
AOPUTTRIVER provides a 24-month warranty for this product. For technical support, warranty claims, or further assistance, please contact AOPUTTRIVER customer service through your purchase platform or the official brand webсайт.


