1. Киришүү
This manual provides comprehensive instructions for the setup, operation, and maintenance of your TechniSat TECHNISTAR S5 HD+ digital satellite receiver. Please read this manual thoroughly before using the device to ensure proper functionality and to maximize your viewing experience. The TECHNISTAR S5 HD+ is designed for receiving digital satellite television in HDTV quality, offering features such as integrated HD+ decryption, PVRReady for recording, and Timeshift functionality.
2. Коопсуздук маалыматы
ЭСКЕРТҮҮ: To reduce the risk of electric shock, do not open the device casinг. Бардык тейлөөлөрдү квалификациялуу тейлөө кызматкерлерине тапшырыңыз.
- Түзмөктүн туруктуу, тегиз бетке коюлганын текшериңиз.
- Аппаратты жамгырга же нымга тийгизбеңиз.
- Аппаратты радиаторлор, жылуулук регистрлери, мештер же башка аппараттар (анын ичинде) сыяктуу жылуулук булактарынын жанына коюудан алыс болуңуз. ampкөтөргүчтөр) жылуулукту пайда кылуучу.
- Өндүрүүчү тарабынан көрсөтүлгөн тиркемелерди/аксессуарларды гана колдонуңуз.
- Аппаратты чагылгандуу бороондордо же узак убакыт бою колдонбогондо электр розеткасынан ажыратыңыз.
- Ашыкча ысып кетүүнүн алдын алуу үчүн желдетүү тешиктерин ачык кармаңыз.
3. Пакеттин мазмуну
Пакетте бардык буюмдар бар экенин текшериңиз:
- 1 x TechniSat TECHNISTAR S5 HD+ Receiver
- 1 x Алыстан башкаруу
- 1 х энергия менен жабдуу бирдиги
- 1 х Колдонуучунун колдонмосу (бул документ)
- 2 x AAA батарейкалар (алыстан башкаруу үчүн)
4. Продукт бүтүп калдыview
4.1 алдыңкы панели
The front panel of the TECHNISTAR S5 HD+ features essential controls and indicators.

Сүрөт 4.1: Фронт view of the TechniSat TECHNISTAR S5 HD+ satellite receiver. It shows the display, power button, channel up/down buttons, and the HD+ logo.
- Дисплей: Канал номерин же убакытты көрсөтөт.
- Кубат баскычы: Turns the device on/off or to standby.
- Channel Buttons (V / ^): Navigates through channels.
- HD+ Logo: Indicates HD+ compatibility.
4.2 Арткы панель жана байланыштар
The rear panel provides all necessary ports for connecting the receiver to your television, satellite dish, and other devices.

Сүрөт 4.2: Арткы view of the TechniSat TECHNISTAR S5 HD+ satellite receiver, illustrating the various connection ports. These include Smartcard (Conax), CI+ slot, Ethernet, LNB (Sat-Eingang), USB, HDMI Out, A/V Out, S/PDIF Out, and Power input.
- Smartcard (Conax): Slot for Conax smartcards.
- CI+ Slot: Common Interface Plus slot for CI+ modules (e.g., for HD+ or Sky).
- Ethernet: For network connection and UPnP streaming.
- LNB (Sat-Eingang): Input for the satellite dish cable (F-connector).
- USB: For connecting external storage devices (USB stick or hard drive) for PVRReady and Timeshift functions.
- HDMI Чыгышы: Телевизоруңузга туташуу үчүн жогорку сапаттагы мультимедиялык интерфейс чыгышы.
- A/V Out: Analog audio/video output (requires specific TechniSat adapter, optional).
- S/PDIF чыгуусу: Digital audio output (electrical).
- Күч: Input for the external power supply unit.
5. Орнотуу
5.1 Кабыл алгычты туташтыруу
- Спутниктик байланыш: Connect your satellite dish cable to the "LNB (Sat-Eingang)" port on the rear panel.
- TV туташуу: Connect the receiver to your TV using an HDMI cable. Insert one end into the "HDMI Out" port on the receiver and the other into an available HDMI input on your TV.
- Кубат туташуу: Connect the power supply unit to the "Power" input on the receiver, then plug the power adapter into a wall outlet.
- Кошумча туташуулар:
- USB сактагыч: For recording and Timeshift, connect a USB stick or external hard drive to the "USB" port.
- Тармак: For UPnP and other network features, connect an Ethernet cable to the "Ethernet" port.
- CI+ Module: If you have a CI+ module (e.g., for HD+ or Sky), insert it into the "CI+ Slot".
5.2 First Installation (AutoInstall)
Upon first power-on, the receiver will guide you through an automatic installation process. This "AutoInstall" feature simplifies the initial setup, including channel search and basic settings.
- Сыналгыңызды күйгүзүңүз жана туура HDMI киргизүүнү тандаңыз.
- Power on the TECHNISTAR S5 HD+.
- Follow the on-screen instructions to select your language, country, and perform a channel scan. The receiver will automatically search for available satellite channels.
- The ISIPRO feature will assist with automatic station search and updates.

Сүрөт 5.2: TechniSat Comfort Services, highlighting features like SFI (Electronic Program Guide), ISIPRO (Program List Manager), AutoInstall (Easy First Installation), Password-protected User Profiles, and ISI Mode (Simplified Menus with Large Font).
6. Кабылдагычты иштетүү
6.1 Негизги функциялар
Use the provided remote control to navigate menus and control the receiver.
Сүрөт 6.1: The TechniSat remote control alongside a smartphone displaying the TechniSat Connect app interface, demonstrating both traditional and modern control methods.
- Канал тандоо: Use the number buttons or the CH+/CH- buttons to change channels.
- Үндү көзөмөлдөө: Use the VOL+/VOL- buttons.
- Меню навигациясы: Use the directional arrows and OK button to navigate through the on-screen menus.
- SFI (Service Information): Access the electronic program guide (EPG) to view программалар жана маалымат.
- ISIPRO: This feature automatically manages and updates your channel list, ensuring you always have the latest channel lineup.
- ISI Mode: A simplified menu mode with larger fonts, useful for users who prefer a less complex interface or as a child safety feature.
6.2 Recording (PVRReady) and Timeshift
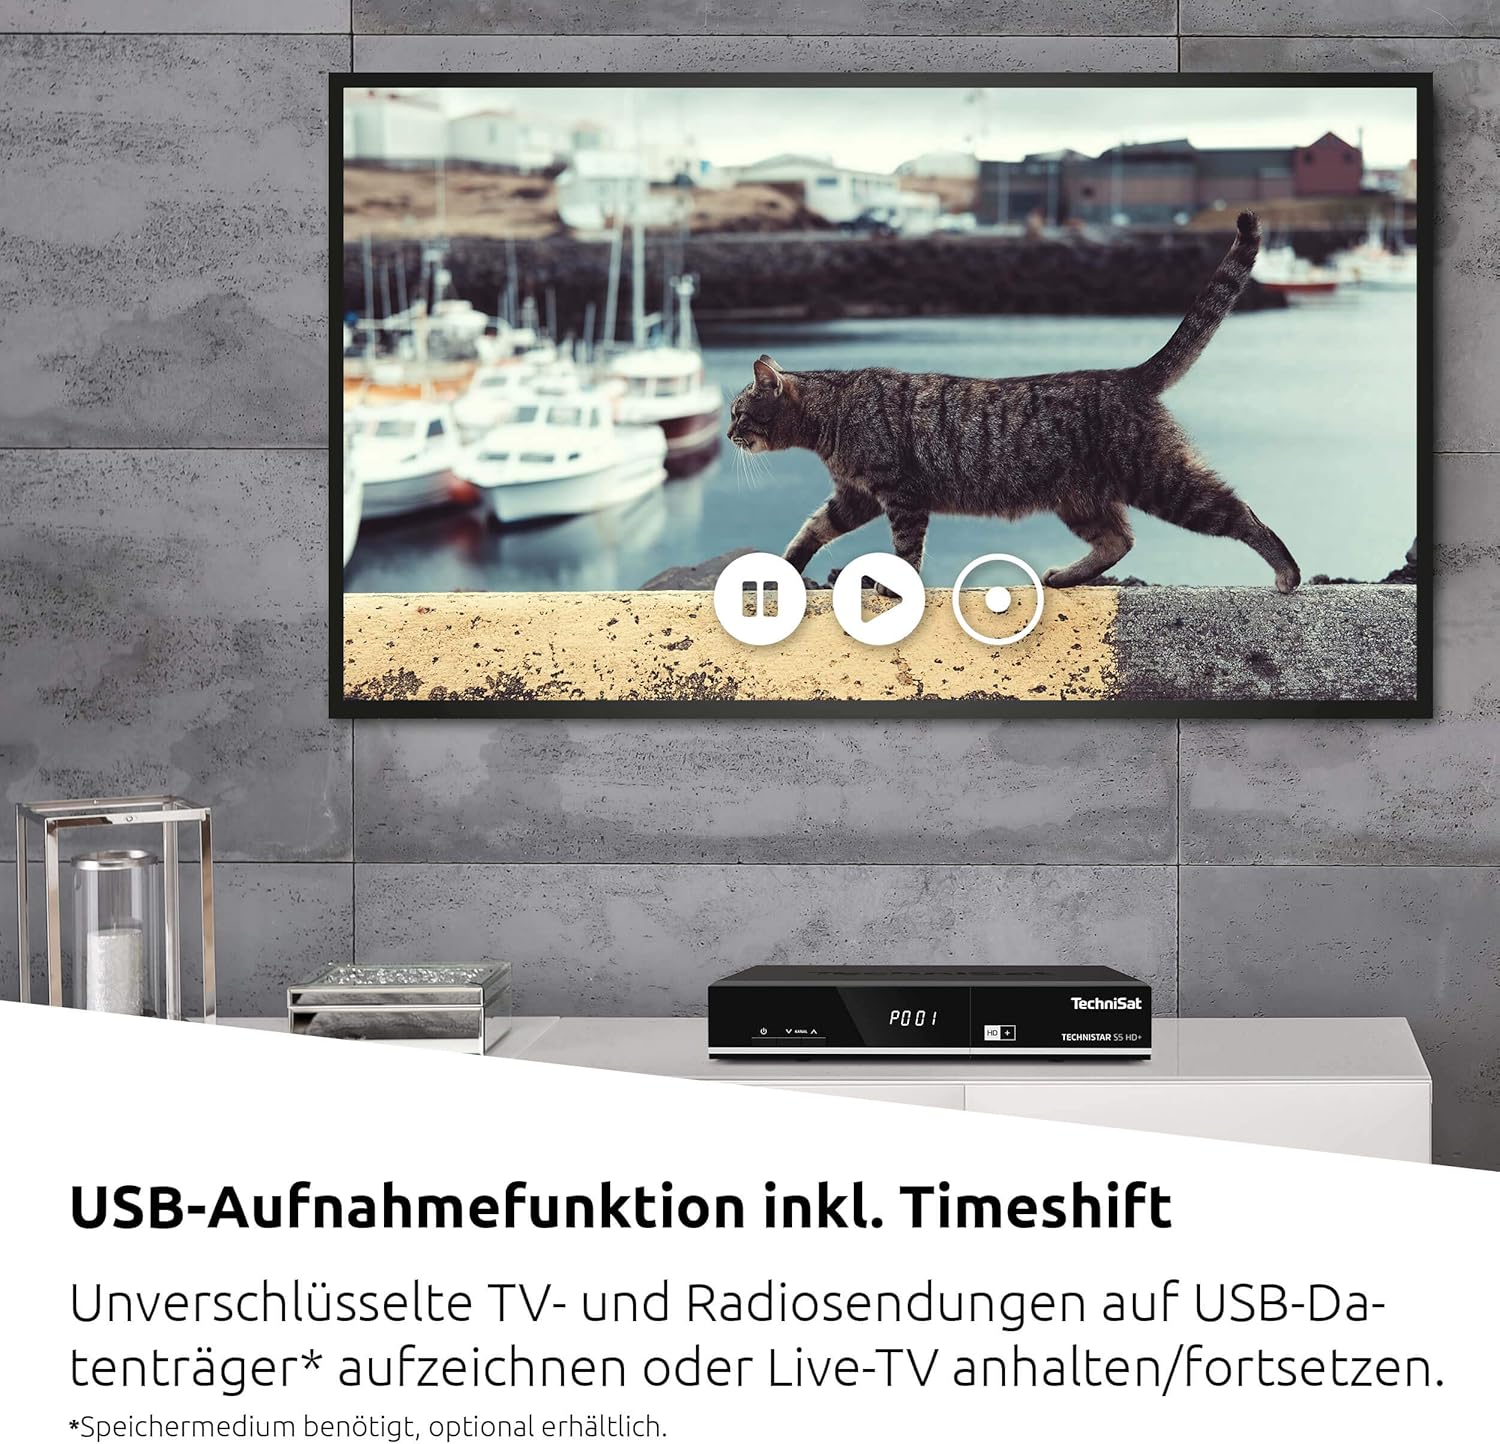
The TECHNISTAR S5 HD+ supports recording of unencrypted digital TV and radio programs to an external USB storage device (PVRReady). It also features Timeshift, allowing you to pause and resume live television.

Сүрөт 6.2: A television screen displaying a paused live broadcast, demonstrating the Timeshift function. The on-screen controls for play, pause, and rewind are visible.
- Жазуу үчүн: Connect a USB storage device (formatted as FAT32 or NTFS). While watching a program, press the "Record" button on your remote control.
- Timeshift: Press the "Pause" button during live TV to temporarily pause the broadcast. Press "Play" to resume from where you left off.
- Ойнотуу: Access recorded programs through the receiver's menu.
6.3 HD+ Features
The TECHNISTAR S5 HD+ includes an integrated decryption system for HD+.
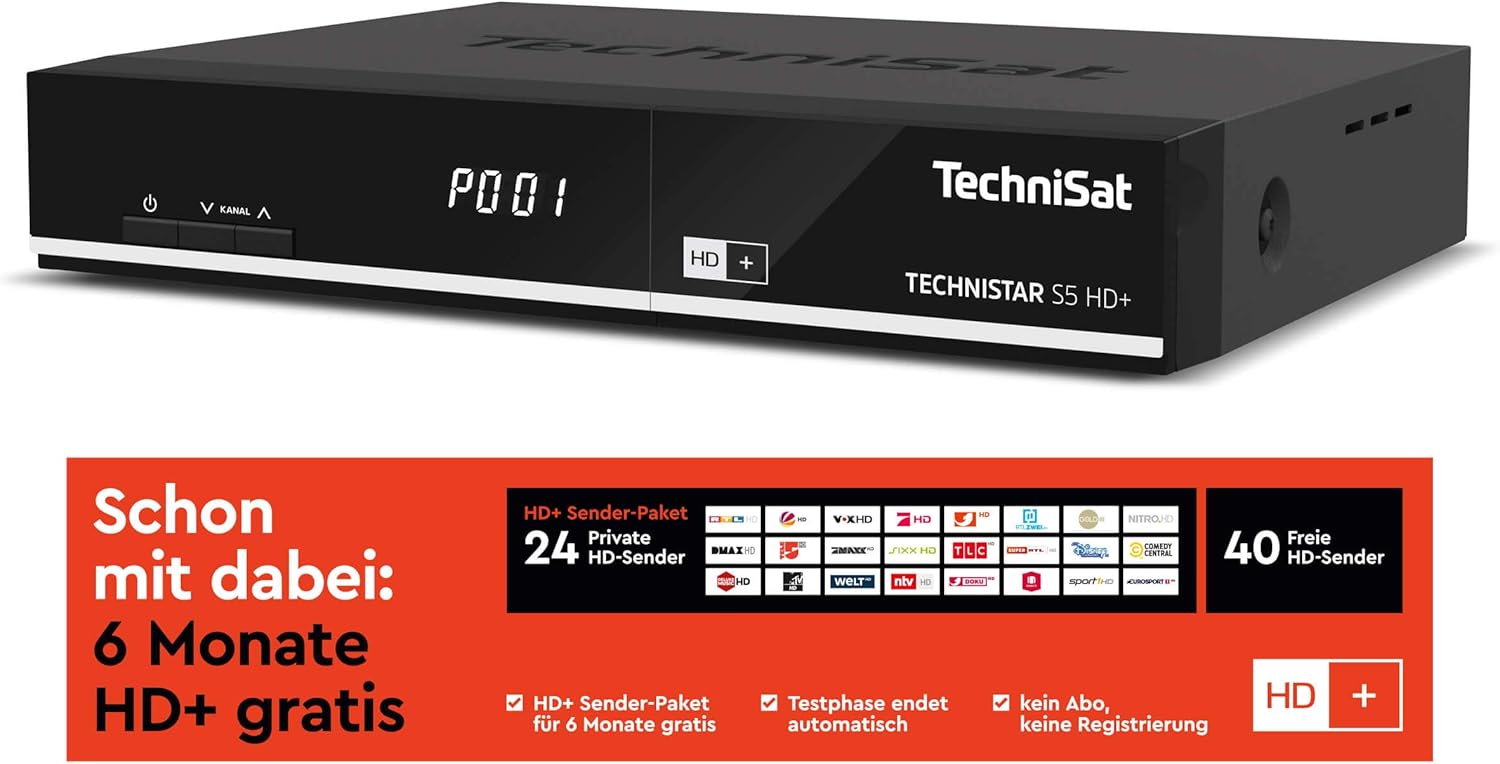
Сүрөт 6.3: Information regarding the HD+ channel package, indicating 6 months of free HD+ access, 24 private HD channels, and 40 free HD channels. It also states that the test phase ends automatically with no registration required.
- The device comes with 6 months of free HD+ access for 23 HD quality channels.
- Additional pay-TV offers, such as Sky, can be accessed via the CI+ interface with a compatible CI+ module and subscription.
6.4 TechniSat Connect App
The TechniSat Connect app can be used as a universal remote control for your receiver, offering convenient control from your smartphone or tablet.
- Download the TechniSat Connect app from your device's app store.
- Ensure your smartphone/tablet and the receiver are connected to the same local network.
- Follow the app's instructions to pair it with your TECHNISTAR S5 HD+.
7. Техникалык тейлөө
- Тазалоо: Disconnect the power before cleaning. Use a soft, dry cloth to clean the exterior of the receiver. Do not use liquid or aerosol cleaners.
- Вентиляция: Ensure that the ventilation slots on the device are not blocked to prevent overheating.
- Программалык камсыздоо жаңыртуулары: TechniSat'ты мезгил-мезгили менен текшерип туруңуз website or the receiver's menu for available software updates to ensure optimal performance and access to new features.
8. Кыйынчылыктарды
If you encounter issues with your TECHNISTAR S5 HD+, refer to the following common solutions:
- Сүрөт/үн жок:
- Check all cable connections (HDMI, LNB, power).
- Телевизоруңуз туура HDMI киргизүүсүнө коюлганын текшериңиз.
- Verify the receiver is powered on and not in standby mode.
- Спутник сигналы жок:
- Check the LNB cable connection.
- Ensure your satellite dish is correctly aligned.
- Perform a new channel scan via the receiver's menu.
- Алыстан башкаруу иштебейт:
- Check and replace the batteries (2x AAA).
- Пульт менен ресивердин ортосунда эч кандай тоскоолдуктар жок экенин текшериңиз.
- Жаздыруу маселелери:
- Ensure the USB storage device is properly connected and has sufficient free space.
- Verify the USB device is formatted correctly (FAT32 or NTFS).
- Note that only unencrypted programs can be recorded.
For more detailed troubleshooting or persistent issues, please consult the full online manual on the TechniSat webсайтка же кардарларды колдоо менен байланышыңыз.
9. Техникалык шарттар
| Бренд | TechniSat |
| Модель номери | 0000/4716 |
| Түс | Нейтралдуу (Кара) |
| Байланыш технологиясы | Ethernet, HDMI, USB |
| Жалпы USB порттору | 1 |
| Жалпы HDMI порттору | 1 |
| Аудио чыгаруу режими | Курчап |
| Тtage | 5 вольт |
| Жыштык диапазону | 950 МГц - 2150 МГц |
| Элемент Салмагы | 600 грамм |
| Камтылган компоненттер | Алыстан башкаруу |
| Батареялар | 2 AAA (кошулган) |
| Программалык камсыздоонун жаңыртууларына кепилдик берилет | Маалымат жеткиликтүү эмес |
| Запастык бөлүктөрдүн болушу | Маалымат жеткиликтүү эмес |
10. Кепилдик жана колдоо
For detailed information regarding warranty terms, software updates, and spare parts availability, please refer to the official TechniSat website or contact TechniSat customer support directly. Keep your proof of purchase for warranty claims.
TechniSat Official Webсайт: www.technisat.com


