1. Киришүү
This manual provides detailed instructions for the safe installation, operation, and maintenance of your Fantech PB270L10V-2 Dual Grille Bath Fan. This system is designed to provide efficient ventilation for bathrooms, featuring a powerful 270 CFM fan, one ceiling grille with an integrated 10W LED light, and one vent-only ceiling grille. It supports both 4-inch and 6-inch duct connections, offering flexible installation options for optimal air movement and moisture control.
Please read this manual thoroughly before beginning installation or operation to ensure proper function and to prevent potential hazards.
2. Коопсуздук маалыматы
ЭСКЕРТҮҮ: Өрт, электр шок же адамдардын жаракат алуу коркунучун азайтуу үчүн төмөнкүлөрдү сактаңыз:
- Монтаждоо иштери жана электр зымдары квалификациялуу адам(лар) тарабынан бардык колдонулуучу коддорго жана стандарттарга, анын ичинде өрткө каршы курулуш нормаларына жана стандарттарына ылайык аткарылышы керек.
- Бул аппаратты өндүрүүчү белгилеген тартипте гана колдонуңуз. Эгерде суроолоруңуз болсо, өндүрүүчүгө кайрылыңыз.
- Түзмөктү тейлөөдөн же тазалоодон мурун, тейлөө панелинен электр энергиясын өчүрүп коюңуз жана кубаттуулуктун кокусунан күйүп калышына жол бербөө үчүн кызматты ажыратуучу каражаттарды кулпулаңыз. Кызматты ажыратуу каражаттары кулпуланбаса, көрүнүктүү эскертүү түзмөгүн бекем бекиткиле, мисалы tag, тейлөө панелине.
- Do not use this fan with any solid-state speed control device unless specifically approved by the manufacturer.
- This product is UL Listed for wet locations, but proper installation to prevent water ingress into electrical components is crucial.
- Always wear safety glasses and gloves during installation.
3. Пакеттин мазмуну
Орнотууну улантуудан мурун, төмөндө көрсөтүлгөн бардык компоненттердин бар экендигин жана бузулбагандыгын текшериңиз:
- 1x Fantech PB270L10V-2 Inline Fan Unit
- 1x Ceiling Grille with 10W LED Light
- 1x Vent-Only Ceiling Grille
- 2x Grille Housings with Dampers
- 1x Y-Adapter (4x4x6 inches)
- 1x 14-watt Instant-On LED Bulb (for the lit grille)
- Монтаждоочу жабдыктар (буроолор, кашаалар)
- Орнотуу боюнча колдонмо
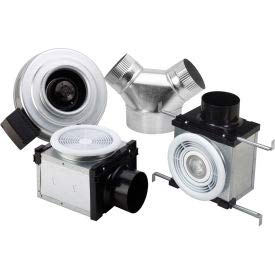
This image displays the various components included with the Fantech PB270L10V-2 bath fan system. It shows the inline fan motor, two separate grille housings (one with an integrated LED light, one without), and a Y-adapter for connecting ductwork. These parts are essential for setting up the dual-grille ventilation system.
4. Орнотуу
The Fantech PB270L10V-2 is designed for remote mounting, allowing for quiet operation by positioning the fan motor away from the living area. This system utilizes a Y-adapter to connect two ceiling grilles to a single fan unit.
4.1 Орнотууга чейинки текшерүүлөр
- Ensure the installation location complies with local building codes and electrical regulations.
- Verify that the power supply is 120V, 1PH.
- Confirm adequate space in the attic or joist space for the fan unit, ductwork, and grille housings.
- Plan the ducting runs to be as straight and short as possible to maximize airflow efficiency.
4.2 Fan Unit Mounting
- Select a suitable remote location for the fan unit, typically in an attic or utility space, away from the bathroom.
- Securely mount the fan unit to a sturdy structural member using appropriate fasteners. Ensure the unit is level.
4.3 Түтүк туташтыргычтары
- Install the two grille housings in the desired ceiling locations. These should be positioned directly over areas requiring ventilation, such as showers, whirlpool tubs, or toilets.
- Connect 4-inch or 6-inch ductwork from each grille housing to the Y-adapter. Use duct clampаба өткөрбөй турган туташууларды камсыз кылуу үчүн скотч же скотч.
- Connect the single output of the Y-adapter to the inlet of the Fantech fan unit.
- Connect the exhaust outlet of the fan unit to exterior venting using appropriate ductwork. Ensure the exhaust duct terminates outside the building, away from windows or air intakes.
- Minimize bends and kinks in the ductwork to maintain optimal airflow.
4.4 Электр зымдары
- Зымдарды туташтыра баштоодон мурун, автоматтык өчүргүчтүн кубаты ӨЧҮК экенин текшериңиз.
- Route 120V electrical wiring to the fan unit and to the grille housing with the LED light, if separate wiring is required for the light.
- Connect the fan unit wiring according to the wiring diagram provided with the unit and local electrical codes.
- Connect the LED light wiring within the grille housing. Install the 14-watt LED bulb into the designated socket.
- All electrical connections must be secure and properly insulated.
4.5 Торду орнотуу
- Once ducting and wiring are complete, attach the decorative grilles to their respective housings in the ceiling.
- Ensure the grilles are flush with the ceiling surface for a clean finish.
5. Операция
The Fantech PB270L10V-2 bath fan system is designed for straightforward operation.
5.1 Желдетүүчүнүн иштеши
The fan unit is typically controlled by a wall switch (not included). Flip the switch to the 'ON' position to activate the fan. The fan will begin to draw air from both grille locations, exhausting it to the outside. The remote-mounted design ensures quiet operation within the living space.
5.2 LED жарыктын иштеши
The 10W LED light integrated into one of the grilles is also controlled by a separate or combined wall switch. Turn the switch to 'ON' to illuminate the area. The LED bulb provides instant-on illumination.
5.3 Үзгүлтүксүз иштөө
This fan is designed for continuous operation to meet ASHRAE Standard 62.2, which specifies minimum ventilation rates for indoor air quality. Consult local building codes for specific requirements regarding continuous ventilation.
6. Техникалык тейлөө
Regular maintenance ensures optimal performance and longevity of your Fantech bath fan system.
6.1 Решетканы тазалоо
- Автоматтык өчүргүчтөгү желдеткичти өчүрүңүз.
- Carefully remove the grilles from the ceiling housings.
- Wash the grilles with a mild soap and water solution. Rinse thoroughly and allow them to dry completely before reinstallation.
- Wipe down the interior of the grille housings to remove any dust or debris.
6.2 Fan Unit Inspection
Periodically (e.g., annually), inspect the fan unit in the attic or utility space:
- Автоматтык өчүргүчтөгү желдеткичти өчүрүңүз.
- Check for any accumulation of dust or debris on the fan blades or motor housing. If necessary, gently clean with a soft brush or vacuum.
- Inspect duct connections for any leaks or disconnections. Re-secure with duct clamps or tape if needed.
- Ensure the fan unit is still securely mounted.
6.3 LED Bulb Replacement
If the LED light stops working:
- Turn off power to the light at the circuit breaker.
- Carefully remove the grille with the LED light.
- Unscrew the old LED bulb and replace it with a new 14-watt instant-on LED bulb of the same type.
- Reinstall the grille and restore power.
7. Кыйынчылыктарды
This section addresses common issues you might encounter with your Fantech PB270L10V-2 bath fan.
| Көйгөй | Мүмкүн себеп | Чечим |
|---|---|---|
| Желдеткич иштебейт | Аппаратка кубат жок Туура эмес дубал өчүргүч Бошоң зымдар байланышы Мотордун бузулушу | Check circuit breaker and wall switch. Ensure power is ON. Сыноо же дубалды алмаштыруу. Inspect wiring connections (with power OFF). Квалификациялуу тейлөө кызматкерлерине кайрылыңыз. |
| LED жарыгы күйбөйт | Жарыкка күч жок Бузулган LED лампа Бошоң зымдар байланышы | Check circuit breaker and wall switch. Ensure power is ON. Replace LED bulb (with power OFF). Inspect wiring connections (with power OFF). |
| желдеткичтен ашыкча ызы-чуу | Бошоң монтаждоо Желдеткичтердеги сыныктар Ductwork obstruction or kink Мотор подшипниктеринин эскириши | Ensure fan unit is securely mounted. Clean fan blades (with power OFF). Түтүктөрдүн ийри-буйру же тоскоолдуктары бар-жогун текшериңиз. Квалификациялуу тейлөө кызматкерлерине кайрылыңыз. |
| Poor ventilation performance | Ductwork leaks or obstructions Grilles are dirty Improper duct sizing | Inspect ductwork for leaks or obstructions. Seal any leaks. Clean grilles and fan blades. Ensure ductwork is correctly sized (4" or 6") and installed. |
If you are unable to resolve an issue after consulting this troubleshooting guide, please contact Fantech customer support or a qualified electrician/HVAC technician.
8. Техникалык шарттар
Key technical specifications for the Fantech PB270L10V-2 Dual Grille Bath Fan:
| Өзгөчөлүк | Спецификация |
|---|---|
| Модел | PB270L10V-2 |
| Аба агымынын сыйымдуулугу (CFM) | 270 |
| Тtage | 120V |
| Фаза | 1PH |
| Ampөчүрүү | 0.7 Amps |
| LED Light Wattage | 14 Watts (Instant-On) |
| Өткөргүчтүн өлчөмүнүн шайкештиги | 4 дюйм жана 6 дюйм |
| Сертификаттар | HVI Certified, UL Listed for wet locations |
| Үн деңгээли | Quiet Operation (Remote Mount) |
| Өндүрүүчү | Fantech |
9. Кепилдик жана колдоо
Fantech products are manufactured to high-quality standards. For specific warranty details regarding your PB270L10V-2 Dual Grille Bath Fan, please refer to the warranty card included with your product or visit the official Fantech webсайт.
If you require technical assistance, have questions about installation, or need to report a defect, please contact Fantech customer support. Ensure you have your model number (PB270L10V-2) and purchase date available when contacting support.


