1. Киришүү
Welcome to the TMEZON Wireless Security Camera System user manual. This guide provides detailed instructions for the setup, operation, and maintenance of your MZ-WF8430W system. Please read this manual thoroughly before installation and use to ensure proper functionality and safety. This system features 3-megapixel cameras, an 8-channel Network Video Recorder (NVR), and IP66 waterproof cameras suitable for both indoor and outdoor surveillance.
2. Пакеттин мазмуну
Сураныч, пакетте төмөнкү нерселерди текшериңиз:
- 1 x 8-Channel Wireless NVR
- 4 x 3MP зымсыз IP камералар
- 1 x NVR кубат адаптери
- 4 x камера кубат адаптерлери
- 1 х USB чычкан
- 1 х Network Cable
- 1 x User Manual
- Монтаждоочу бурамалар топтомдору

Сүрөт: бүттүview of the TMEZON Wireless Security Camera System components, including the NVR and four cameras.
3. Орнотуу колдонмосу
3.1 Баштапкы NVR туташуусу
Follow these steps to set up your NVR:
- NVRди HDMI же VGA кабели аркылуу мониторго туташтырыңыз.
- USB чычканын NVRдин USB портуна туташтырыңыз.
- Connect the NVR to your router using the provided network cable for internet access and remote viewing.
- NVR кубат адаптерин туташтырып, аны электр розеткасына сайыңыз. NVR автоматтык түрдө күйөт.

Image: Diagram illustrating the connections for the NVR, including power, monitor, and network cable to a router.
3.2 Камераны орнотуу
The cameras are IP66 waterproof, making them suitable for both indoor and outdoor use. Ensure cameras are within the NVR's wireless range.
- Choose suitable locations for your cameras, considering coverage area and power outlet proximity.
- Mount the cameras securely using the provided screw kits.
- Connect each camera to its respective power adapter and plug into an electrical outlet.
- The cameras will automatically pair with the NVR. If not, refer to the troubleshooting section for manual pairing.
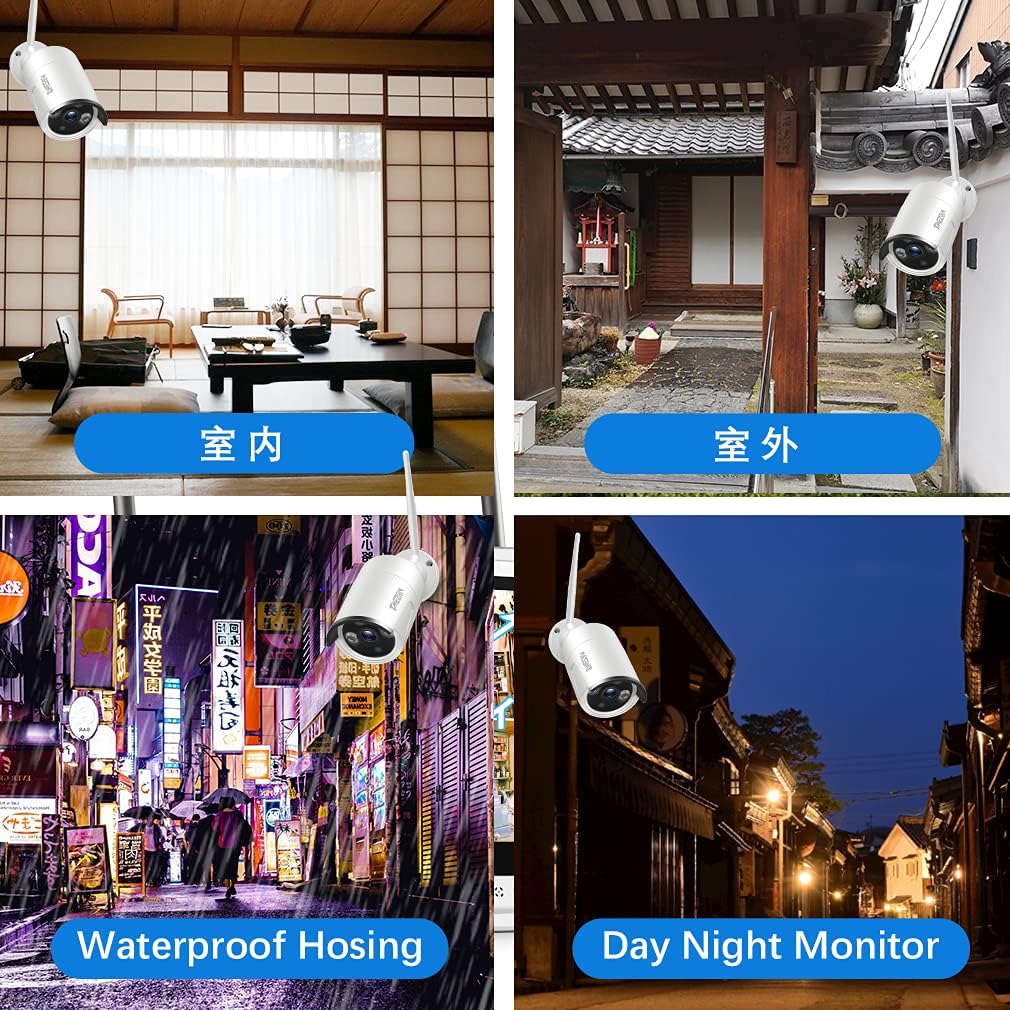
Сүрөт: Мисamples of camera placement for both indoor and outdoor environments.
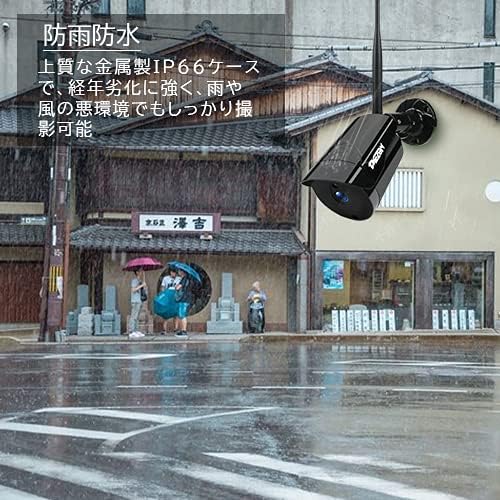
Image: A camera mounted outdoors, demonstrating its IP66 waterproof capability in a rainy setting.
3.3 Remote Access Setup (Mobile App)
үчүн view your cameras remotely on a smartphone or PC, follow these steps:
- Download the 'IP PRO' app from the App Store (iOS) or Google Play Store (Android).
- Register a new account within the app.
- Scan the QR code on your NVR or manually enter the device ID to add your system to the app.
- Кошулгандан кийин, сиз төмөнкүлөрдү жасай аласыз view live feeds, playback recordings, and manage settings from your mobile device.

Image: Demonstrates remote access to the camera system from various devices including tablets, laptops, and smartphones.

Image: A visual guide showing the steps for easy remote access setup via the mobile application.
Видео: Жалпыview of the system's features and setup process.
4. Иштөө нускамалары
4.1 Live View жана Жаздыруу
After initial setup, the NVR will display live feeds from all connected cameras. You can navigate the interface using the USB mouse. The system is configured for continuous recording by default. You can adjust recording schedules and modes (e.g., motion-triggered) in the NVR settings.
4.2 Ойнотуу
Кайраview foo жазылганtage:
- Right-click on the NVR interface to access the main menu.
- Select 'Playback'.
- Choose the desired camera, date, and time to view жаздыруулар.
4.3 Кыймылды аныктоо
The system supports motion detection, which can trigger recording and alerts. To configure:
- Access the NVR's main menu and go to 'Alarm' or 'Motion Detect' settings.
- Enable motion detection for specific cameras.
- Adjust sensitivity and define detection areas as needed.

Image: Highlights key features such as WiFi wireless connectivity, motion detection, night vision mode, IP66 waterproof rating, remote monitoring, and email alerts.
4.4 Түнкү көрүнүш
The cameras are equipped with infrared (IR) LEDs for automatic night vision, providing clear black and white video footage in low-light or no-light conditions.
4.5 Электрондук почта эскертүүлөрү
You can configure the system to send email notifications when motion is detected:
- In the NVR settings, navigate to 'Network' then 'Email'.
- Enter your email server details and recipient email addresses.
- Enable email alerts for motion detection events.

Image: A smartphone screen displaying an instant email notification triggered by an alarm event, showing a person attempting to break in.
Video: Demonstrates various operational aspects of the security camera system.
5. Техникалык тейлөө
Үзгүлтүксүз техникалык тейлөө коопсуздук системаңыздын оптималдуу иштешин жана узак мөөнөттүү иштешин камсыз кылат:
- Таза камералар: Камера линзаларын мезгил-мезгили менен жумшак, d чүпүрөк менен сүртүп туруңузamp чаңды жана кирди кетирүү үчүн кездеме, бул сүрөттүн так сапатын камсыз кылат.
- Байланыштарды текшерүү: Ensure all power and network cables are securely connected to prevent signal loss.
- Программалык камсыздоонун жаңыртуулары: TMEZON расмий сайтынан текшериңиз website for any available firmware updates for your NVR and cameras to enhance features and security.
- Катуу дисктин ден соолугу: If your NVR has a hard drive, regularly check its status in the system settings to prevent recording failures.
6. Кыйынчылыктарды
Бул жерде сиз кабылышы мүмкүн болгон жалпы маселелерди чечүү жолдору бар:
6.1 Монитордо видео дисплей жок
- Күчтү текшерүү: Ensure the NVR and monitor are powered on and connected correctly.
- Кабель туташуу: Verify the HDMI/VGA cable is securely connected between the NVR and monitor.
- Киргизүү булагы: Confirm the monitor's input source is set to the correct HDMI/VGA port.
6.2 Cameras Not Showing on NVR
- Камеранын күчү: Ensure all cameras are powered on.
- Зымсыз диапазон: Check if cameras are within the NVR's wireless range. Obstacles like thick walls can reduce signal strength.
- Кол менен жупташтыруу: If cameras do not automatically connect, you may need to manually pair them. Access the NVR's 'IPC Channel Config' or 'Wireless Add' menu and follow the on-screen instructions to add cameras.
6.3 Алыстан кирүү иштебей жатат
- NVR Internet Connection: Ensure the NVR is connected to your router and has internet access. Check the network status in NVR settings.
- Колдонмого кирүү: Verify you are logged into the correct account on the mobile app.
- Түзмөк кошулду: Confirm the NVR device has been successfully added to your app account.
- Маршрутизатор орнотуулары: Ensure your router is not blocking the NVR's internet access.
6.4 Сүрөттүн сапаты начар
- Таза линза: Clean the camera lens as described in the maintenance section.
- Резолюция орнотуулары: Check the camera's resolution settings in the NVR. Ensure it's set to 3MP (2048*1536P) for optimal clarity.
- Жарыктандыруу: Ensure adequate lighting for color images during the day. Night vision will be black and white.
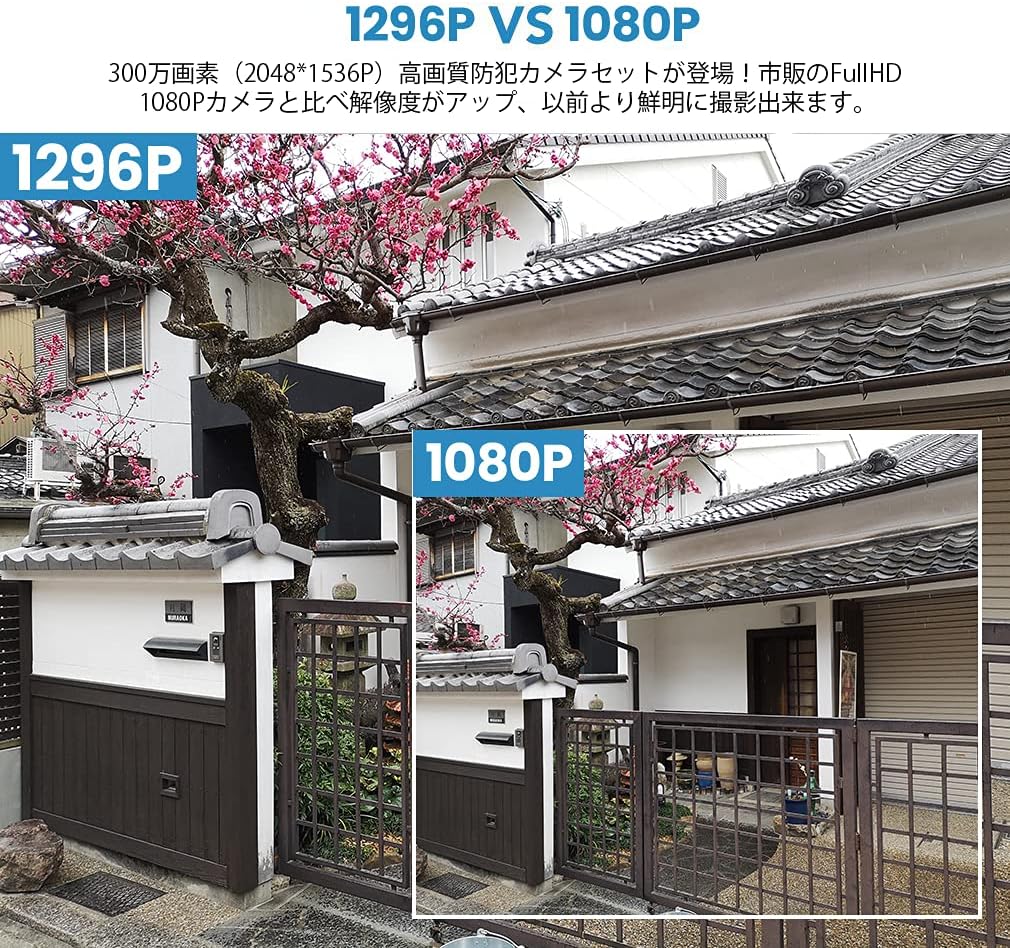
Image: A visual comparison demonstrating the improved clarity and detail of 1296P resolution compared to 1080P.

Image: A comparison showing the difference in image quality between 1080P and 720P resolutions, highlighting the superior detail of 1080P.
7. Техникалык шарттар
| Өзгөчөлүк | Спецификация |
|---|---|
| Бренд | TMEZON |
| Модель номери | MZ-WF8430W |
| Байланыш технологиясы | Зымсыз |
| Видео тартуунун резолюциясы | 1944p (3 Megapixels) |
| Өзгөчөлүктөр | Суу өткөрбөйт (IP66) |
| Каналдардын саны | 8 |
| Пакеттин өлчөмдөрү | 32 x 31.1 x 18.3 см |
| Пакет Салмагы | 3.64 килограмм |
| Батареялар талап кылынат | Жок |
8. Кепилдик жана колдоо
TMEZON provides customer support for its products. For warranty information, technical assistance, or any questions not covered in this manual, please contact TMEZON customer service through their official website or the contact information provided with your purchase. Please have your model number (MZ-WF8430W) and purchase details ready when contacting support.


