1. Продукт бүтүп калдыview
The ANENG Q1 is a 9999 counts True RMS digital multimeter designed for accurate measurement of various electrical parameters. It features an EBTN black screen with a large, backlit LCD for clear readability in diverse lighting conditions. This device supports both automatic and manual ranging, offering flexibility for different measurement needs. It includes an analog bar graph display for quick visual indication of readings.
Негизги өзгөчөлүктөрү:
- Чыныгы RMS өлчөө: Синусоидалуу эмес толкундар үчүн так окууну камсыз кылат.
- NCV (контактсыз томtagд) аныктоо: For safe identification of live wires without direct contact.
- Автоматтык/Кол менен башкаруу: User-selectable measurement range for convenience and precision.
- Аналогдук тилке графиги: Visual representation of measurement trends.
- Арткы жарыктуу чоң LCD: Жарык аз болгон чөйрөдө көрүнүүнү жакшыртуу.
- Ашыкча жүктөн коргоо: Бардык өлчөө диапазондорунда коопсуздукту камсыз кылат.
- Батареянын төмөн көрсөткүчү: Батареяны алмаштыруу керек болгондо эскертмелерди берет.
- Маалыматты кармоо функциясы: Оңой жаздыруу үчүн көрсөтүлгөн окууну токтотот.
- Авто өчүрүү: Батареянын иштөө мөөнөтүн үнөмдөйт.
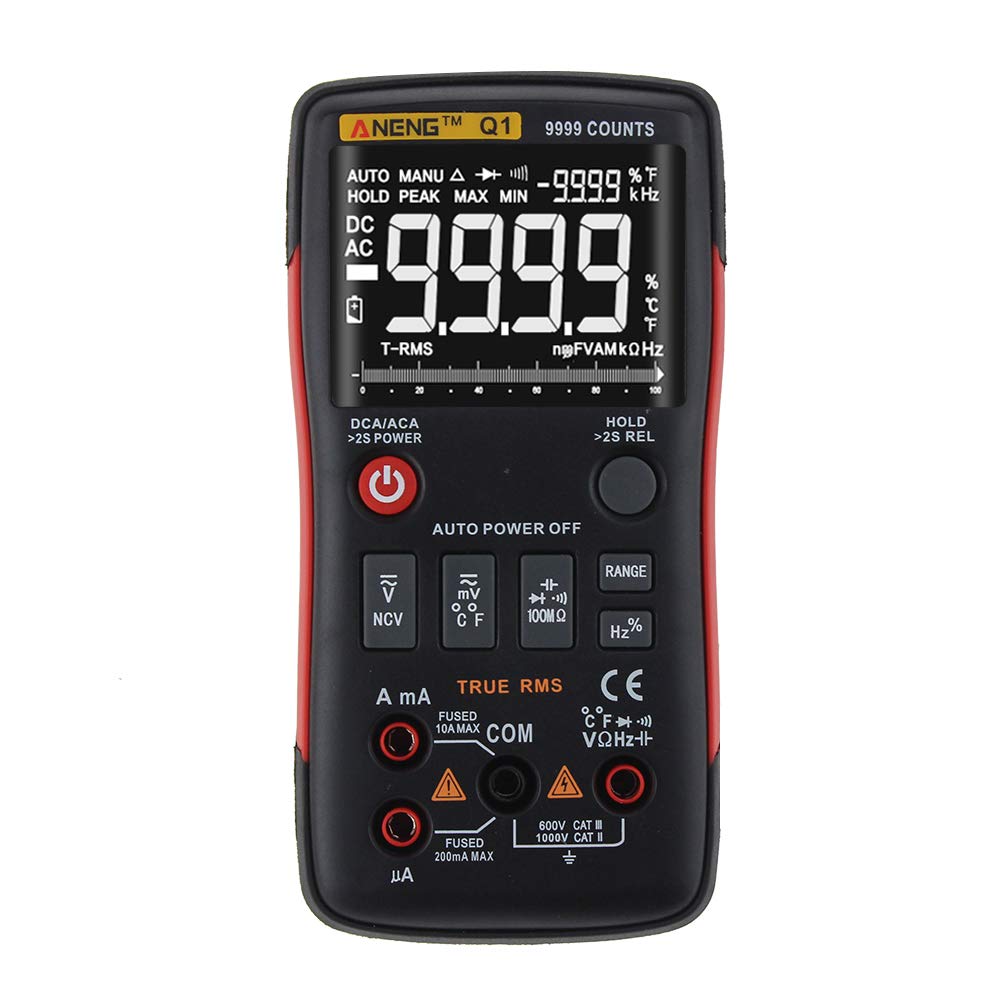
Figure 1: ANENG Q1 Digital Multimeter with its display and function buttons.
2. Коопсуздук маалыматы
Always observe basic safety precautions when using this multimeter to prevent personal injury or damage to the device. Read and understand all safety information before operation.
- Эч кандай функция үчүн максималдуу киргизүү маанилеринен ашпаңыз.
- Том менен иштөөдө этият болуңузtag30V AC RMS, 42V пик же 60V DC жогору. Бул томtagшок коркунучун жаратат.
- Before measuring current, ensure the circuit is de-energized and the multimeter is connected in series.
- Функцияларды өзгөртүүдөн мурун, ар дайым сыноо өткөргүчтөрүн чынжырдан ажыратыңыз.
- Колдонуудан мурун сыноо өткөргүчтөрдүн изоляциясынын бузулганын же ачык металлдын бар-жоктугун текшериңиз. Бузулган болсо алмаштырыңыз.
- Do not operate the multimeter if the battery cover is not properly closed.
- Батарея аз индикатор пайда болгондо, батарейкаларды дароо алмаштырыңыз.
- Жергиликтүү жана улуттук коопсуздук эрежелерин сактаңыз.
3. Орнотуу
3.1 Батареяны орнотуу
- Мультиметрдин өчүрүлгөнүн текшериңиз.
- Аппараттын артындагы батарея бөлүкчөсүн табыңыз.
- Батарея уясынын капкагын бурап, аны чыгарып алыңыз.
- Insert two 1.5V AA batteries, observing the correct polarity (+/-).
- Батареянын капкагын ордуна коюп, аны бурама менен бекитиңиз.
3.2 Сыноо өткөргүчтөрүн туташтыруу
The multimeter comes with a set of test leads. Always connect the black lead to the 'COM' (Common) jack. Connect the red lead to the appropriate input jack based on the measurement function:
- VΩHz+ Vol үчүн домкратtage, Каршылык, Жыштык, Сыйымдуулук, Диод жана Үзгүлтүксүздүктү өлчөө.
- mA jack for current measurements up to 999.9mA.
- 10A jack for current measurements up to 10A.

Figure 2: Included test leads and probes.

Figure 3: Complete ANENG Q1 Multimeter kit with accessories.
4. Иштөө нускамалары
The ANENG Q1 multimeter offers both automatic and manual ranging. Press the 'RANGE' button to switch between auto and manual modes. In manual mode, press 'RANGE' repeatedly to cycle through available ranges.
4.1 Күйгүзүү/өчүрүү
Press the red power button to turn the multimeter on or off. The device features an auto power-off function to conserve battery life after a period of inactivity.
4.2 Өлчөө AC/DC Voltage (V)
- Connect the black test lead to the 'COM' jack and the red test lead to the 'VΩHz+' jack.
- Томду тандаңызtage measurement function (AC V or DC V) using the function button.
- Сыноо зонддорун өлчөнө турган схема же компонент боюнча параллель туташтырыңыз.
- Томду окуңузtage мааниси дисплейде.
4.3 Measuring AC/DC Current (A/mA/µA)
- Маанилүү: Ensure the circuit is de-energized before connecting the multimeter for current measurement.
- Connect the black test lead to the 'COM' jack. Connect the red test lead to the 'mA' jack for currents up to 999.9mA, or to the '10A' jack for currents up to 10A.
- Select the current measurement function (AC A or DC A).
- Чынжырды ачып, мультиметрди жүк менен удаалаш туташтырыңыз.
- Схеманы кайра кубаттап, дисплейдеги учурдагы маанини окуңуз.
4.4 Каршылыкты өлчөө (Ω)
- Connect the black test lead to 'COM' and the red test lead to 'VΩHz+'.
- Select the resistance measurement function.
- Каршылыкты өлчөөдөн мурун чынжыр же тетиктин энергиясы өчүрүлгөнүн текшериңиз.
- Сыноо зонддорун компоненттин үстүнө туташтырыңыз.
- Дисплейдеги каршылык маанисин окуп чыгыңыз.
4.5 Өлчөө сыйымдуулугу (F)
- Connect the black test lead to 'COM' and the red test lead to 'VΩHz+'.
- Select the capacitance measurement function.
- Ensure the capacitor is fully discharged before measurement to prevent damage to the multimeter.
- Сыноочу зонддорду конденсатордун терминалдарына туташтырыңыз.
- Дисплейдеги сыйымдуулуктун маанисин окуңуз.
4.6 Өлчөө жыштыгы (Гц) жана иштөө цикли (%)
- Connect the black test lead to 'COM' and the red test lead to 'VΩHz+'.
- Select the frequency/duty cycle measurement function.
- Сыноо зонддорун сигнал булагы аркылуу туташтырыңыз.
- Read the frequency or duty cycle value on the display.
4.7 Температураны өлчөө (°C/°F)
- Connect the temperature probe to the appropriate input jacks (usually 'COM' and 'VΩHz+' or dedicated temperature jacks if available).
- Select the temperature measurement function.
- Температуралык зонддун учун температурасы өлчөнө турган объекттин үстүнө же жанына кой.
- Дисплейдеги температуранын маанисин окуңуз.
4.8 Диоддун сыноосу
- Connect the black test lead to 'COM' and the red test lead to 'VΩHz+'.
- Select the diode test function.
- Кызыл зондду анодго, кара зондду диоддун катодуна туташтырыңыз.
- Дисплей алдыга томду көрсөтөтtage drop. Reverse the probes; an open circuit (OL) indicates a good diode.
4.9 Үзгүлтүксүздүк тести
- Connect the black test lead to 'COM' and the red test lead to 'VΩHz+'.
- Үзгүлтүксүздүктү текшерүү функциясын тандаңыз.
- Сынамык зонддорду чынжыр же компонент боюнча туташтырыңыз.
- Үзгүлтүксүз бип сигналы каршылыктын төмөн жолун (үзгүлтүксүздүктү) көрсөтөт.
4.10 NCV (контактсыз томtagд) аныктоо
- NCV функциясын тандаңыз.
- Bring the top of the multimeter close to the conductor or outlet.
- Аппарат AC том бар экенин көрсөтөтtage through an audible alarm and/or visual indicator.
5. Техникалык тейлөө
5.1 Тазалоо
Ишти жарнама менен сүртүңүзamp кездеме жана жумшак жуугуч. Абразивдерди же эриткичтерди колдонбоңуз. Колдонуудан мурун аппарат толугу менен кургак экенин текшериңиз.
5.2 Сактоо
When not in use for extended periods, remove the batteries to prevent leakage. Store the multimeter in a cool, dry place, away from direct sunlight and extreme temperatures. The recommended storage conditions are -20°C to 60°C (-4°F to 140°F) with humidity less than 80% RH.
6. Кыйынчылыктарды
- Дисплей жок: Батареянын орнотулушун текшерип, батарейкалары түгөнүп калбагандыгын текшериңиз. Керек болсо алмаштырыңыз.
- Туура эмес окуулар: Verify that the correct function and range are selected. Ensure test leads are properly connected and not damaged. Check battery level.
- 'OL' (Ашыкча жүктөө) дисплей: The measured value exceeds the selected range or the maximum input limit. Switch to a higher range or ensure the input is within the device's specifications.
- Үзгүлтүксүздүк сигналы жок: Check if the circuit is truly continuous and has very low resistance. Ensure test leads are making good contact.
7. Техникалык шарттар
7.1 Электрдик мүнөздөмөлөр

Figure 4: Electrical Specifications - DC and AC Voltage.

Figure 5: Electrical Specifications - DC and AC Current, and Resistance.

Figure 6: Electrical Specifications - Capacitance, Frequency, and Duty Cycle.

Figure 7: Electrical Specifications - Temperature, Diode, Continuity, and NCV.
7.2 General, Mechanical, and Environmental Specifications

Figure 8: General, Mechanical, and Environmental Specifications.
| Параметр | Нарк |
|---|---|
| Дисплей | 9999 саны LCD |
| Рангинг | Авто/Кол |
| Материал | ABS+TPE |
| Жаңыртуу баасы | 3 Times / Second |
| Чыныгы RMS | Ооба |
| Маалыматтарды кармоо | Ооба |
| Арткы жарык | Ооба |
| Батареянын төмөн көрсөткүчү | Ооба |
| Авто өчүрүү | Ооба |
| Параметр | Нарк |
|---|---|
| Өлчөм | 146*74*34мм |
| Салмагы | 125г |
| Батарея түрү | 2 x 1.5V AA батареясы (кошулбаган) |
| Параметр | Нарк |
|---|---|
| Иштөө температурасы | 0~40°C |
| Иштөө нымдуулугу | <75% RH |
| Сактоо температурасы | -20~60°C |
| Сактоочу нымдуулук | <80% RH |
8. Кепилдик жана колдоо
8.1 Кепилдик
This ANENG Q1 Digital Multimeter comes with a бир жылдык кепилдик from the date of purchase, covering manufacturing defects. This warranty does not cover damage caused by misuse, accident, unauthorized modification, or normal wear and tear. Please retain your proof of purchase for warranty claims.
8.2 Кардарларды колдоо
For technical assistance, troubleshooting, or warranty inquiries, please contact the retailer or manufacturer's customer service. Refer to your purchase documentation for specific contact details.


