1. Киришүү
This manual provides detailed instructions for the installation, operation, and maintenance of your Suuwer S701 Non-Programmable Thermostat. This thermostat is designed for use with 1 Heat/1 Cool conventional single-stage heating and cooling systems. Please read this manual thoroughly before installation and operation to ensure proper function and safety.

Сүрөт 1.1: Алдыңкы view of the Suuwer S701 Non-Programmable Thermostat, displaying room temperature and set temperature on a blue backlit screen.
2. Коопсуздук маалыматы
- Термостатты орнотуудан же тейлөөдөн мурун ар дайым негизги сактагычтан же автоматтык өчүргүчтүн панелинен жылытуу/муздатуу системасын өчүрүңүз.
- This thermostat operates on 24VAC power or 2 AAA batteries. Do not connect to line voltage (120-240V) systems.
- If you are inexperienced with electrical wiring, it is recommended to seek professional assistance for installation.
- Ensure all wiring connections are secure to prevent short circuits or damage to the system.
3. Пакеттин мазмуну
Пакетиңизде бардык буюмдар бар экенин текшериңиз:
- Suuwer S701 Thermostat Unit
- Орнотуу боюнча колдонмо
- Кабель этикеткасы
- Монтаждоо бурамалар (2)
- Дубал казыктары (2)

Image 3.1: Illustration of the Suuwer S701 thermostat and its included accessories.
4. Системанын шайкештиги
The Suuwer S701 thermostat is designed for specific HVAC systems. Please review the compatibility information carefully before installation.
4.1 Шайкеш системалар
- Кадимки Single-Stage Heating & Cooling (with C-wire or without C-wire)
- Gas Fireplace (24 Volts)
- Gas / Oil / Electric Furnace (Heating only)
- Boiler Radiant Heating Only
- Furnace Forced-Air Heating Only
- Cooling Only (with C-wire or without C-wire)
Эскертүү: Verify your existing thermostat base is wired with 2 to 5 wires. Systems with 6 to 8 wires are generally not supported by this model.
4.2 Incompatible Systems
- Multistage Heating & Cooling (e.g., 1H/2C, 2H/2C)
- HVAC Heat Pump Systems (e.g., 2H/1C, 4H/2C)
- PTACs (Packaged Terminal Air Conditioners)
- 3-wire Hydronic (Hot Water) Systems
- Dual Fuel/Hybrid Heating Systems
- Line Voltage Systems (120-240V electric baseboards heat)
- Mini Split Heat Pump Air Conditioners
- RV Air Conditioners (Mach and Roughneck series)
- Конвекторлор
- Нурлуу шып жылытуу
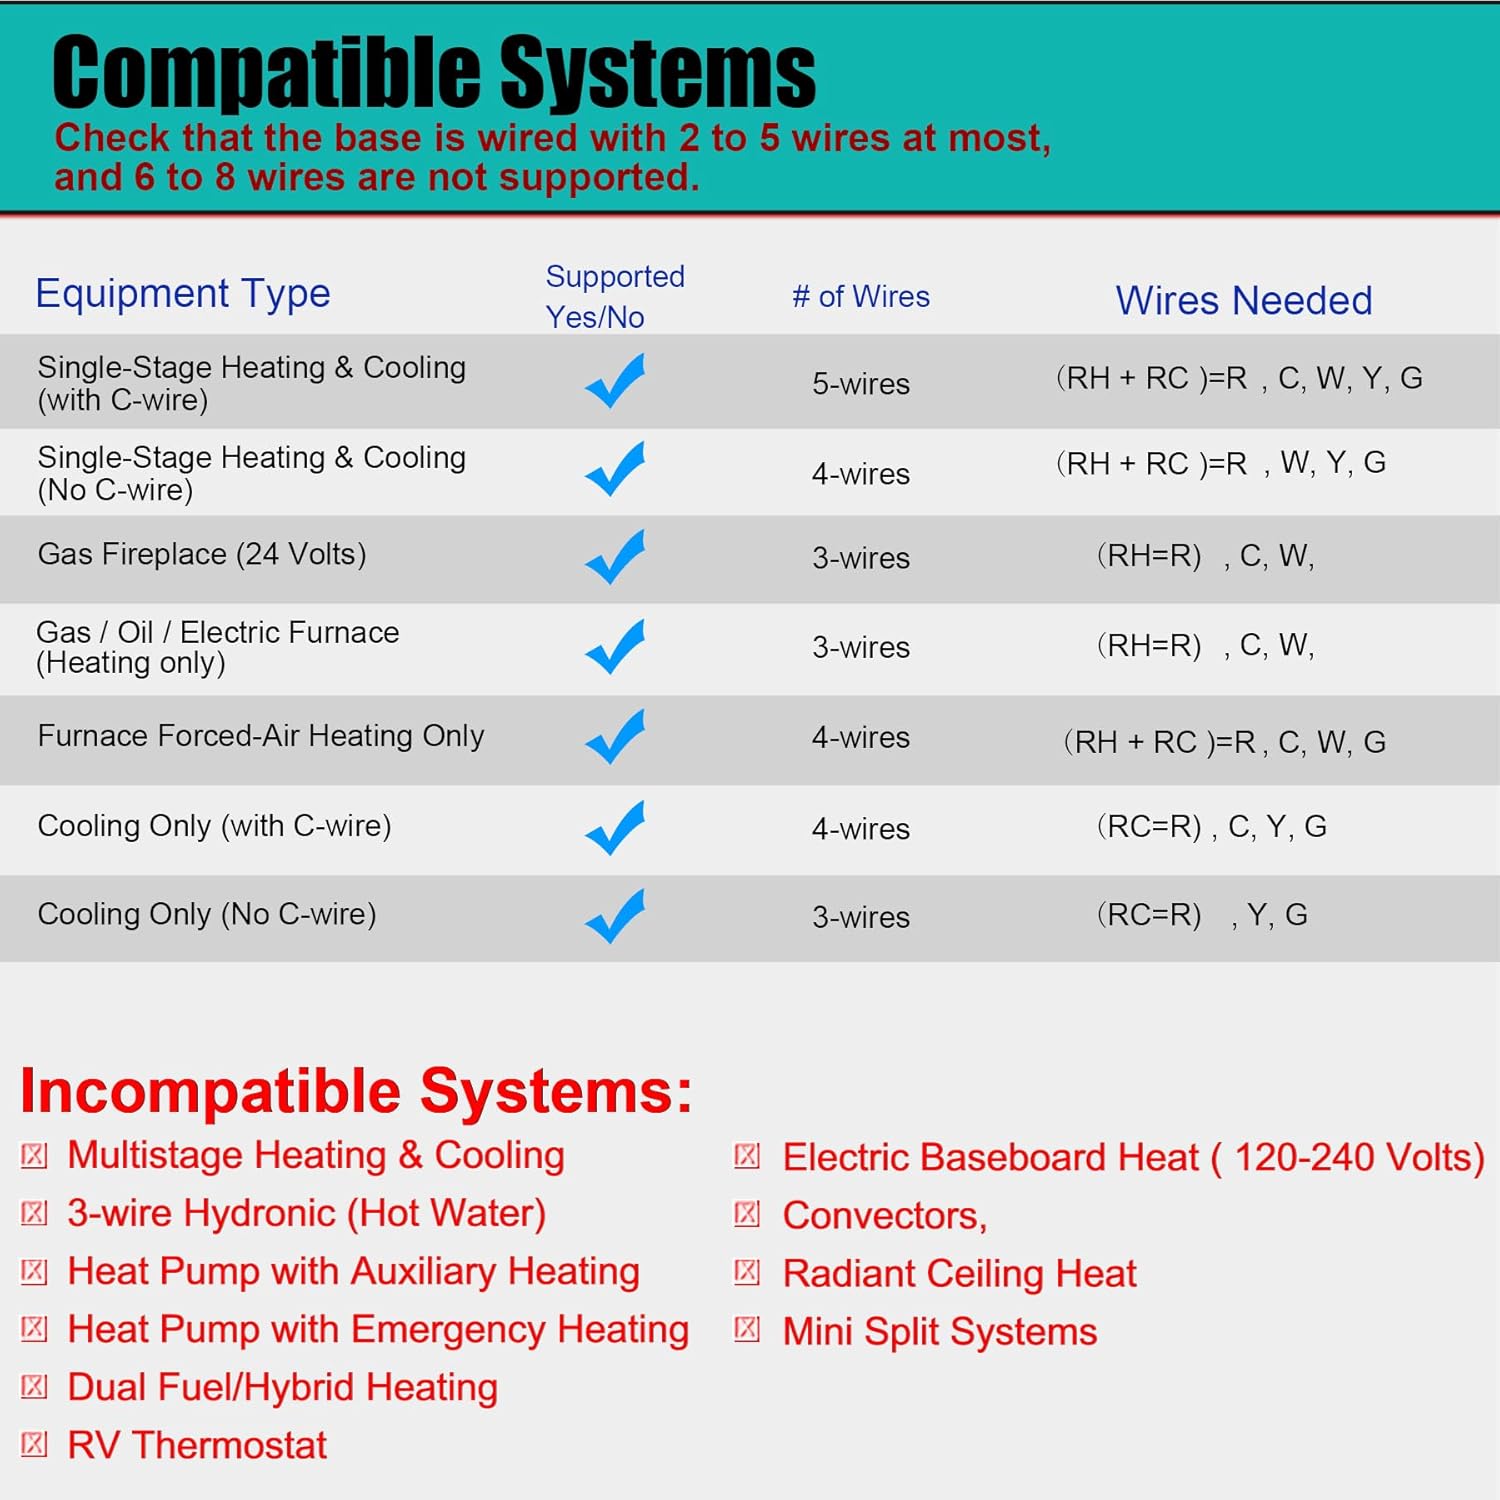
Image 4.1: Detailed compatibility chart for the Suuwer S701 thermostat.
5. Орнотуу жана орнотуу
Follow these steps for proper installation. It is recommended to take a picture of your old thermostat's wiring before disconnecting any wires.
5.1 Эски термостатыңызды алып салуу
- Электр кубатын өчүрүү: Жылытуу жана муздатуу системаңызды башкарган автоматтык өчүргүчтү же сактагыч кутучасын таап, электр кубатын өчүрүңүз.
- Капкакты алып салуу: Carefully remove the cover of your old thermostat.
- Зымдарды сүрөткө тартуу: Take a clear picture of the wiring connections, noting which wire is connected to each terminal.
- Зымдардын этикеткасы: Use the provided cable labels to mark each wire according to its terminal designation (e.g., R, W, Y, G, C).
- Зымдарды ажыратыңыз: Эски термостаттын терминалдарынан зымдарды ажыратыңыз.
- Remove old base: Unscrew and remove the old thermostat's mounting base from the wall.
5.2 Жаңы термостатты орнотуу
- Position base: Hold the new Suuwer S701 thermostat base against the wall where you want to mount it.
- Mark screw holes: Mark the positions for the mounting screws. If possible, use existing screw holes.
- Бургулоо тешиктери: If new holes are needed, drill pilot holes and insert the wall anchors.
- Коопсуз база: Pull the wires through the opening in the thermostat base and secure the base to the wall using the provided screws.
5.3 Зымдарды туташтыруу
Connect the labeled wires to the corresponding terminals on the Suuwer S701 thermostat base. Refer to the wiring diagram below and your photograph for accuracy.
- R/RC: 24VAC power (often jumpered, see diagram)
- G: Ички үйлөгүч (желдеткич)
- Y: 1-сtagэ сонун
- W: 1-сtagжылуулук
- C: Common wire (optional for battery-powered operation, but recommended for continuous backlight)

Image 5.1: Wiring diagram and system switch setting for the Suuwer S701 thermostat.
5.4 Setting the System Switch (GAS/ELEC)
On the back of the thermostat unit, locate the small switch labeled 'GAS' and 'ELEC'.
- Эгерде сизде а gas or oil furnace, которуштурууну коюңуз ГАЗ.
- Эгер сизде бар electric furnace, которуштурууну коюңуз ELEC.
5.5 Батареяларды орнотуу
The thermostat can be powered by 24VAC or 2 AAA batteries. Batteries are required for operation if no C-wire is connected. Even with a C-wire, batteries provide backup power.
- Open the battery compartment on the front of the thermostat.
- Туура полярдуулукту (+/-) камсыз кылып, эки жаңы AAA щелочтуу батарейканы салыңыз.
- Батарея отсегин жабыңыз.
5.6 Attaching the Thermostat to the Base
Align the thermostat unit with the mounted base and gently push it into place until it clicks securely.
5.7 Кубатты калыбына келтирүү
Once the thermostat is securely mounted and wired, turn the power back on at the main circuit breaker or fuse box.
6. Иштөө нускамалары
The Suuwer S701 is a non-programmable thermostat, offering straightforward manual control of your home's temperature.

Image 6.1: Display and controls of the Suuwer S701 thermostat.
6.1 Дисплейview
The large LCD with blue backlight shows the current room temperature and the set temperature. The backlight activates for 10 seconds when any button is pressed.
- Бөлмө: Учурдагы айлана-чөйрөнүн температурасын көрсөтөт.
- Төмөнкүгө коюлган: Каалаган температура жөндөөсүн көрсөтөт.
- Cool/Heat/Off: Indicates the current system mode.
- Fan ON/AUTO: Учурдагы желдеткич режимин көрсөтөт.
6.2 Температураны жөндөө
колдонуу + (Өйдө) жана - (Down) buttons on the right side of the thermostat to adjust the desired temperature setting. Each press changes the temperature by 1 degree Fahrenheit.
6.3 Системалык режимди тандоо
колдонуу СИСТЕМА switch located at the bottom right of the thermostat to select the operating mode:
- БАРАКЕЛДЕ: Бөлмөнүн температурасы коюлган температурадан жогору көтөрүлгөндө муздатуу системасын иштетет.
- ЖЫЛУУ: Бөлмөнүн температурасы коюлган температурадан төмөн түшкөндө жылытуу системасын иштетет.
- ӨЧҮК: Жылытуу жана муздатуу системаларын өчүрөт.
6.4 Күйөрман режимин тандоо
колдонуу КҮЙӨРМАН switch located at the bottom left of the thermostat to select the fan operating mode:
- АВТО: Желдетүүчү жылытуу же муздатуу системасы активдүү иштеп турганда гана иштейт. Бул эң кеңири таралган жана энергияны үнөмдөөчү параметр.
- КҮЙҮК: Жылытуу же муздатуу системасы активдүү экендигине карабастан, желдеткич тынымсыз иштейт.
6.5 Adjusting Temperature Swing (Cycle Rate)
The temperature swing, also known as cycle rate or differential, determines how much the temperature can vary from your setpoint before the system turns on. A smaller swing results in more frequent, shorter cycles, while a larger swing results in less frequent, longer cycles.
The swing is adjustable from 0.2°F to 2°F. The factory default is 0.5°F for both heating and cooling.

Image 6.2: Thermostat display showing the temperature swing setting.
To adjust the temperature swing:
- басып, кармап туруңуз КҮЙӨРМАН button for approximately 3 seconds until the display changes to show the current swing setting.
- колдонуу + (Жогору) же - (Down) buttons to adjust the swing value.
- басыңыз КҮЙӨРМАН button again to toggle between heating and cooling swing settings.
- The thermostat will automatically save the setting after a few seconds of inactivity.
7. Техникалык тейлөө
7.1 Батареяны алмаштыруу
When the low battery indicator (a battery icon) appears on the display, it is time to replace the batteries. Replace with two new AAA alkaline batteries. Refer to Section 5.5 for battery installation steps.
7.2 Тазалоо
Термостаттын сыртын жумшак менен сүртүңүз, damp кездеме. Абразивдүү тазалагычтарды же эриткичтерди колдонбоңуз.
8. Кыйынчылыктарды
Термостатыңызда көйгөйлөргө туш болсоңуз, төмөнкү жалпы көйгөйлөрдү жана чечимдерди караңыз:
| Көйгөй | Мүмкүн себеп | Чечим |
|---|---|---|
| Дисплей бош | No power, dead batteries, or tripped circuit breaker. | Check batteries and replace if necessary. Ensure power is on at the circuit breaker. Verify wiring connections. |
| Жылытуу/Муздатуу системасы жооп бербейт | Incorrect system mode, incorrect wiring, or system issue. | Ensure SYSTEM switch is set to HEAT or COOL. Verify wiring. Check if furnace/AC unit has power. |
| Температураны окуу туура эмес көрүнөт | Thermostat location, or calibration needed. | Ensure thermostat is not in direct sunlight or near heat sources. The thermostat has a room temperature calibration adjustment for +/-1-degree F. Consult the full installation manual for advanced settings. |
| Low Battery Indicator (battery icon) | Батареялары аз. | Replace with two new AAA alkaline batteries immediately. |
| Compressor short cycling (turning on/off too frequently) | Temperature swing set too low. | Adjust the temperature swing to a higher value (e.g., 1.0°F or 1.5°F). |
For more detailed troubleshooting, please refer to the Көйгөйлөрдү чечүү боюнча колдонмо (PDF).
9. Техникалык шарттар
- Модел: S701
- Продукциянын өлчөмдөрү: 0.98"D x 4.72"W x 3.86"H
- Элемент Салмагы: 6.7 унция (0.42 фунт)
- Түсү: Көк арткы жарык
- Материал: Пластик
- Дисплей түрү: Blue Backlight менен LCD
- Экрандын өлчөмү: 4.5 дюйм
- Башкаруу түрү: Push Button / Button Control
- Монтаж түрү: Дубалга орнотуу
- Кубат булагы: 24 Volts (AC) or 2 AAA Batteries
- Температураны көзөмөлдөө диапазону: 44°F жана 90°F
- Room Temperature Display Range: 41°F жана 95°F
- Температуранын тактыгы: +/-1°F
- Өзгөчөлүктөр: Non-Programmable, Separate Heating and Cooling Swing (0.2°F to 2°F), Low Battery Indicator, 5 Minute Compressor Delay Protection (Selectable ON or OFF)
- UPC: 709327753278
10. Кепилдик жана колдоо
10.1 Кепилдик маалыматы
The Suuwer S701 Non-Programmable Thermostat comes with a 2 жылдык кепилдик сатып алынган күндөн тартып. Бул кепилдик нормалдуу колдонуудагы материалдардагы жана жасалгадагы кемчиликтерди камтыйт. Кепилдик дооматтары үчүн сатып алганыңыздын далилин сактап коюңуз.
10.2 Кардарларды колдоо
For technical assistance, troubleshooting, or warranty inquiries, please contact Suuwer customer service. We offer 24-hour customer service to assist you.
Кошумча ресурстар:


