1. Киришүү
This manual provides detailed instructions for the installation, operation, and maintenance of your DEATTI 8-Channel 2K Wireless Security Camera System. Please read this manual thoroughly before using the product to ensure proper setup and functionality.

Сүрөт 1.1: Бүттүview of the DEATTI 8-Channel 2K Wireless Security Camera System, showing the NVR unit, eight cameras, and a 1TB hard drive.
The DEATTI 2K wireless surveillance system features an integrated router and Wi-Fi antenna for stable and long-range wireless connectivity. It supports motion detection, P2P remote access, and offers a true plug-and-play setup experience.
2. Пакеттин мазмуну
Төмөндө тизмеленген нерселердин баары пакетиңизде бар экенин текшериңиз. Эгерде кандайдыр бир нерселер жок болсо же бузулса, кардарларды колдоо менен байланышыңыз.

Image 2.1: Visual representation of the complete package contents, including the NVR, cameras, and accessories.
- 1 x 8-Channel Network Video Recorder (NVR)
- 8 x 3MP зымсыз IP камералар
- 1 x 1TB Hard Disk Drive (Pre-installed)
- 1 х USB чычкан
- 8 x камера кубат адаптерлери
- 1 x NVR кубат адаптери
- 8 x Screw Bags (for camera mounting)
- 1 x Antenna (for NVR, if not pre-attached)
- 1 x Quick Start Guide
3. Системаны орнотуу
3.1 Баштапкы туташуу
Follow these steps for the initial setup of your security system:
- NVRди HDMI же VGA кабели аркылуу мониторго туташтырыңыз.
- USB чычканын NVRдин USB портуна туташтырыңыз.
- NVRди берилген NVR кубат адаптерин колдонуп кубат булагына туташтырыңыз.
- Connect each camera to its respective power adapter and plug them into an electrical outlet. The cameras will automatically pair with the NVR.
- For internet access and remote viewing, connect the NVR to your router using an Ethernet cable.

Image 3.1: NVR system connection ports for monitor, internet, mouse, and power.
3.2 Wireless Connection and Range
The system utilizes a wireless connection between the cameras and the NVR. Each camera can also function as a Wi-Fi repeater to extend the wireless range.
- Open Space Range: Up to 1000 feet (approximately 300 meters).
- With Obstacles: Up to 200 feet (approximately 60 meters), depending on the type and number of obstacles (e.g., walls).

Image 3.2: Illustration of the auto-pairing feature between a camera and the NVR.

Image 3.3: Wireless signal range comparison: up to 1000ft in open space and up to 200ft with obstacles.
4. Алыстан кирүү мүмкүнчүлүгүн орнотуу
The system supports P2P (Peer-to-Peer) remote access, allowing you to view жаша фооtage and recordings from your mobile device or computer without complex network configurations.
4.1 Мобилдик колдонмону орнотуу
To access your system remotely via a smartphone or tablet:
- Download the recommended mobile application (e.g., 'IP Pro' or 'EseeCloud') from your device's app store.
- Каттоо эсебин жана кирүү.
- Add your NVR device by scanning the QR code displayed on your NVR's monitor or by manually entering the device ID.
- Кошулгандан кийин, сиз төмөнкүлөрдү жасай аласыз view live feeds and manage settings from your mobile device.
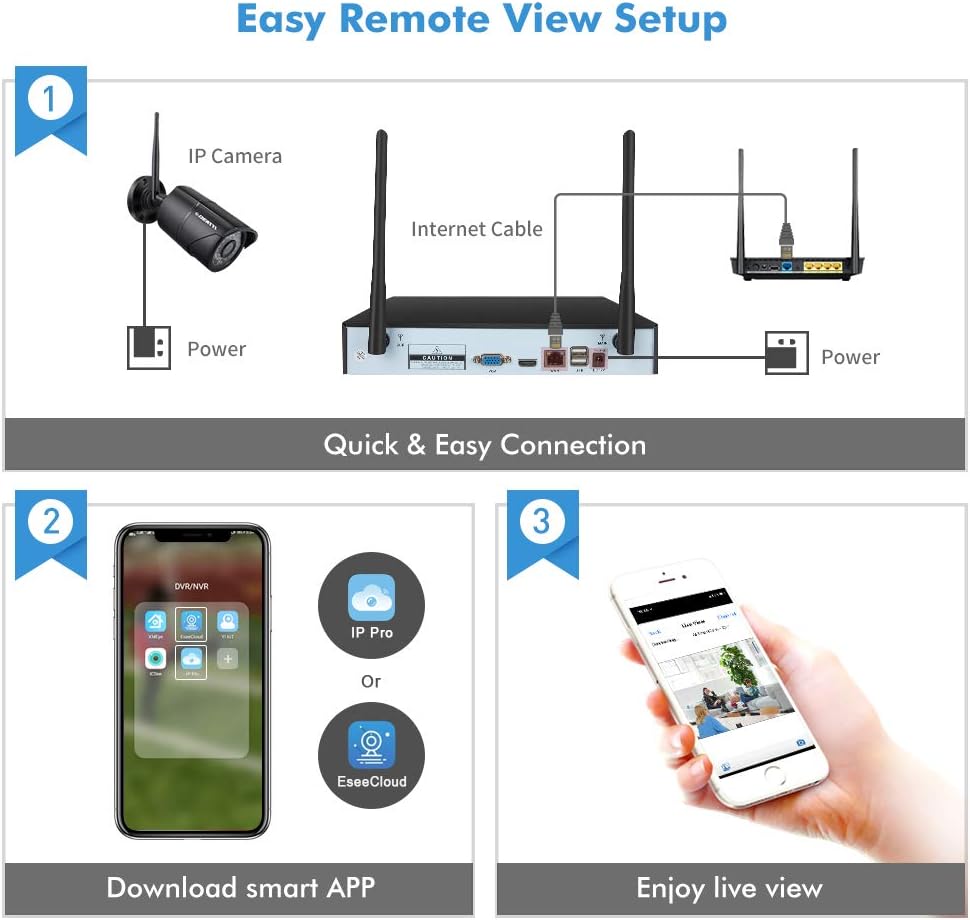
Image 4.1: Guide for setting up remote viewing, including NVR-router connection, app download, and live monitoring.
5. Иштөө нускамалары
5.1 Live View жана Жаздыруу
After successful setup, the NVR will display live feeds from all connected cameras. The pre-installed 1TB HDD will automatically begin recording based on default settings (typically continuous recording or motion-triggered recording).
- Viewing: Use the connected monitor and USB mouse to navigate the NVR interface. You can switch between single-camera view жана көп камералуу тор view.
- Ойнотуу: Жазылган footage through the NVR's playback menu. You can search by date, time, and event type.
5.2 Кыймылды аныктоо жана эскертүүлөр
The system features integrated motion detection. When motion is detected in a camera's field of view, it can trigger recording and send alerts.
- Конфигурация: Access the NVR's menu to configure motion detection zones, sensitivity, and recording schedules for each camera.
- Эскертүүлөр: Enable email notifications or push notifications to your mobile app to receive instant alerts when motion is detected.

Сүрөт 5.1: Мисample of an instant email alert received on a smartphone after motion detection.
5.3 Күндүзгү жана түнкү көрүү
The cameras are equipped with infrared (IR) LEDs for night vision, providing clear surveillance in low-light or no-light conditions. The system automatically switches between day (color) and night (black and white IR) modes.

Image 5.2: Visual comparison of camera performance in daylight and nighttime conditions.
6. Техникалык тейлөө
6.1 Камерага кам көрүү
- Тазалоо: Дайыма камера линзаларын жумшак, гamp ачык сүрөт сапатын камсыз кылуу үчүн кездеме. Абразивдүү тазалагычтардан алыс болуңуз.
- Аба ырайын коргоо: The cameras are IP66 weatherproof, designed to withstand various outdoor conditions. However, extreme weather may affect performance.

Image 6.1: An outdoor camera operating in snowy conditions, highlighting its weatherproof construction.
6.2 NVR Maintenance
- Вентиляция: Ensure the NVR is placed in a well-ventilated area to prevent overheating.
- Программалык камсыздоонун жаңыртуулары: Periodically check for and install firmware updates to ensure optimal performance and security.
- Катуу дискти башкаруу: The 1TB hard drive will overwrite older footage once full. Back up important recordings regularly.
7. Кыйынчылыктарды
- Монитордо сүрөт жок:
- Check power connections for both NVR and monitor.
- Verify HDMI/VGA cable connection.
- Ensure the correct input source is selected on your monitor. - Cameras Not Connecting:
- Ensure cameras are powered on.
- Check the distance between cameras and NVR; reduce obstacles if possible.
- Re-pair cameras with the NVR if necessary (refer to the Quick Start Guide for pairing instructions). - Алыстан кирүү мүмкүнчүлүгү жок:
- Ensure the NVR is connected to your router via Ethernet cable.
- Verify your internet connection.
- Check app settings and device ID for accuracy. - Түнкү көрүү начар:
- Камеранын линзасын тазалаңыз.
- Ensure there are no obstructions blocking the IR LEDs.
- Adjust camera angle to avoid reflective surfaces.
8. Техникалык шарттар
| Бренд | DEATTI |
| Модель номери | DE-DET-8Na2M8WCa2M1TB |
| Байланыш технологиясы | Зымдуу, Зымсыз |
| Видео жаздыруу чечими | 1440p (2K) |
| Өзгөчө өзгөчөлүк | Motion Detection |
| Каналдардын саны | 8 |
| Түс | Кара |
| Power Source | Power Adapter Operated |
| Өлчөмдөрү (L x W x Y) | 33.3 x 29.9 x 29 см |
| Сунушталган Колдонуулар | Motion Detection, Surveillance |
| Шайкеш түзмөктөр | Smartphones, Tablets, Laptops, Personal Computers |
9. Кепилдик жана колдоо
Your DEATTI 8-Channel 2K Wireless Security Camera System comes with the following:
- 30 күндүк акчаны кайтарып берүү кепилдиги: Эгерде сиз сатып алган товарыңызга канааттанбасаңыз, аны 30 күндүн ичинде кайтарып берип, толук акчаңызды кайтарып алсаңыз болот.
- 1 жылдык Өндүрүүчүнүн Кепилдиги: This product is covered by a 1-year manufacturer warranty against defects in materials and workmanship.
For technical assistance or warranty claims, please contact DEATTI customer support via email. Support is available in English and German.


