1. Киришүү
This manual provides detailed instructions for the installation, operation, and maintenance of your Aerocool Eclipse 12 Pro Bundle ARGB Fan Kit. This kit includes three 120mm Addressable RGB (ARGB) fans, an H66F 6-port control hub, and a remote control. The fans feature a unique dual slim ring lighting design, curved blades for efficient airflow, and anti-vibration pads for quiet operation. The H66F hub allows for centralized control of fan speed via PWM and lighting effects, with options for motherboard synchronization or remote control.

Сүрөт 1.1: Бүттүview of the Aerocool Eclipse 12 Pro Bundle components.
2. Кутуда эмне бар
- 3 x Aerocool Eclipse 120mm ARGB Fans
- 1 x H66F 6-Port ARGB Control Hub
- 1 x Алыстан башкаруу
- Mounting Screws for Fans
- Necessary Connection Cables (SATA power, Motherboard ARGB sync cable, PWM cable)

Image 2.1: All components included in the Aerocool Eclipse 12 Pro Bundle.
3. Орнотуу жана орнотуу
3.1 Коопсуздук чаралары
- Орнотуудан мурун компьютериңиздин өчүрүлгөнүн жана розеткадан суурулганын текшериңиз.
- Бөлүктөрдү кармоодон мурун жерге туташтырылган металл буюмга тийип, статикалык электрди чыгарыңыз.
- Refer to your motherboard manual for specific header locations and compatibility.
3.2 H66F Hub Connection
- Кубат туташуу: Connect the SATA power cable from your power supply to the H66F hub's SATA power input.
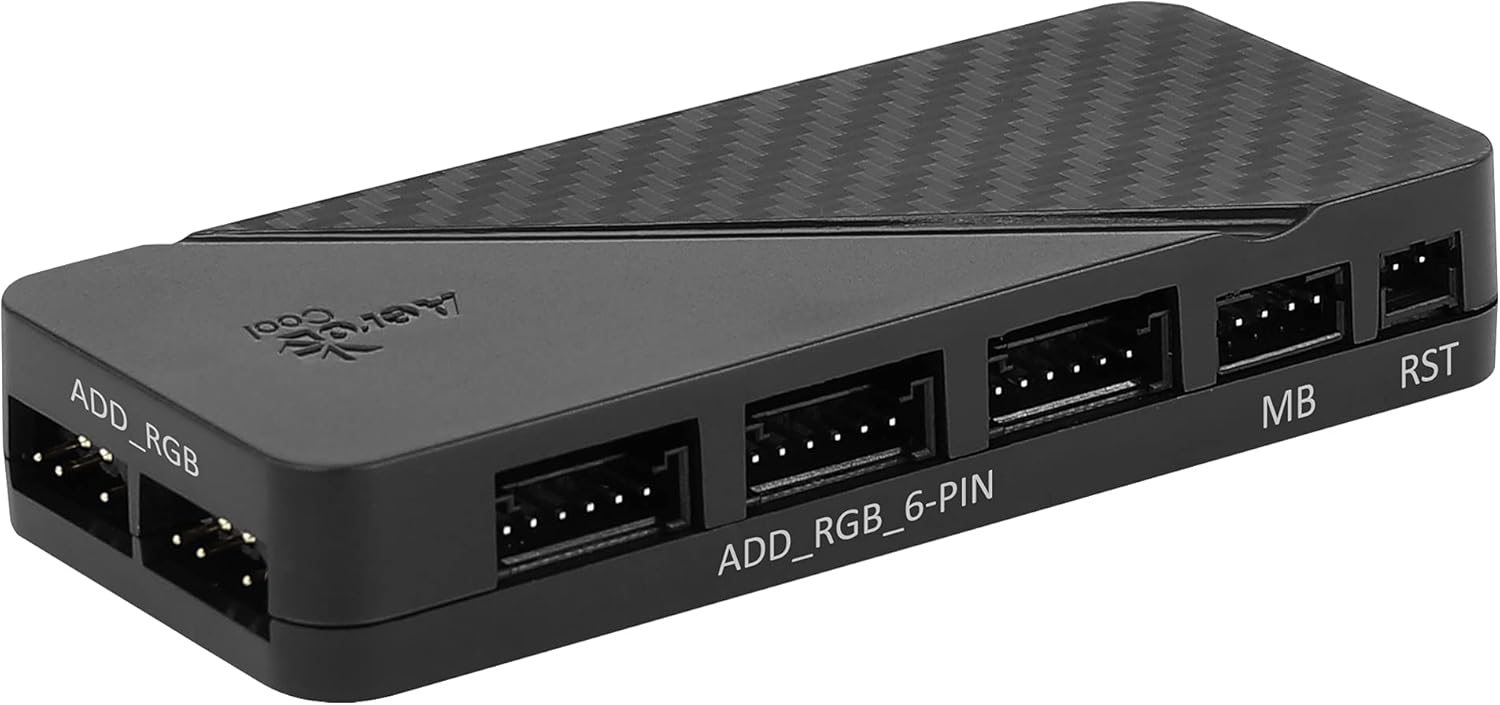
Image 3.2.1: The H66F control hub with various connection ports.
- Желдетүүчү туташуу: Connect each 6-pin fan cable from the Aerocool Eclipse 12 fans to the "ADD_RGB_6-PIN" ports on the H66F hub. The hub supports up to six fans.
- Motherboard ARGB Sync (Optional): If your motherboard has a 5V 3-pin ARGB header, connect the included ARGB sync cable from the H66F hub's "MB" port to your motherboard's ARGB header. This allows software control of lighting.

Сүрөт 3.2.2: Мисample of connection cables, including the ARGB sync cable.
- Motherboard PWM Control (Optional): Connect the included PWM cable from the H66F hub's "PWM" port to a 4-pin PWM fan header on your motherboard. This enables motherboard control of fan speed.
- Reset Switch Connection (Optional): If desired, connect your PC case's reset switch cable to the "RST" port on the H66F hub. This allows you to cycle through lighting modes using the case's reset button.
3.3 Fan Mounting
- Identify suitable mounting locations within your PC case (e.g., front, top, rear, bottom).
- Position each fan in the desired orientation for airflow (intake or exhaust).
- Secure each fan using the provided mounting screws. The anti-vibration pads on the fan corners help reduce noise.
4. Иштөө нускамалары
Once all connections are secure and your computer is powered on, the fans will begin to operate. You can control the fan speed and RGB lighting effects using the included remote control or, if connected, through your motherboard's ARGB software.

Image 4.1: Aerocool Eclipse 12 Pro fans and the remote control for operation.
4.1 Алыстан башкаруу функциялары
The remote control provides direct access to various lighting modes, colors, and fan speed settings.
- Кубат баскычы: Turns the lighting on/off.
- PWM Button: Toggles between PWM control (if connected to motherboard) and fixed fan speed.
- HUB Button: Switches control to the H66F hub's internal modes.
- MOBO Button: Switches control to motherboard ARGB sync (if connected).
- MODE / MODE+ Buttons: Cycles through different lighting effects.
- COLOR / COLOR+ Buttons: Changes the static color or color scheme of the lighting effect.
- SPEED / SPEED+ Buttons: Динамикалык жарыктандыруу эффекттеринин ылдамдыгын тууралайт.
- ASTRO / AUTO / RAINBOW Buttons: Direct access to specific lighting presets.
- Brightness Buttons (Sun icons): Adjusts the brightness of the lighting.
- Кулпу баскычы: Locks the current lighting settings.
4.2 Motherboard Software Control
If the H66F hub is connected to your motherboard's 5V ARGB header, you can use your motherboard's proprietary RGB software (e.g., ASUS Aura Sync, MSI Mystic Light Sync, Gigabyte RGB Fusion, ASRock Polychrome Sync) to customize lighting effects. Ensure the remote control is set to "MOBO" mode for motherboard software to take control.
5. RGB Lighting Features
The Aerocool Eclipse 12 Pro fans feature a dual slim ring lighting design, providing vibrant and customizable illumination. The Addressable RGB (ARGB) technology allows for individual LED control, enabling complex and dynamic lighting patterns.

Image 5.1: Aerocool Eclipse 12 Pro fans showcasing their ARGB lighting effects.
You can switch between various pre-programmed effects using the remote control or synchronize the lighting with other ARGB components in your system via motherboard software.
6. Техникалык тейлөө
Regular maintenance helps ensure optimal performance and longevity of your Aerocool Eclipse 12 Pro fans.
- Тазалоо: Periodically clean dust from the fan blades and frames using compressed air or a soft, dry cloth. Ensure the computer is powered off and unplugged before cleaning.
- Текшерүү: Check fan cables for any signs of wear or damage. Ensure all connections to the H66F hub and motherboard remain secure.
- Курчап турган чөйрө: Operate the fans in a clean, dry environment to prevent dust buildup and moisture damage.
7. Кыйынчылыктарды
| Көйгөй | Мүмкүн себеп | Чечим |
|---|---|---|
| Fans not spinning. | No power to H66F hub; loose fan connection; faulty fan. | Ensure SATA power cable is securely connected to the H66F hub and power supply. Check all 6-pin fan connections to the hub. Test individual fans if possible. |
| RGB жарыктандыруу иштебейт. | No power to H66F hub; loose ARGB connection; remote control not working; hub in wrong mode. | Verify SATA power. Check 6-pin fan connections. Ensure remote control battery is functional. Press "HUB" or "MOBO" on the remote to select the correct control mode. If using motherboard sync, ensure the 5V ARGB cable is connected and motherboard software is configured. |
| Алыстан башкаруу жооп бербей жатат. | Battery depleted; signal obstruction. | Replace the remote control battery. Ensure there are no obstructions between the remote and the H66F hub. |
| Fan speed not controllable via motherboard. | PWM cable not connected; remote not in PWM mode; motherboard header not configured. | Ensure the PWM cable is connected from the H66F hub to a 4-pin PWM header on the motherboard. Press the "PWM" button on the remote. Check motherboard BIOS/UEFI settings for fan header configuration. Note: Fan RPM may not be displayed by the motherboard when connected via the H66F hub. |
8. Техникалык шарттар
| Өзгөчөлүк | Деталь |
|---|---|
| Модель номери | ECLIPSE12PRO |
| Fan өлчөмдөрү | 120 мм x 120 мм x 25 мм (болжол менен 3.94 x 3.94 x 0.79 дюйм) |
| Fan Speed | Up to 2000 RPM (Max) |
| Ызы-чуу деңгээли | 15 dB (Min) - 19.8 dB (Eclipse 12 Pro specific) |
| Аба агымы | 32.1 CFM (Eclipse 12 Pro specific) |
| Статикалык басым | 1.27 mm-H2O (Eclipse 12 Pro specific) |
| Rated Voltage | 12V |
| Power Connector | 6-Pin (Fans), SATA (Hub) |
| RGB туташтыргычы | Addressable RGB (5V 3-pin) |
| Башкаруу ыкмасы | Remote Control, Motherboard ARGB Sync, Motherboard PWM |
| Материал | Copper (referring to internal components, not fan frame) |
| Шайкеш түзмөктөр | Үстөл компьютерлери |
9. Кепилдик жана колдоо
For warranty information and technical support, please refer to the official AeroCool webсайтка же сатуучуга кайрылыңыз. Кепилдик дооматтар үчүн сатып алганыңыздын далилин сактаңыз.
AeroCool Official Webсайт: www.aerocool.io


