1. Киришүү
The KitchenAid Programmable Wired Probe Thermometer KQ906 is designed to assist in accurately monitoring food temperatures during cooking. This device features a wired probe for use in ovens or grills, a digital display, and programmable settings for various types of meat and desired doneness. It also includes a timer function for versatile kitchen use.

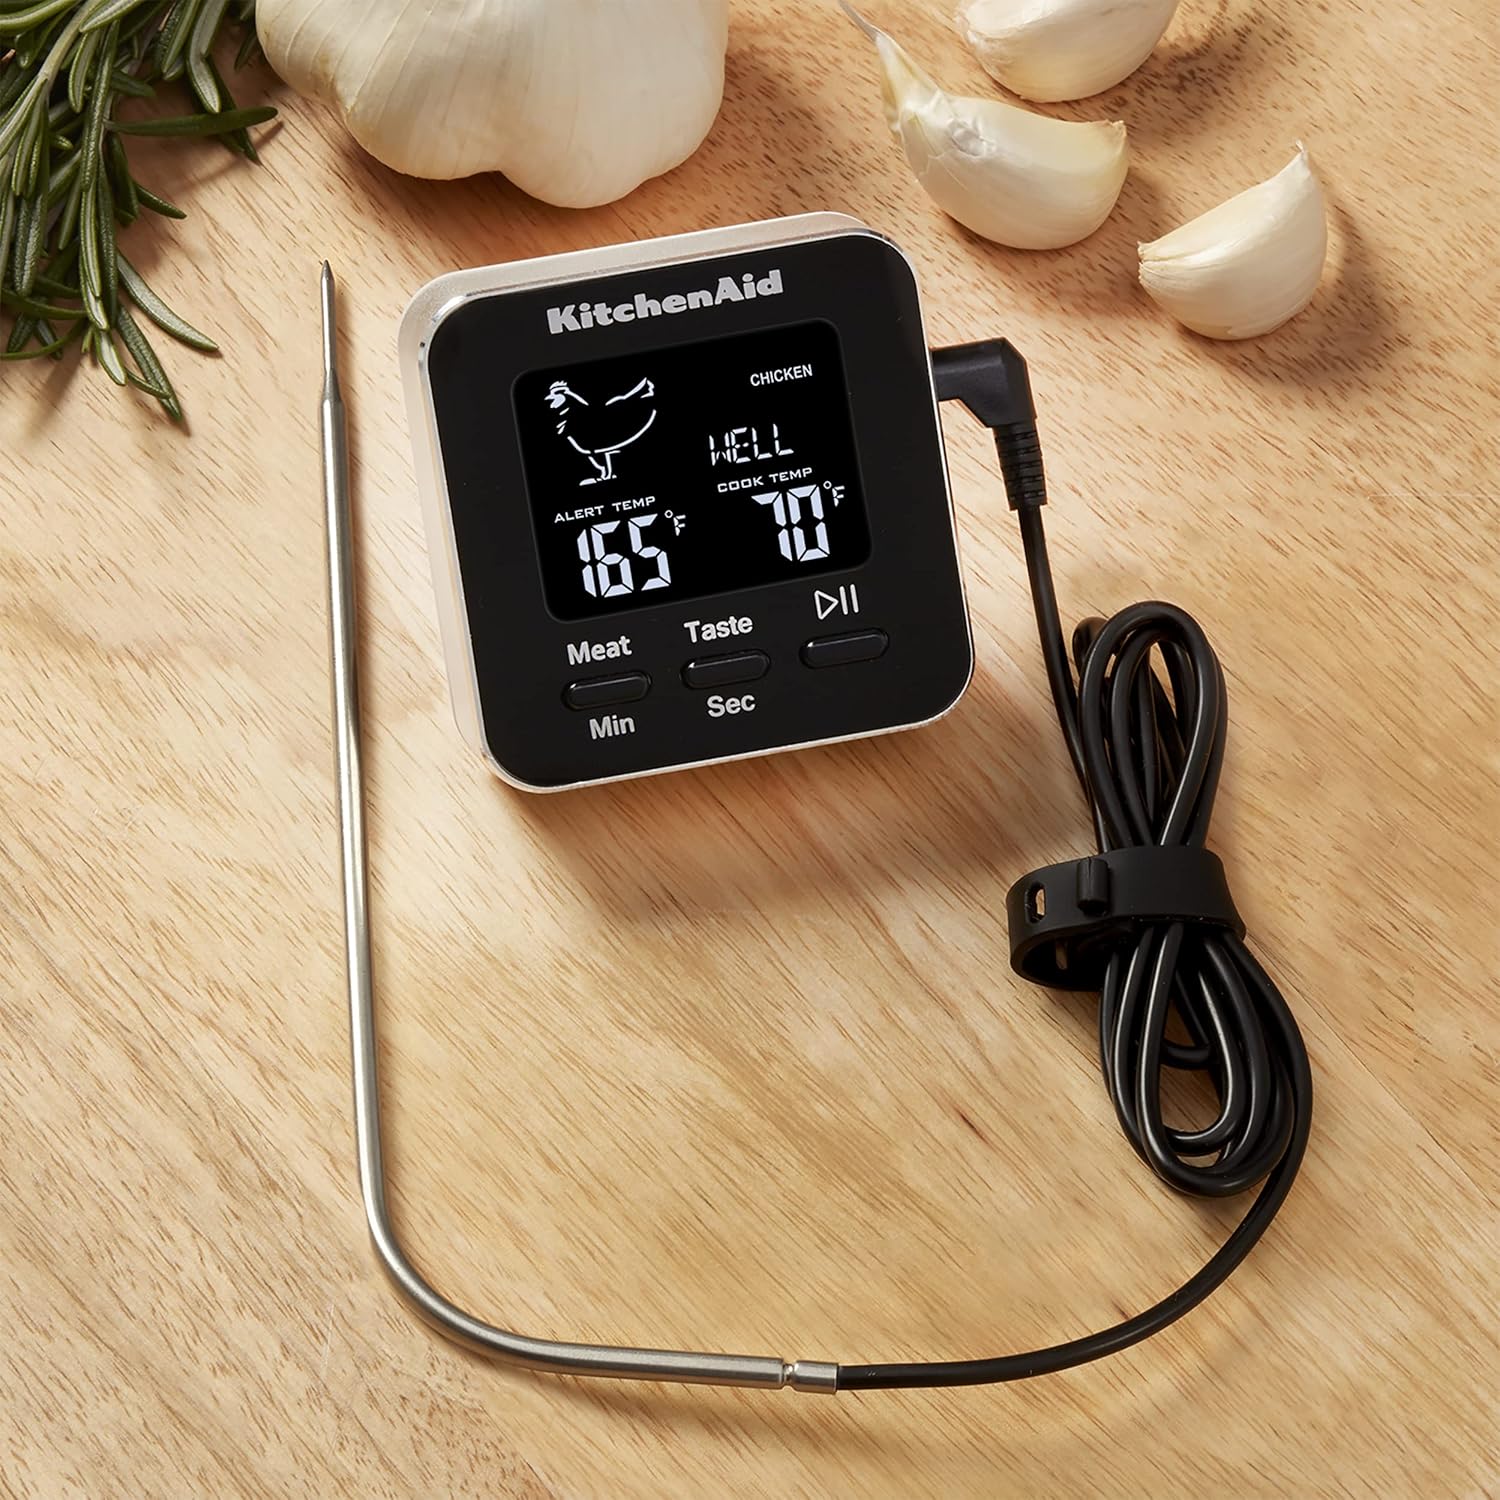
1.1-сүрөт: KitchenAid Programmable Wired Probe Thermometer KQ906. This image displays the main unit with its digital screen, the stainless steel probe, and the connecting silicone cord with a cord wrap.
2. Пакеттин мазмуну
Пакетте бардык компоненттер бар экенин текшериңиз:
- 1 x KitchenAid Programmable Wired Probe Thermometer (Main Unit)
- 1 x Stainless Steel Probe with Silicone Cord
- 1 x Silicone Cord Wrap
- Колдонуучунун Колдонмосу (бул документ)
3. Орнотуу
3.1 Батареяны орнотуу
- Термометрдин арткы бетиндеги батарея бөлүмүн табыңыз.
- Батареянын капкагын жылдырыңыз.
- Бөлүмдүн ичинде көрсөтүлгөндөй, полярдуулуктун тууралыгын (+/-) текшерип, эки AAA 1.5V батарейканы салыңыз.
- Батареянын капкагын бекем жабыңыз.

3.1-сүрөт: Арткы view of the thermometer showing the battery compartment. The image displays the open battery compartment with slots for two AAA batteries and the battery cover.
3.2 Баштапкы күйгүзүү
After battery installation, the unit should power on automatically. If not, locate the power switch (often combined with COOK/TIMER/OFF selector) and slide it to the 'COOK' or 'TIMER' position.
3.3 Зонд туташуусу
Insert the stainless steel probe's jack into the designated port on the side of the main thermometer unit. Ensure a firm connection.

3.2-сүрөт: Бүттүview of the KitchenAid thermometer highlighting its features and dimensions. This image illustrates the thermometer's programmable nature, oven-proof silicone cord, magnetic back, and timer range, along with its physical dimensions and temperature range.
4. Иштөө нускамалары
The thermometer offers two primary modes: Термометр режими жана Таймер режими. These modes function independently and cannot be used simultaneously. Programming one will disable the other.
4.1 Thermometer Mode (COOK)
- Slide the switch on the back of the unit to the 'COOK' position.
- Select Meat Type: Press the 'Meat' button to cycle through preset protein options: Beef, Pork, Fish, Veal, Lamb, Chicken, Turkey, Hamburger, and PGM (custom).
- Select Doneness (Taste): After selecting a meat type, press the 'Taste' button to choose the desired doneness (e.g., Rare, Medium, Well). For 'PGM' (custom), you can manually set the target temperature.
- Пробду киргизүү: Дат баспас болоттон жасалган зондду тамактын эң калың жерине этияттык менен киргизиңиз, сөөк же түкчөлөрдөн сактаныңыз. Зонддун учу толугу менен орнотулганын текшериңиз.
- Монитор температурасы: The display will show the current internal temperature of the food and the set target temperature.
- Ойготкуч: An audible alarm will sound when the food reaches the preset target temperature.
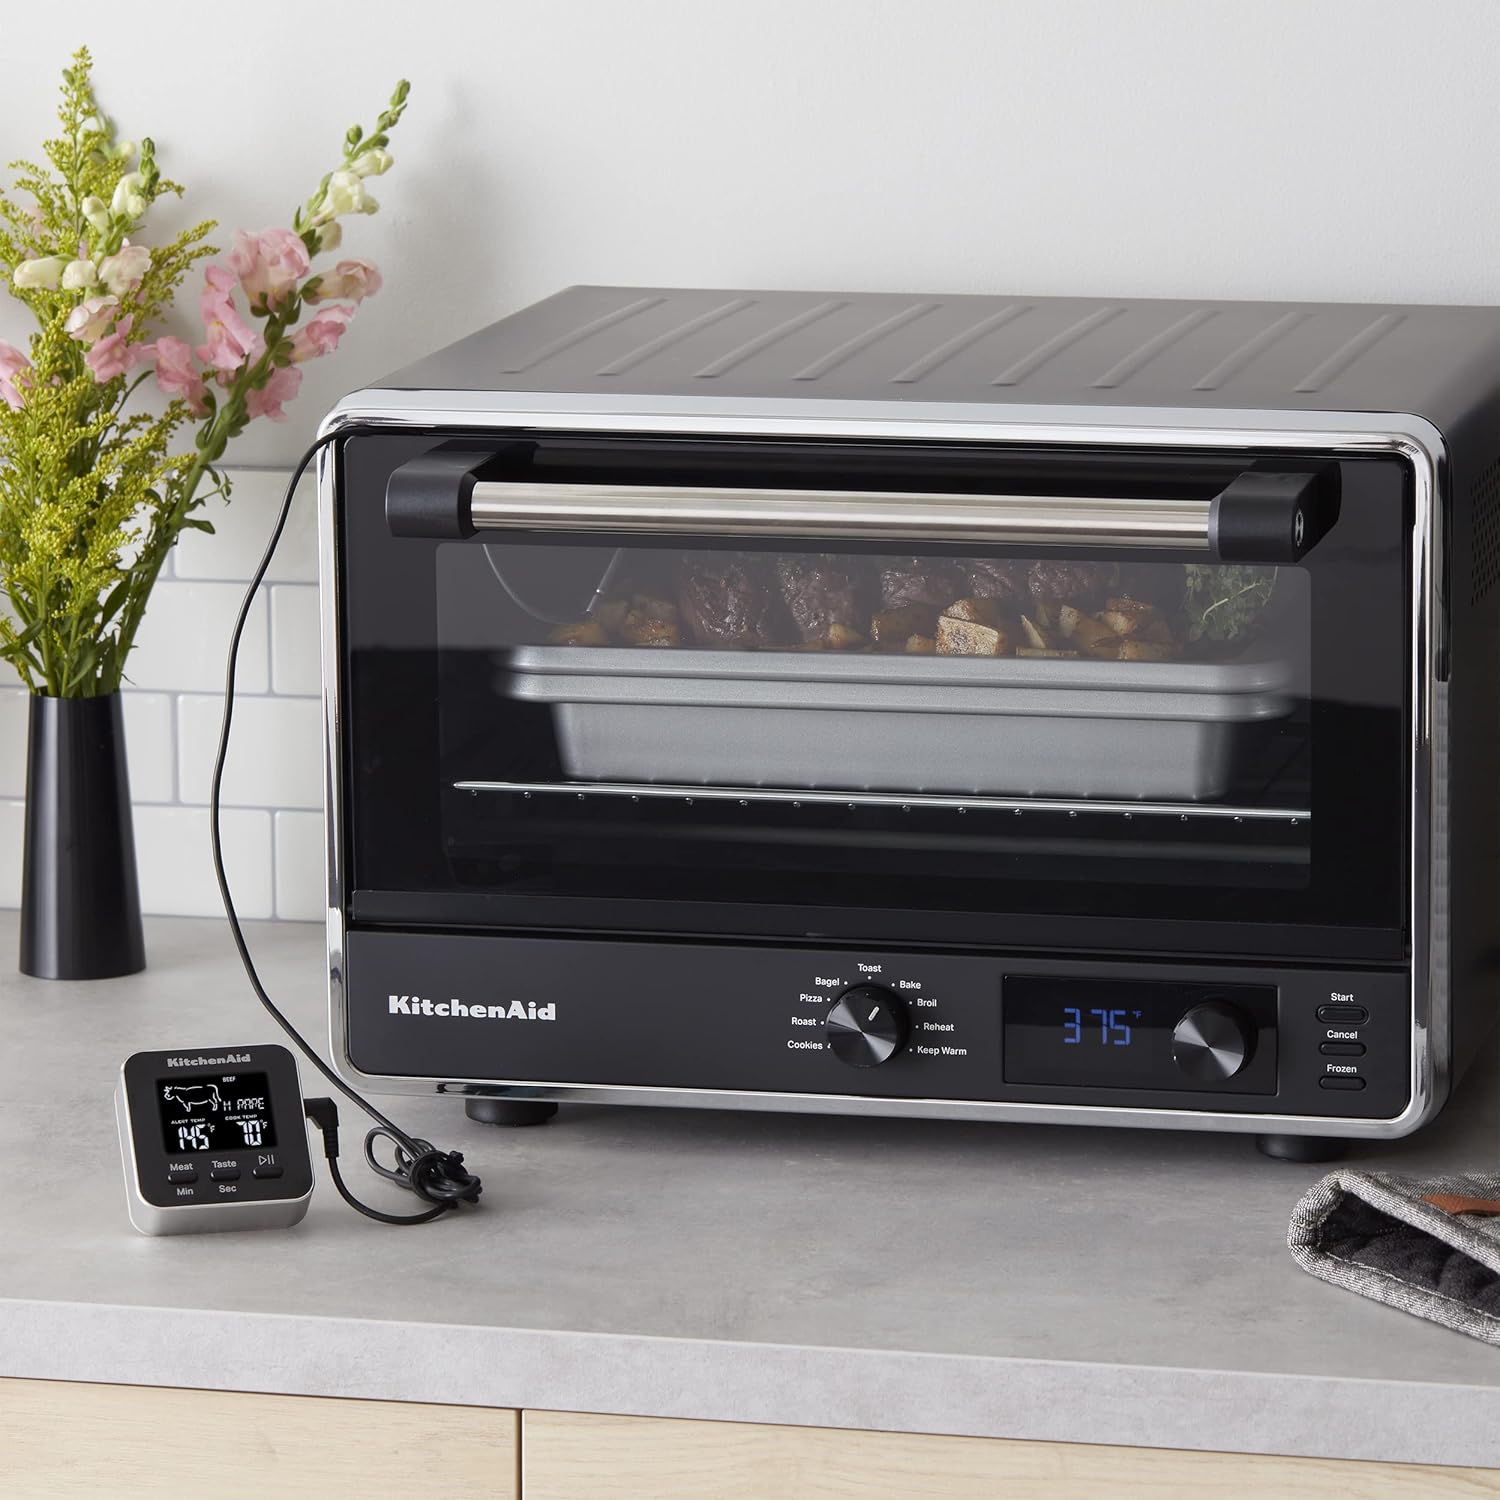
4.1-сүрөт: The thermometer unit placed outside an oven, with its probe inserted into food cooking inside. This demonstrates how to monitor internal food temperature without opening the oven door.

4.2-сүрөт: A hand interacting with the thermometer's display buttons while the probe is inserted into food within an oven. This illustrates the process of setting or checking temperature parameters during cooking.
4.2 Таймер режими
- Slide the switch on the back of the unit to the 'TIMER' position.
- Убакытты коюу: Use the 'Min' and 'Sec' buttons to set the desired countdown time (up to 99 minutes, 59 seconds).
- Баштоо/Токтоо: Press the Play/Pause button (often labeled with a triangle/two vertical bars icon) to start or pause the timer.
- Саноо: The timer can also function as a count-up timer if not set for a countdown.
- Ойготкуч: An alarm will sound when the countdown timer reaches zero.
5. Important Notes and Safety Precautions
- Зонддун жайгашуусу: Digital thermometers are designed for continuous monitoring during cooking. The probe can remain in the food inside the oven or grill.
- Жылуулук таасири: The main thermometer unit (display) is ЖОК meant to be left inside the oven or grill. The plastic and electronic components can be damaged by excessive heat.
- Probe Temperature Limits: The wired probe should not be exposed to temperatures exceeding 482°F (250°C) or come into direct contact with flames.
- Handling Hot Probe: The probe will be hot after use. Always use oven mitts or potholders when handling the hot probe.
- Timer and Thermometer: Remember that the thermometer and timer functions are independent and cannot be used simultaneously. Activating one will disable the other.
6. Техникалык тейлөө жана тазалоо
6.1 Тазалоо боюнча нускамалар
- Негизги блок: Hand wash only. Do not immerse the main thermometer unit in water or place it in a dishwasher. For best results, wipe the unit with a damp чүпүрөк жана кылдат кургатуу.
- Текшерүү: The stainless steel probe can be cleaned with warm, soapy water. Rinse thoroughly and dry completely before storage.
6.2 Сактоо
Utilize the integrated silicone cord wrap to neatly store the probe's cord, preventing tangles and damage. Store the thermometer in a dry place away from extreme temperatures.
6.1-сүрөт: The KitchenAid thermometer displayed on a wooden cutting board, accompanied by garlic cloves and rosemary sprigs. This image showcases the product in a typical kitchen setting.
7. Кыйынчылыктарды
If you encounter issues with your KitchenAid Programmable Wired Probe Thermometer, refer to the following common solutions:
- No Display/Unit Not Turning On:
- Батарейканын уюлдуулугун текшериңиз.
- Батареяларды жаңысына алмаштырыңыз.
- Ensure the power switch is in the 'COOK' or 'TIMER' position.
- Температуранын так эмес көрсөткүчтөрү:
- Зонддун тамактын эң калың жерине толугу менен киргизилгенин, сөөктөрдөн сактанганын текшериңиз.
- Verify the probe cord is securely connected to the main unit.
- Check if the probe or cord has visible damage.
- Ойготкуч угулбайт:
- Confirm the target temperature or timer duration is correctly set.
- Ensure the unit is in the correct mode (COOK for temperature, TIMER for timer).
- Timer or Thermometer Not Working Simultaneously:
- This is normal operation. The unit is designed to function in one mode at a time. Select either 'COOK' or 'TIMER' mode.
8. Техникалык шарттар
| Модель номери | KQ906 |
| Температура диапазону | -40°F – 482°F (-40°C – 250°C) |
| Таймер диапазону | Up to 99 minutes, 59 seconds |
| Дисплей түрү | Санарип |
| Power Source | 2 x AAA 1.5V батарейкалар (киргизилген эмес) |
| Сырткы материал | Кремний, дат баспас болоттон жасалган |
| Продукциянын өлчөмдөрү | 1 x 3.2 x 7.6 дюйм (Негизги бирдик) |
| Продукт Салмагы | 4.97 унция |
| Care Instructions | Hand Wash Only (Main Unit), Probe is washable |
9. Кепилдик жана колдоо
For warranty information, product support, or to inquire about replacement parts, please refer to the official KitchenAid website or contact KitchenAid customer service directly. Keep your purchase receipt as proof of purchase.
Webсайт: www.kitchenaid.com


