1. Киришүү
Thank you for choosing the HOMVILLA Digital Alarm Clock. This device features a large LED mirror display, temperature indication, dual alarms, voice activation, and adjustable settings for brightness and volume. This manual provides detailed instructions to help you set up and operate your new alarm clock effectively.
2. Пакеттин мазмуну
- HOMVILLA Digital Alarm Clock (Model 8808)
- USB кубат кабели
- User Manual
3. Продукт бүтүп калдыview
Ойготкуч саатыңыздын ар кандай компоненттери жана башкаруу элементтери менен таанышып алыңыз.
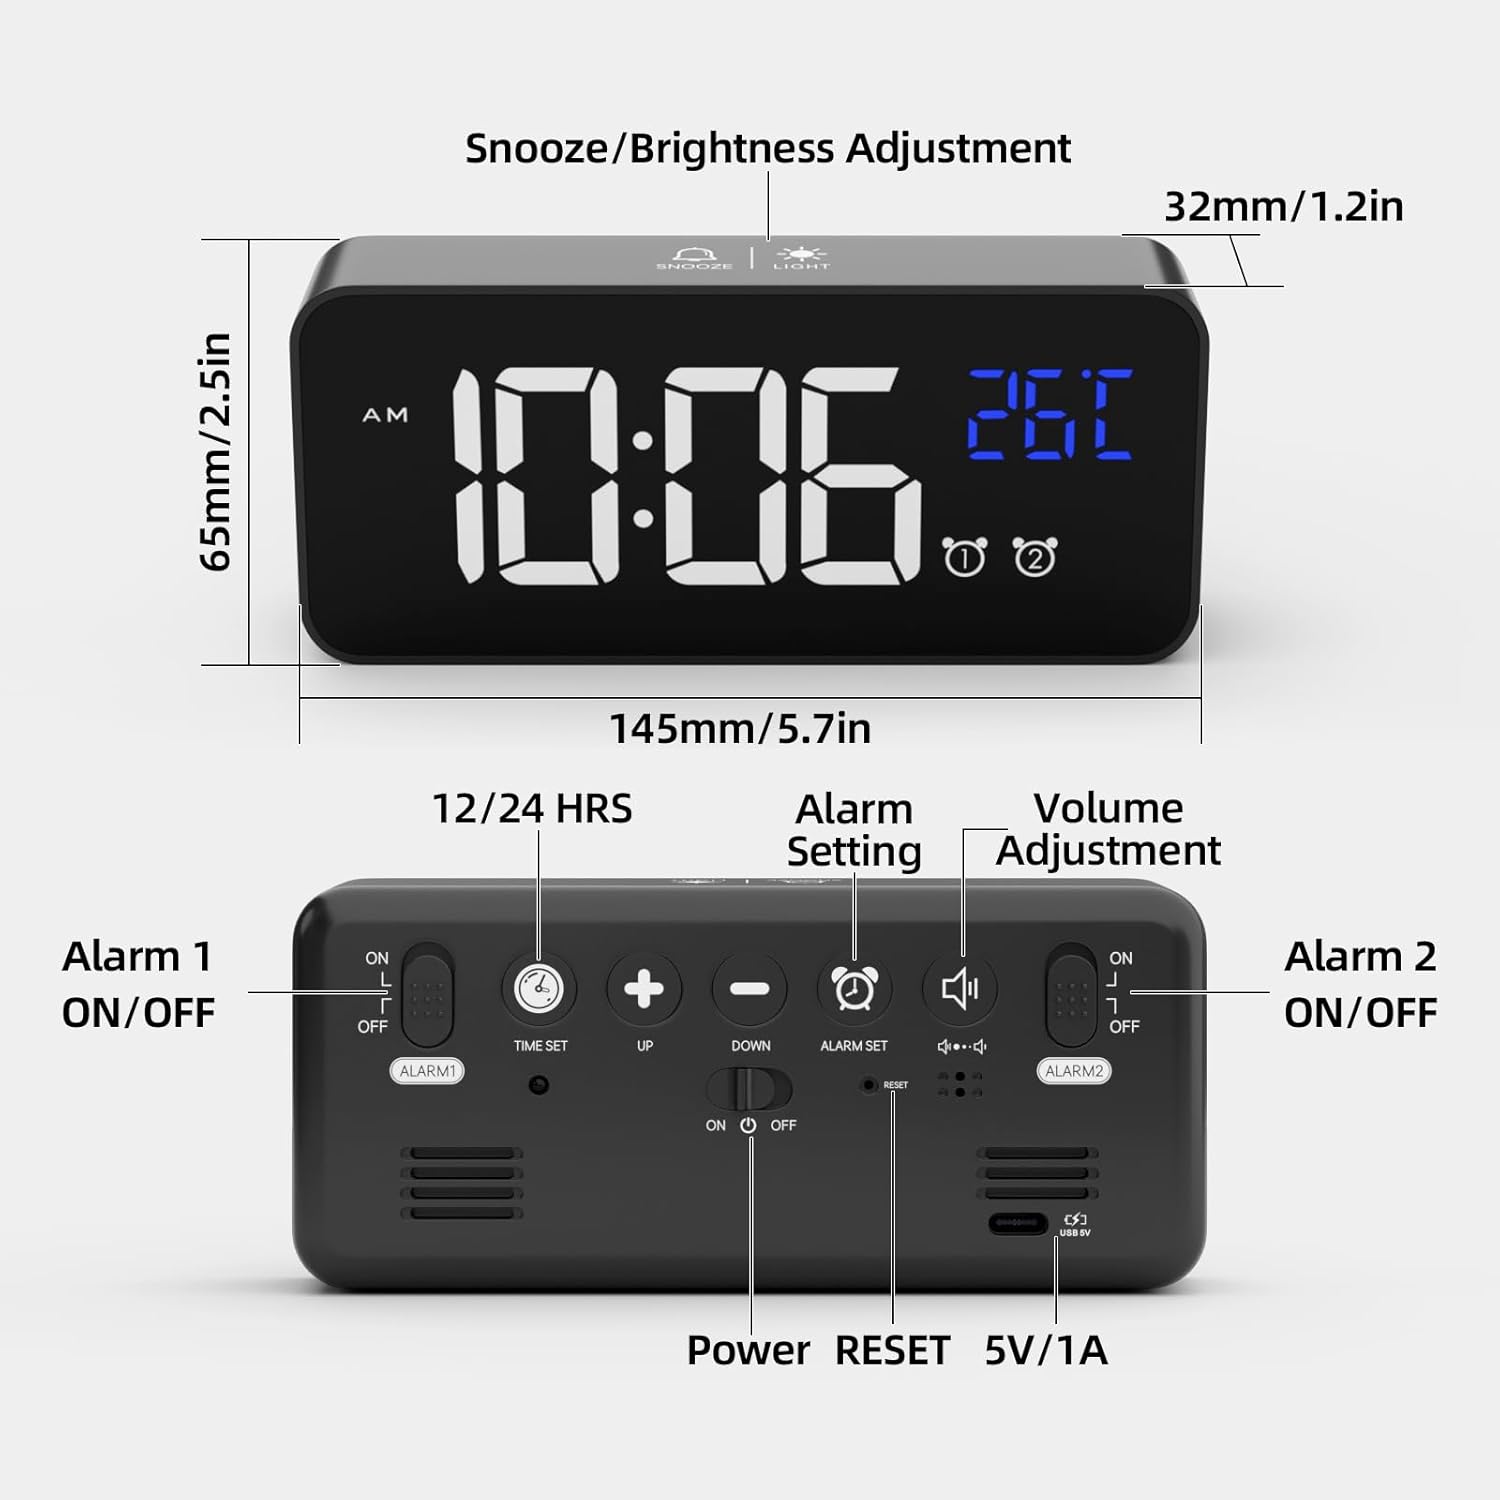
Сүрөт 3.1: Алдыңкы жана арткы View of the Alarm Clock. The front features the LED display for time and temperature, along with alarm indicators. The top has buttons for Snooze/Brightness Adjustment. The rear panel includes buttons for Time Set, Up, Down, Alarm Set, Volume Adjustment, Alarm 1 ON/OFF switch, Alarm 2 ON/OFF switch, Power button, Reset button, and a 5V/1A USB power input.
Алдыңкы дисплей:
- Убакытты көрсөтүү: Large LED digits showing current time.
- Температура дисплейи: Айлана-чөйрөнүн температурасын Цельсий же Фаренгейтте көрсөтөт.
- AM/PM индикатору: 12 сааттык формат үчүн.
- Сигнал индикаторлору: Icons for Alarm 1 and Alarm 2.
Үстүнкү баскычтар:
- ТЫНЧТЫК/ЖАРЫК баскычы: Activates snooze during an alarm; adjusts brightness.
Rear Buttons and Ports:
- TIME SET баскычы: Убакытты орнотуу режимине кирет.
- UP Button (+): Increases values; switches between 12/24-hour format.
- DOWN Button (-): Decreases values; adjusts volume.
- ALARM SET баскычы: Сигнал орнотуу режимине кирет.
- ALARM 1 ON/OFF Switch: 1-ойготкучту иштетет/өчүрөт.
- ALARM 2 ON/OFF Switch: 2-ойготкучту иштетет/өчүрөт.
- КҮЧ баскычы: Turns the clock on/off.
- RESET баскычы: Resets the clock to factory settings.
- 5V/1A USB порт: For power input and charging the internal battery.
4. Орнотуу
4.1 Баштапкы күйгүзүү
- Connect the provided USB cable to the 5V/1A USB port on the back of the alarm clock.
- Plug the other end of the USB cable into a 5V/1A or 5V/2A USB adapter (not included) or a USB port.
- The LED display will light up. If using battery power, the display will turn off after 6 seconds unless voice activation is triggered. Ensure the clock is fully charged when relying on battery power.
4.2 Убакытты коюу
- басып, кармап туруңуз УБАКЫТТЫ ОРНОТУУ button on the back. The hour digits will start flashing.
- колдонуу ЖОГОРКУ (+) or ТӨМӨН (-) саатты тууралоо үчүн баскычтар.
- Басыңыз УБАКЫТТЫ ОРНОТУУ Саатты ырастоо жана мүнөт коюуга өтүү үчүн кайрадан басыңыз. Мүнөт сандары күйүп-өчүп турат.
- колдонуу ЖОГОРКУ (+) or ТӨМӨН (-) мүнөттөрдү тууралоо үчүн баскычтар.
- Басыңыз УБАКЫТТЫ ОРНОТУУ мүнөттөрдү ырастоо үчүн кайра.
- 12 сааттык жана 24 сааттык форматтын ортосунда которулуу үчүн, басыңыз ЖОГОРКУ (+) button once while the time is displayed (not in setting mode). The 'AM' or 'PM' indicator will appear for 12-hour format.
4.3 Temperature Display Calibration
After unpacking, allow the alarm clock to remain stationary for at least 30 minutes to ensure accurate temperature display.
5. Иштөө нускамалары
5.1 Ойготкучтарды орнотуу (ойготкуч 1 & Ойготкуч 2)
Саат эки көз карандысыз ойготкуч менен жабдылган.

Сүрөт 5.1: Example of setting two distinct alarms for different daily needs.
- басып, кармап туруңуз Сигналды орнотуу button. The Alarm 1 hour digits will flash.
- колдонуу ЖОГОРКУ (+) or ТӨМӨН (-) buttons to adjust the Alarm 1 hour.
- Басыңыз Сигналды орнотуу again to confirm the hour and move to Alarm 1 minute setting. The minute digits will flash.
- колдонуу ЖОГОРКУ (+) or ТӨМӨН (-) buttons to adjust the Alarm 1 minutes.
- Басыңыз Сигналды орнотуу again to confirm Alarm 1 minutes.
- Repeat steps 2-5 for Alarm 2.
- After setting both alarms, use the ALARM 1 ON/OFF жана ALARM 2 ON/OFF switches on the back to activate or deactivate each alarm. An alarm icon will appear on the display when an alarm is active.
5.2 Selecting Ringtones
The alarm clock offers 10 different ringtones.
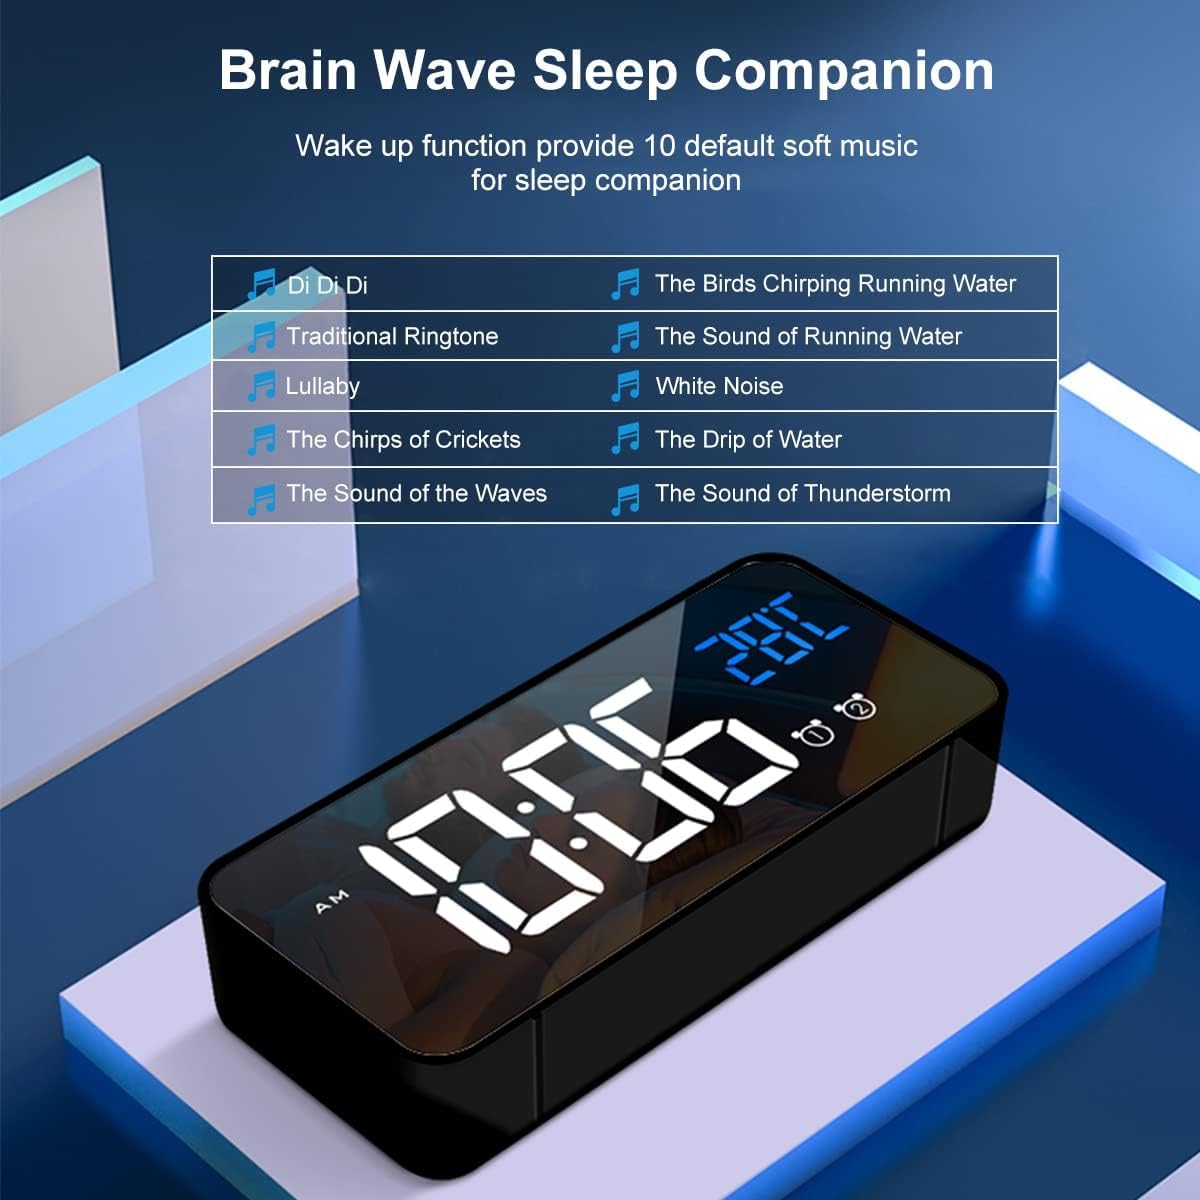
Сүрөт 5.2: List of 10 available ringtones, ranging from traditional to nature sounds.
- While in alarm setting mode (after setting minutes for an alarm), press Сигналды орнотуу again to cycle through ringtone options.
- колдонуу ЖОГОРКУ (+) or ТӨМӨН (-) buttons to select your desired ringtone.
- Басыңыз Сигналды орнотуу to confirm the ringtone.
5.3 Ойготкучтун үнүн тууралоо
There are three adjustable volume levels for the alarm.

Сүрөт 5.3: Visual representation of the alarm volume adjustment.
- While in alarm setting mode (after selecting ringtone), press Сигналды орнотуу again to enter volume adjustment.
- колдонуу ЖОГОРКУ (+) or ТӨМӨН (-) buttons to select one of the three volume levels.
- Басыңыз Сигналды орнотуу to confirm the volume and exit alarm setting.
5.4 Тындыруу функциясы
Ойготкуч чыкканда, басыңыз SNOOZE / LIGHT button on the top to activate the snooze function. The alarm will pause for 5 minutes and then sound again. The alarm icon will flash during snooze mode. To turn off the alarm completely, press any other button on the back of the clock.

Сүрөт 5.4: Activating the 5-minute snooze by pressing the top button.
5.5 Жарыктыкты жөндөө
The clock offers 4 levels of brightness. When powered by USB, the clock can automatically adjust brightness based on time of day. You can also manually adjust it.

Сүрөт 5.5: The four adjustable brightness levels of the LED display.
- басыңыз SNOOZE / LIGHT button on the top to cycle through the 4 brightness levels.
- If connected via USB, the clock may automatically adjust brightness. Manual adjustment will override automatic settings until the next automatic cycle.
5.6 Үн менен башкаруу функциясы
When operating on battery power, the display will turn off after 6 seconds to conserve energy. You can activate the display by making a sound (e.g., clapping) or gently knocking on the surface where the clock rests, if the ambient noise reaches approximately 90 decibels. The display will light up for 6 seconds.

Сүрөт 5.6: Demonstrating how sound or vibration can activate the display in battery mode.
Эскертүү: When the clock is connected via USB for continuous power, the intelligent voice control function is automatically disabled, and the display remains continuously on.
5.7 Температура дисплейи
The clock displays the ambient temperature. To switch between Celsius (°C) and Fahrenheit (°F), press the ЖОГОРКУ (+) button once while the temperature is displayed (not in setting mode).

Сүрөт 5.7: Switching between Celsius and Fahrenheit temperature units.
5.8 Эстутум функциясы
The alarm clock has a built-in memory function. If the clock is sufficiently charged and the power key is turned off, it will retain its time and alarm settings. When powered on again, it will display the correct time without needing to be reset.

Сүрөт 5.8: The clock's memory function ensures settings are retained even when powered off, provided it has sufficient charge.
6. Техникалык тейлөө
- Тазалоо: Use a soft, dry cloth to clean the mirror display and casinг. Абразивдүү тазалагычтардан же эриткичтерден качыңыз.
- Батареяга кам көрүү: For optimal battery life, avoid fully discharging the internal lithium battery frequently. Recharge the clock when the battery indicator is low.
- Сактагыч: If storing the clock for an extended period, ensure it is fully charged and store it in a cool, dry place.
7. Кыйынчылыктарды
| Көйгөй | Мүмкүн себеп | Чечим |
|---|---|---|
| Display is off or dim (battery mode) | Battery is low or voice activation not triggered. | Connect to USB power to charge. Make a sound (e.g., clap) or gently knock to activate display. |
| Ойготкуч угулбайт | Ойготкуч иштетилген эмес же үн өтө төмөн. | Check ALARM ON/OFF switch on the back. Adjust alarm volume (Section 5.3). |
| Туура эмес убакыт/дата | Убакыт туура эмес коюлган же электр энергиясы үзгүлтүккө учураган. | Reset the time (Section 4.2). If issues persist, use the RESET button on the back. |
| Температураны окуу туура эмес көрүнөт | Clock recently moved or placed near a heat/cold source. | Allow the clock to stabilize for 30 minutes in its location. Ensure it's not near extreme temperatures. |
8. Техникалык шарттар
- Бренд: HOMVILLA
- Модель номери: 8808
- Түсү: Кара
- Продукциянын өлчөмдөрү (L x W x Y): 14.5 x 3.81 x 3 см (5.7 x 1.5 x 1.2 дюйм)
- Элемент Салмагы: 158 грамм (0.35 фунт)
- Материал: Пластик
- Дисплей түрү: Digital LED
- Өзгөчөлүктөр: Alarm, Temperature Display, Voice Activation, Snooze, Adjustable Brightness, Adjustable Volume, Memory Function
- Кубат булагы: Battery Powered (internal lithium battery) / USB Powered (5V/1A)
- Бөлмө түрү: Уктоочу бөлмө
- Форма: Төрт бурчтуу
- Ички/тышкы колдонуу: Indoor
9. Кепилдик жана колдоо
For warranty information or technical support, please refer to the product packaging or contact HOMVILLA customer service through your purchase platform. Keep your proof of purchase for any warranty claims.


