Introduction
The Perel EDIN305N is a 230V 16A 3600W DIN-rail mount digital weekly timer designed for indoor use. This device allows for precise, programmable control of electrical circuits, enabling automatic switching ON and OFF of connected appliances or lighting systems over a weekly cycle. It features a clear digital display and multiple programming options to suit various scheduling needs.
Коопсуздук чаралары
ЭСКЕРТҮҮ: Electrical installation should only be performed by a qualified electrician. Incorrect wiring can lead to electric shock, fire, or damage to the device and connected equipment. Always disconnect power at the main circuit breaker before installation or maintenance.
- Ensure the power supply matches the device's specifications (230V~50Hz).
- 16A / 3600W максималдуу жүк көтөрүмдүүлүгүнөн ашпаңыз.
- This device is designed for indoor use only. Avoid exposure to moisture, dust, or extreme temperatures.
- Аппаратты өзүңүз ачууга же оңдоого аракет кылбаңыз. Бардык тейлөөлөрдү квалификациялуу кызматкерлерге тапшырыңыз.
- Балдар жетпеген жерде сактаңыз.
Продукт бүттүview
The Perel EDIN305N digital timer consists of a main body with a digital display, control buttons, and terminal blocks for electrical connections. A transparent cover protects the display and buttons.
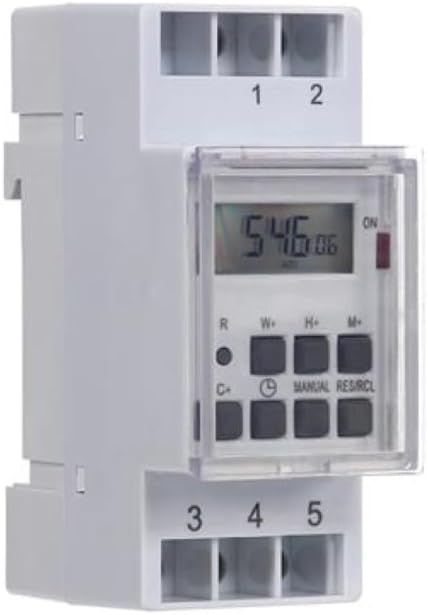
1-сүрөт: Фронт view of the Perel EDIN305N Digital Weekly Timer. The image displays the LCD screen, control buttons (R, W+, H+, M+, C+, Clock, Manual, RES/RCL), and numbered terminal blocks (1, 2 at the top, 3, 4, 5 at the bottom).
Башкаруу баскычтары:
- R: Reset button (recessed).
- W+: Weekday setting.
- H+: Саат жөндөө.
- M+: Minute setting.
- C+: Clear program.
- Саат сөлөкөтү: Used to set current time and day, and to exit programming mode.
- КОЛ: Manual override for ON/AUTO/OFF modes.
- RES/RCL: Reset/Recall program.
Терминал блоктору:
- 1, 2: Power supply input (N, L).
- 3, 4, 5: Output terminals for controlled circuit (Common, Normally Open, Normally Closed).
Техникалык мүнөздөмөлөр
| Параметр | Нарк |
|---|---|
| Модель номери | EDIN305N |
| Тtage | 230V~50Hz |
| Макс. Учурдагы | 16A |
| Макс. Күч | 3600 Вт |
| Орнотуулардын саны | 7 (КҮЙГҮЗҮҮ/ӨЧҮРҮҮ программалары) |
| Монтаж түрү | Темир менен |
| Өлчөмдөрү (L x W x Y) | 2.36 x 3.54 x 1.57 дюйм (60 x 90 x 40 мм) |
| Салмагы | 0.12 кг (4.2 унция) |
| Материал | Пластик |
| Түс | Ак |
| Батареялар талап кылынат | No (internal battery for memory backup) |
Орнотуу
1. Монтаждоо
The Perel EDIN305N is designed for DIN-rail mounting. Securely attach the timer to a standard 35mm DIN-rail within an electrical enclosure. Ensure sufficient space for wiring and ventilation.
2. Электр зымдары
МААНИЛҮҮ: Ensure power is disconnected at the main circuit breaker before proceeding with wiring. Follow local electrical codes and regulations.
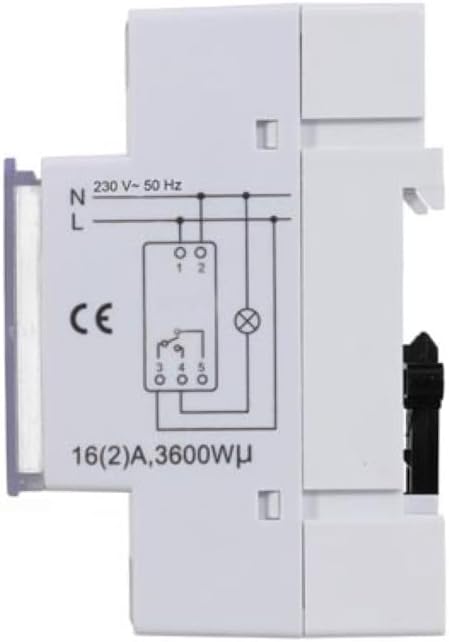
2-сүрөт: Side view of the Perel EDIN305N Digital Weekly Timer showing the electrical wiring diagram. It illustrates connections for Neutral (N), Live (L), and the output contacts (1, 2, 3, 4, 5) for controlling a load.
Refer to the wiring diagram (Figure 2) and the terminal block labels on the device:
- Connect the Neutral (N) wire of your 230V AC supply to terminal 1.
- Connect the Live (L) wire of your 230V AC supply to terminal 2.
- For the controlled circuit:
- Terminal 3: Common contact for the relay output.
- Terminal 4: Normally Open (NO) contact. The circuit connected here will be ON when the timer is active.
- Terminal 5: Normally Closed (NC) contact. The circuit connected here will be OFF when the timer is active.
- Connect the load (e.g., light, appliance) between the Live (L) supply and either terminal 4 (for NO operation) or terminal 5 (for NC operation), with terminal 3 connected to the Live (L) supply. Alternatively, connect the load between terminal 4 or 5 and the Neutral (N) supply, with terminal 3 connected to the Live (L) supply. Consult a qualified electrician for specific load wiring configurations.
Баштапкы орнотуу жана иштетүү
1. Power On and Reset
After wiring and restoring power, the display will illuminate. If the display is blank or shows erratic characters, press the recessed R (Reset) button using a pointed non-metallic object (e.g., a pen tip). This will clear all settings and restore default values.
2. Учурдагы убакытты жана күндү коюу
- басып, кармап туруңуз Саат сөлөкөтү баскычы.
- кармап жатканда Саат сөлөкөтү баскычын басыңыз W+ to set the current day of the week (1=Monday, 7=Sunday).
- кармап жатканда Саат сөлөкөтү баскычын басыңыз H+ учурдагы саатты орнотуу үчүн (0-23).
- кармап жатканда Саат сөлөкөтү баскычын басыңыз M+ учурдагы мүнөттү коюу үчүн (0-59).
- бошотуңуз Саат сөлөкөтү button. The time and day are now set.
3. КҮЙГҮЗҮҮ/ӨЧҮРҮҮ ЦИКЛДЕРИН ПРОГРАММАЛОО
Таймер 7га чейин КҮЙГҮЗҮҮ/ӨЧҮРҮҮ программаларын колдойт. Ар бир программа КҮЙГҮЗҮҮ убактысынан жана ӨЧҮРҮҮ убактысынан турат.
- басыңыз Саат сөлөкөтү button once to enter programming mode. The display will show "1 ON".
- Басыңыз W+ to select the day(s) for this program. You can choose a single day, a block of days (e.g., Mon-Fri), or all days.
- Басыңыз H+ to set the ON hour for program 1.
- Басыңыз M+ to set the ON minute for program 1.
- басыңыз Саат сөлөкөтү баскычын кайра басыңыз. Дисплейде "1 OFF" көрсөтүлөт.
- Repeat steps 2-4 to set the OFF day(s), hour, and minute for program 1.
- To set additional programs (2-7), press the Саат сөлөкөтү button to cycle through "2 ON", "2 OFF", etc., and repeat the setting process.
- Бардык керектүү программаларды орноткондон кийин, баскычын басыңыз КОЛ программалоо режиминен чыгып, учурдагы убакытты көрсөтүүгө кайтуу үчүн баскычты басыңыз.
4. Кол менен өзгөртүү
басыңыз КОЛ button repeatedly to cycle through the operating modes:
- КҮЙҮК: Чыгаруу үзгүлтүксүз КҮЙҮК абалда турат, бардык программаларды жокко чыгарат.
- АВТО: The timer operates according to the programmed ON/OFF cycles.
- ӨЧҮК: Чыгаруу үзгүлтүксүз ӨЧҮК абалда турат, бардык программаларды жокко чыгарат.
Таймердин коюлганын текшериңиз АВТО for programmed operation.
5. Clearing Programs
To clear a specific program:
- баскычын басуу менен программалоо режимине кириңиз Саат сөлөкөтү button until the desired program number (e.g., "3 ON") is displayed.
- басыңыз C+ button. This will clear both the ON and OFF times for that specific program.
- Зарылчылыкка жараша башка программалар үчүн кайталаңыз.
- Басыңыз КОЛ программалоо режиминен чыгуу үчүн.
To clear all programs and reset the device, use the recessed R (Reset) button.
Техникалык тейлөө
- Аппаратты жумшак, кургак чүпүрөк менен тазалаңыз. Абразивдүү тазалагычтарды же эриткичтерди колдонбоңуз.
- Ensure the transparent cover is closed to protect the display and buttons from dust and splashes.
- Regularly check electrical connections for tightness, especially in high-vibration environments.
Проблемаларды чечүү
| Көйгөй | Мүмкүн себеп | Чечим |
|---|---|---|
| Дисплей бош. | Электр менен камсыздоо жок; ички батареясы түгөндү. | Check power connections (terminals 1 & 2). Ensure main power is ON. If power is present, press the R (Reset) button. The internal battery recharges when connected to power. |
| Таймер программалангандай күйбөй/өчпөй жатат. | Incorrect program settings; timer in manual ON/OFF mode. | Verify program settings (time, day, ON/OFF). Ensure the timer is in АВТО басуу менен режим КОЛ баскычы. |
| Connected appliance not receiving power. | Incorrect wiring; appliance fault; timer fault. | Check wiring according to Figure 2. Test the appliance directly. If wiring and appliance are fine, the timer may be faulty. |
| Buttons unresponsive or display erratic. | Software glitch; low internal battery. | Press the recessed R (Reset) button. Ensure the timer has been connected to power for at least 24 hours to fully charge the internal battery. |
утилдештирүү
Do not dispose of this product with general household waste. This electronic device contains materials that can be recycled. Please dispose of it at a designated collection point for electrical and electronic equipment waste, in accordance with local regulations.
Кепилдик жана колдоо
Perel products are manufactured to high quality standards. For warranty information, technical support, or service inquiries, please refer to the documentation provided with your purchase or contact your local Perel distributor or retailer. Please have your model number (EDIN305N) and purchase details ready when contacting support.


