1. Introduction and Overview
The Escort EDM 1111A is a versatile digital multimeter designed for accurate measurement of various electrical parameters. This device is essential for electricians, technicians, and hobbyists for testing circuits, components, and power sources. It features a clear digital display and a rotary dial for selecting different measurement functions.

The Escort EDM 1111A Digital Multimeter with red and black test leads connected, ready for use.
Негизги функцияларга төмөнкүлөр кирет:
- DC Voltage (DCV) measurement
- AC Voltage (ACV) measurement
- DC Current (DCA) measurement
- AC Current (ACA) measurement
- Каршылыкты (Ω) өлчөө
- Capacitance (CX) measurement
- Diode and Transistor (hFE) testing
2. Орнотуу
2.1 Батареяны орнотуу
The Escort EDM 1111A requires a DC 9V 006P battery for operation. To install or replace the battery:
- Мультиметр өчүрүлгөнүн текшериңиз.
- Бирдиктин артындагы батарея отсегин табыңыз.
- Carefully slide open or unscrew the battery cover.
- Insert a new 9V 006P battery, observing the correct polarity (+/-).
- Батареянын капкагын бекем орнотуңуз.

арткы view of the Escort EDM 1111A Digital Multimeter, showing the battery compartment cover and the product label.
2.2 Сыноо өткөргүчтөрүн туташтыруу
The multimeter comes with two test leads, typically one red (positive) and one black (negative/common). Proper connection is crucial for accurate and safe measurements.
- Көпчүлүк үчүн томtage, resistance, and low current measurements, connect the black lead to the 'COM' (Common) jack.
- Connect the red lead to the 'V-Ω-mA' jack for voltage, каршылык жана миллиampучурдагы өлчөөлөр.
- Жогорку ток өлчөө үчүн (10А чейин) кызыл өткөргүчтү '10A' уячасына туташтырыңыз. Always ensure the correct jack is used to prevent damage to the meter or circuit.

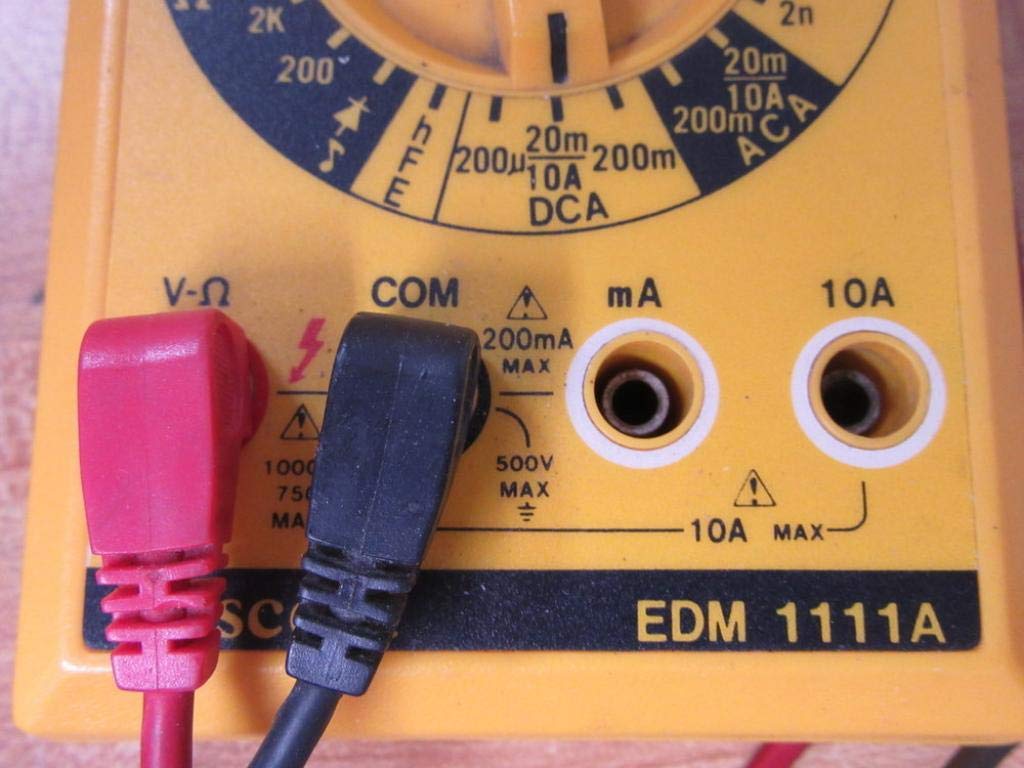
A closer look at the input jacks (V-Ω, COM, mA, 10A) and the lower portion of the rotary dial, indicating current measurement ranges.

The red and black test probes (leads) used with the Escort EDM 1111A Digital Multimeter, featuring pointed tips for electrical contact.
3. Иштөө нускамалары
Before taking any measurements, ensure the test leads are correctly connected and the rotary dial is set to the appropriate function and range.

Деталдаштырылган view of the rotary selector dial on the Escort EDM 1111A Digital Multimeter, displaying various measurement functions such as DCV, ACV, Ω, DCA, ACA, and CX.
3.1 Өлчөө DC Voltage (DCV)
- Set the rotary dial to the desired DCV range (e.g., 200m, 2, 20, 200, 1000). Choose a range higher than the expected voltage.
- Connect the red lead to the positive (+) side of the circuit and the black lead to the negative (-) side.
- Томду окуңузtage мааниси дисплейде.
3.2 AC ченөө Voltage (ACV)
- Set the rotary dial to the desired ACV range (e.g., 200m, 2, 20, 200, 750). Choose a range higher than the expected voltage.
- Сыноо өткөргүчтөрүн AC том аркылуу туташтырыңызtage source. Polarity does not matter for AC voltage.
- Томду окуңузtage мааниси дисплейде.
3.3 Каршылыкты өлчөө (Ω)
- Каршылыкты өлчөөдөн мурун чынжыр же тетиктин энергиясы өчүрүлгөнүн текшериңиз.
- Set the rotary dial to the desired Ω range (e.g., 200, 2K, 20K, 200K, 2M, 20M, 200M).
- Сыноо өткөргүчтөрүн өлчөнө турган компонентке туташтырыңыз.
- Дисплейдеги каршылык маанисин окуп чыгыңыз.
3.4 Measuring DC Current (DCA)
- Схема кубаты өчүрүлгөнүн текшериңиз.
- Set the rotary dial to the desired DCA range (e.g., 200µ, 2m, 20m, 200m, 10A).
- Маанилүү: For currents up to 200mA, use the 'V-Ω-mA' jack for the red lead. For currents up to 10A, use the '10A' jack.
- Break the circuit and connect the multimeter in series with the load. The current must flow through the multimeter.
- Чынжырды кайра күйгүзүп, токтун маанисин окуңуз.
3.5 Measuring AC Current (ACA)
- Схема кубаты өчүрүлгөнүн текшериңиз.
- Set the rotary dial to the desired ACA range (e.g., 200µ, 2m, 20m, 200m, 10A).
- Маанилүү: For currents up to 200mA, use the 'V-Ω-mA' jack for the red lead. For currents up to 10A, use the '10A' jack.
- Схеманы бузуп, мультиметрди жүк менен катар туташтырыңыз.
- Чынжырды кайра күйгүзүп, токтун маанисин окуңуз.
3.6 Measuring Capacitance (CX)
- Сыноодон мурун конденсатордун толук зарядсыздангандыгын текшериңиз.
- Set the rotary dial to the CX range (e.g., 2n, 20n, 200n, 2µ, 20µ).
- Конденсатор терминалдары аркылуу сыноо өткөргүчтөрүн туташтырыңыз.
- Дисплейдеги сыйымдуулуктун маанисин окуңуз.
3.7 Diode and Transistor (hFE) Testing
Refer to the specific markings on the dial for diode and transistor testing functions. Typically, diode test mode allows checking the forward voltage drop of a diode, and hFE mode is used for measuring the DC current gain of transistors.
4. Техникалык тейлөө
4.1 Батареяны алмаштыруу
Replace the 9V 006P battery when the low battery indicator appears on the display or if the multimeter fails to power on. Follow the instructions in Section 2.1.
4.2 Тазалоо
To clean the multimeter, use a soft, damp cloth. Do not use abrasive cleaners or solvents, as they may damage the casing or display. Ensure the device is turned off and disconnected from any circuits before cleaning.
4.3 Сактоо
When not in use for extended periods, store the multimeter in a cool, dry place, away from direct sunlight and extreme temperatures. Consider removing the battery to prevent leakage, which could damage the internal components.
5. Кыйынчылыктарды
| Көйгөй | Мүмкүн себеп | Чечим |
|---|---|---|
| Дисплей жок же күңүрт дисплей | Батарея аз же өлүп калды | Replace the 9V 006P battery. |
| Туура эмес окуулар | Incorrect range selected Poor lead connection Бузулган сыноо өткөргүчтөрү Incorrect input jack used | Тийиштүү диапазонду тандаңыз. Ensure leads are firmly connected. Inspect and replace damaged leads. Verify leads are in the correct V-Ω-mA or 10A jack. |
| "OL" (Ашыкча жүктөө) көрсөтүлөт | Measurement exceeds selected range | Жогорку диапазонго которулуңуз. |
| Үзгүлтүксүздүк сигналы жок | Continuity function not selected Ачык схема | Ensure dial is on continuity/diode test. Check the circuit for breaks. |
6. Техникалык шарттар
| Параметр | Нарк |
|---|---|
| Модел | EDM 1111A |
| Продукциянын өлчөмдөрү (L x W x Y) | 8 x 4 x 2 дюйм |
| Элемент Салмагы | 1.84 фунт |
| Power Source | DC 9V 006P Battery |
| Өлчөө түрү | Мультиметр |
| Өндүрүүчү | Эскорт |
| Дата биринчи жеткиликтүү | 21-ноябрь, 2019-жыл |
| DC Voltage Диапазондор | 200мВ, 2В, 20В, 200В, 1000В |
| AC Voltage Диапазондор | 200мВ, 2В, 20В, 200В, 750В |
| Туруктуу токтун диапазондору | 200µA, 2mA, 20mA, 200mA, 10A |
| AC ток диапазондору | 200µA, 2mA, 20mA, 200mA, 10A |
| Каршылык көрсөтүү чектери | 200Ω, 2KΩ, 20KΩ, 200KΩ, 2MΩ, 20MΩ, 200MΩ |
| Capacitance Ranges | 2nF, 20nF, 200nF, 2µF, 20µF |
7. Кепилдик маалыматы
For specific warranty details regarding your Escort EDM 1111A Digital Multimeter, please refer to the documentation provided at the time of purchase or contact the manufacturer directly. Warranty terms typically cover defects in materials and workmanship under normal use.
8. Кардарларды колдоо кызматы
If you encounter any issues or have questions not covered in this manual, please contact Escort customer support. Have your product model number (EDM 1111A) and serial number (if applicable, found on the back label) ready when contacting support for faster assistance.
The product label on the back of the Escort EDM 1111A, indicating 'DIGITAL MULTIMETER DC 9V 006P BATTERY', serial number, and 'MADE IN TAIWAN R.O.C.'.


