1. Киришүү
This manual provides detailed instructions for the installation, operation, and maintenance of your GIGABYTE B660I AORUS PRO DDR4 Mini-ITX Gaming Motherboard. Designed for 12th Gen Intel Core Series Processors, this motherboard offers robust performance and advanced features for gaming and productivity. Please read this manual thoroughly before proceeding with installation to ensure proper setup and functionality.
2. Негизги өзгөчөлүктөрү
- Intel LGA 1700 розетка: Supports 12th Gen Intel Core Series Processors.
- DDR4 шайкеш: Кош канал ECC эмес буфердик DDR4, 2 DIMM.
- Башкаруучу күч дизайны: 8+1+1 Phases Digital VRM Solution with 90A SPS for stable power delivery.
- Эң алдыңкы жылуулук дизайны: Extended Heatsinks and Multi-Layered PCH/M.2 Heatsink, Shielded Memory Routing, Thermal Backplate for efficient heat dissipation.
- Next Gen Connectivity: PCI 4.0, NVMe PCIe 4.0 x4 M.2, USB 3.2 Gen 2x2 Type-C for high-speed data transfer.
- Fast Networking: Intel 2.5GbE LAN, WIFI 6 802.11ax, BT5 for reliable and high-speed network connections.
- Жакшы жөндөө өзгөчөлүктөрү: RGB FUSION 2.0, Supports Addressable LED & RGB LED Strips, Smart Fan 6, Q-Flash Plus for BIOS updates without CPU, Memory, or GPU installation.
3. Продукт бүтүп калдыview
Familiarize yourself with the layout and components of your motherboard.
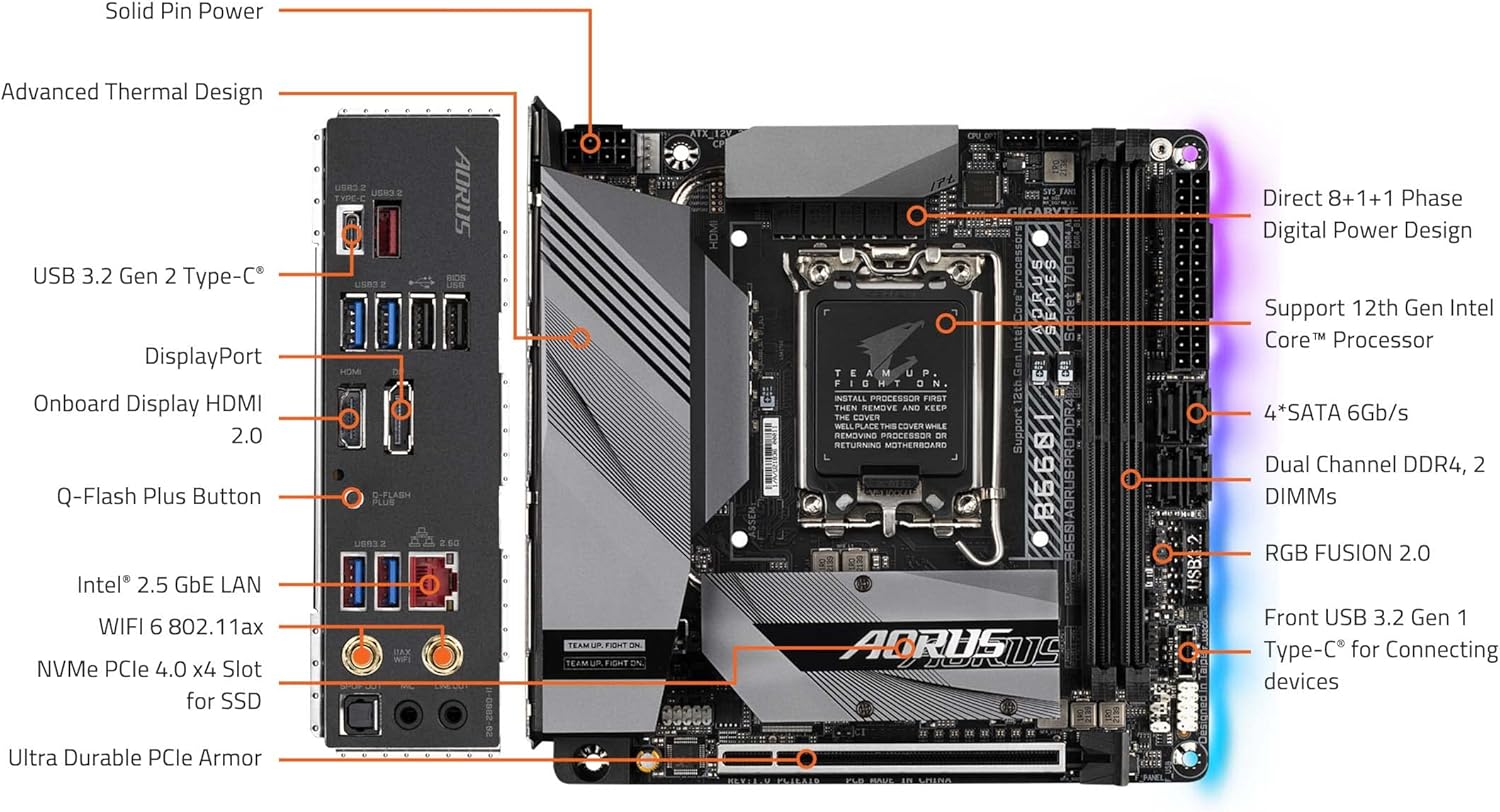
Figure 3.1: GIGABYTE B660I AORUS PRO DDR4 Motherboard with labeled components. This diagram shows the CPU socket, DDR4 DIMM slots, PCIe 4.0 slot, NVMe PCIe 4.0 x4 M.2 slot, USB 3.2 Gen 2 Type-C, DisplayPort, HDMI 2.0, Q-Flash Plus Button, Intel 2.5GbE LAN, WIFI 6 802.11ax, Ultra Durable PCIe Armor, and RGB FUSION 2.0 headers.

Figure 3.2: Rear I/O Panel. This image displays the USB 3.2 ports (Type-C and Type-A), USB 2.0 ports, HDMI, DisplayPort, Intel 2.5GbE LAN port, WiFi antenna connectors, and audio jacks.
4. Орнотуу жана орнотуу
4.1. CPU орнотуу
The motherboard features an LGA 1700 socket. Ensure your CPU cooler has an LGA 1700 bracket for proper installation.
- CPU розеткасынын рычагын ачыңыз.
- Процессордун үч бурчтук белгиси розеткадагы белгиге дал келишин камсыз кылып, CPU менен розеткага кылдат тууралаңыз.
- Процессорду розеткага акырын салыңыз. Аны мажбурлаба.
- CPUну бекитүү үчүн розетка рычагын жабыңыз.
- Install your CPU cooler, ensuring it is compatible with the LGA 1700 socket and properly mounted.

Figure 4.1: CPU Socket and Cooler Bracket. This image shows the LGA 1700 socket on the motherboard and a separate LGA 1700 cooler bracket, emphasizing the need for compatible cooling solutions.
4.2. Эстутум (RAM) орнотуу
This motherboard supports Dual Channel Non-ECC Unbuffered DDR4 memory across 2 DIMM slots.
- DIMM уячасынын эки учундагы клиптерди ачыңыз.
- Align the notch on the DDR4 memory module with the notch on the DIMM slot.
- Эстутумдун модулун уячага кыстаргычтар орнотулганча кыстарыңыз.
4.3. Storage (M.2 SSD) Installation
The motherboard includes an NVMe PCIe 4.0 x4 M.2 slot for high-speed storage.
- Locate the M.2 slot, often covered by a heatsink. Remove the heatsink if present.
- M.2 SSDди уячага бурч менен салыңыз.
- Gently push down the SSD and secure it with the provided screw or retention mechanism.
- Reattach the M.2 heatsink if applicable.
4.4. PCIe картасын орнотуу
The motherboard features a PCIe 4.0 slot for graphics cards or other expansion cards.
- Align your PCIe card with the PCIe slot.
- Press down firmly until the card is seated correctly and the retention clip locks.
- Картаны шассиге бурагыч менен бекитиңиз.
5. Иштөө нускамалары
5.1. Баштапкы жүктөө жана BIOS орнотуу
Upon first boot, access the BIOS/UEFI setup by pressing the designated key (usually DEL or F2) during startup. Here you can configure boot order, system time, and other advanced settings. Refer to the GIGABYTE website for detailed BIOS guides.
5.2. Драйверди орнотуу
After installing your operating system, install the latest drivers for your motherboard's chipset, audio, LAN, and Wi-Fi components. These can be found on the official GIGABYTE support webСиздин конкреттүү моделиңиз үчүн сайт.
5.3. Q-Flash Plus
Q-Flash Plus функциясы сизге процессорду, эс тутумду же видеокартаны орнотпостон BIOS'ту жаңыртууга мүмкүндүк берет. Жөн гана эң акыркы BIOS'ту жүктөп алыңыз file GIGABYTEден website, rename it as instructed, and place it on a USB flash drive. Insert the USB drive into the designated Q-Flash Plus port on the rear I/O panel and press the Q-Flash Plus button.
6. Техникалык тейлөө
6.1. Тазалоо
Regularly clean your PC components to prevent dust buildup, which can lead to overheating. Use compressed air to remove dust from heatsinks, fans, and other components. Ensure the system is powered off and unplugged before cleaning.
6.2. BIOS жаңыртуулары
Keep your BIOS updated to ensure optimal performance, compatibility, and security. Always download BIOS updates directly from the official GIGABYTE website and follow the instructions carefully. Incorrect BIOS updates can damage your motherboard.
6.3. Программалык камсыздоону жаңыртуу
Ensure all system drivers and utility software (e.g., RGB FUSION 2.0, Smart Fan 6) are kept up-to-date for the best user experience and system stability.
7. Кыйынчылыктарды
7.1. No Display/Boot Failure
- Check all power connections to the motherboard (24-pin ATX and 8-pin CPU power).
- Ensure RAM modules are correctly seated in their slots. Try reseating them or testing with one module at a time.
- Verify that the graphics card is properly installed and connected to the monitor.
- Clear CMOS (Complementary Metal-Oxide-Semiconductor) by removing the CMOS battery for a few minutes or using the designated jumper.
7.2. Тармакка туташуу маселелери
- For wired connections, ensure the Ethernet cable is securely plugged into the Intel 2.5GbE LAN port and your router/modem.
- For wireless connections, ensure the Wi-Fi antennas are properly attached to the rear I/O panel.
- Install or update the latest LAN and Wi-Fi drivers from the GIGABYTE webсайт.
7.3. USB Port Malfunction
- Ensure all USB headers on the motherboard are correctly connected to your case's front panel USB ports.
- Чипсет драйверлерин жаңыртыңыз.
- Test the USB device on a different port or another computer to rule out device issues.
8. Техникалык шарттар
| Өзгөчөлүк | Спецификация |
|---|---|
| Бренд | GIGABYTE |
| Модель аты | B660I AORUS PRO DDR4 |
| CPU розетка | LGA 1700 |
| Шайкеш процессорлор | 12th Gen Intel Core Series Processors |
| Чипсет түрү | Intel B660 |
| RAM эс технологиясы | DDR4 |
| Memory Speed | 4400 МГц |
| Эстутум сактоо сыйымдуулугу | 128 ГБ (макс.) |
| Зымсыз түрү | 802.11ax (WiFi 6) |
| LAN | Intel 2.5GbE LAN |
| USB порттору | USB 3.2 Gen 2x2 Type-C, USB 3.2 Gen 2, USB 3.2 Gen 1, USB 2.0 |
| Продукциянын өлчөмдөрү | 9.25 x 8.94 x 3.74 дюйм |
| Элемент Салмагы | 2.62 фунт |
9. Продукциянын демонстрациясы
Video 9.1: A brief product demonstration of the GIGABYTE B660I AORUS PRO DDR4 motherboard, showcasing its physical aspects and features. This video provides a visual overview of the motherboard's design and connectivity options.
10. Кепилдик жана колдоо
GIGABYTE products come with a limited warranty. For detailed warranty information, technical support, driver downloads, and BIOS updates, please visit the official GIGABYTE website. You can also find FAQs and contact customer service through their support portal.
GIGABYTE колдоо Webсайт: www.gigabyte.com/support


