Introduction
The Robus RCM-439 4-Section Carbon Fiber Monopod is engineered to provide stable and reliable support for your camera equipment. Designed with 10x carbon fiber tubes, it offers exceptional rigidity and strength while remaining lightweight. This monopod extends to a maximum height of 65 inches and can support equipment weighing up to 39 lb. It features user-friendly twist-locks for quick adjustments, interchangeable feet for diverse terrains, and a versatile reversible mounting stud for various camera setups. This manual provides essential information for the proper setup, operation, and maintenance of your RCM-439 monopod.
Коопсуздук маалыматы
Please read and understand all safety instructions before using the monopod to prevent damage to the product or injury to yourself.
- Always ensure all twist locks are securely tightened before mounting any equipment or extending the monopod.
- Do not exceed the maximum load capacity of 39 lb (17.69 kg) to prevent instability and potential damage.
- Keep hands and fingers clear of the leg sections when extending or collapsing the monopod to avoid pinching.
- Avoid exposing the monopod to extreme temperatures, corrosive chemicals, or prolonged direct sunlight.
- Use caution when operating the monopod on uneven or slippery surfaces.
Кутуда эмне бар
Төмөнкү нерселердин баары пакетиңизге камтылганын текшериңиз:
- Robus RCM-439 4-Section Carbon Fiber Monopod, 65"
- Ташуу кутусу
- Spike Foot (pre-installed or separate)
- Rubber Foot (pre-installed or separate)
- 2.5мм Hex ачкыч
- 2мм Hex ачкыч

Image: The Robus RCM-439 monopod shown alongside its included carrying case, which features a shoulder strap for easy transport.
Жайгашуу
Attaching a Camera or Head
The RCM-439 monopod features a reversible mounting stud on its head plate, allowing compatibility with both 1/4"-20 and 3/8"-16 threaded accessories.
- To select the desired thread size, gently twist the mounting stud counter-clockwise to remove it from the head plate.
- Flip the stud to expose the alternative thread size.
- Reinsert the stud into the head plate and twist clockwise until it is securely fastened.
- Align your camera, lens collar, or tripod head with the exposed thread and rotate clockwise until it is firmly attached to the monopod. Ensure it is snug but do not overtighten.

Сүрөт: деталдуу view of the monopod's top plate, showing the reversible 1/4"-20 and 3/8"-16 threaded mounting stud for attaching cameras or tripod heads.
Extending and Collapsing the Monopod
The monopod's 4-section design allows for quick height adjustments using twist locks.
- To extend a section, rotate the corresponding twist lock a quarter turn counter-clockwise to loosen it.
- Pull the leg section outwards to the desired length.
- Rotate the twist lock clockwise to securely fasten the section in place.
- Repeat for all sections until the desired height is achieved. The non-rotating leg segments facilitate extending multiple sections simultaneously.
- To collapse, reverse the process: loosen the twist locks, push the sections inwards, and then tighten the locks.

Image: The Robus monopod shown partially extended, illustrating its four sections and the twist-lock mechanisms used for adjusting height.
Interchanging Feet
The monopod includes both rubber and spike feet for optimal stability on various surfaces.
- To change the foot, firmly grasp the existing foot and rotate it counter-clockwise to unscrew it from the bottom of the monopod.
- Select the desired foot (rubber for hard, smooth surfaces; spike for soft ground like dirt or grass).
- Align the new foot with the threaded opening at the base of the monopod and rotate clockwise until it is securely fastened.

Сүрөт: жакын план view demonstrating the interchangeable rubber and spike feet options for the Robus monopod, allowing adaptation to different terrains.
Иштеп жатат
Holding and Positioning the Monopod
Proper handling ensures maximum stability and comfort during use.
- Билек боосу: Utilize the attached wrist strap by looping it around your wrist. This provides an extra layer of security, preventing accidental drops and allowing you to momentarily release your grip without dropping the monopod.
- Кур клип: The integrated belt clip allows you to attach the monopod to your belt or camera bag strap when not in active use, keeping it easily accessible.
- Туруктуулук: For optimal stability, position the monopod directly beneath the center of gravity of your camera setup. Lean the monopod slightly forward or backward, or use it as a third point of contact with your body (e.g., against your hip or shoulder), to create a stable three-point support system.
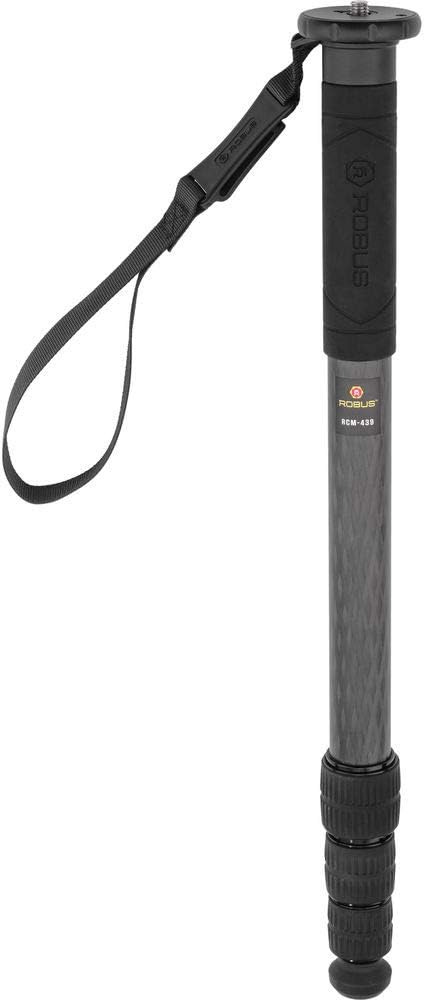
Image: The Robus RCM-439 monopod shown upright, highlighting its textured rubber grip and the attached wrist strap for secure handling.

Image: The Robus monopod shown in use with a camera mounted, demonstrating its extended length and how it supports photographic equipment.
Техникалык тейлөө
Regular maintenance will prolong the life and performance of your monopod.
- Тазалоо: After each use, especially in dusty, sandy, or wet environments, wipe down the carbon fiber tubes and aluminum components with a soft, damp cloth. For stubborn dirt, a mild soap solution can be used, followed by a clean, damp cloth. Ensure all parts are thoroughly dried before storage. Avoid using harsh chemicals or abrasive cleaners.
- Майлоо: Periodically check the twist locks for smooth operation. If they become stiff, apply a very small amount of silicone-based lubricant to the threads. Do not over-lubricate, as this can attract dirt.
- Сактагыч: Store the monopod in its included carrying case in a dry, cool environment away from direct sunlight and extreme temperatures. Ensure it is clean and dry before storing to prevent corrosion or mildew.
Проблемаларды чечүү
If you encounter issues with your RCM-439 monopod, refer to the following common problems and solutions:
- Көйгөй: Monopod sections are difficult to extend or retract.
Чечим: Ensure the twist locks are fully loosened (quarter turn counter-clockwise). Clean any accumulated dirt or debris from the leg sections and inside the twist locks. A small amount of silicone lubricant can be applied to the threads if necessary. - Көйгөй: Camera or attached head feels wobbly or unstable.
Чечим: Verify that the mounting stud is securely tightened to your camera/head and that the head plate is firmly attached to the monopod. Ensure all leg section twist locks are fully tightened. Check that the monopod's feet are appropriate for the surface and are securely attached. - Көйгөй: Monopod slips on the ground.
Чечим: Ensure the correct foot is installed for the terrain (rubber for hard surfaces, spike for soft ground). Verify the foot is securely tightened. Adjust your stance and the monopod's angle for better balance and stability.
Техникалык шарттар
| Өзгөчөлүк | Спецификация |
|---|---|
| Модель номери | RCM-439 |
| Жүктөө жөндөмдүүлүгү | 39 фунт / 17.69 кг |
| Максималдуу иштөө бийиктиги | 65" / 165.1 см |
| Минималдуу иштөө бийиктиги | 21.1" / 53.6 см |
| Катталган узундук | 21.1" / 53.59 см |
| Бут бөлүмдөрү | 4 |
| Бут кулпу түрү | Twist Lock |
| Монтаждоо бурагы | 1/4"-20 Male, 3/8"-16 Male (Reversible) |
| Материалдар | Carbon Fiber, Aluminum, Rubber |
| Элемент Салмагы | 1.1 фунт / 499 гр |
Кепилдик жана колдоо
For information regarding product warranty, technical support, or service inquiries, please refer to the official Robus website or contact Robus customer service directly. It is recommended to retain your purchase receipt as proof of purchase for any warranty claims.
You can find more information about Robus products at: Robus Brand Page on Amazon


