1. Киришүү
This manual provides detailed instructions for the installation, operation, and maintenance of your SMONET 5MP 8-Channel DVR Home Security Camera System. This system is designed for both indoor and outdoor surveillance, featuring 5MP cameras, an 8-channel 5-in-1 DVR with a pre-installed 2TB hard drive, night vision capabilities, and remote viewing via a free mobile application.
1.1 Пакеттин мазмуну
Please verify that all items listed below are included in your package. If any items are missing or damaged, please contact SMONET customer support.
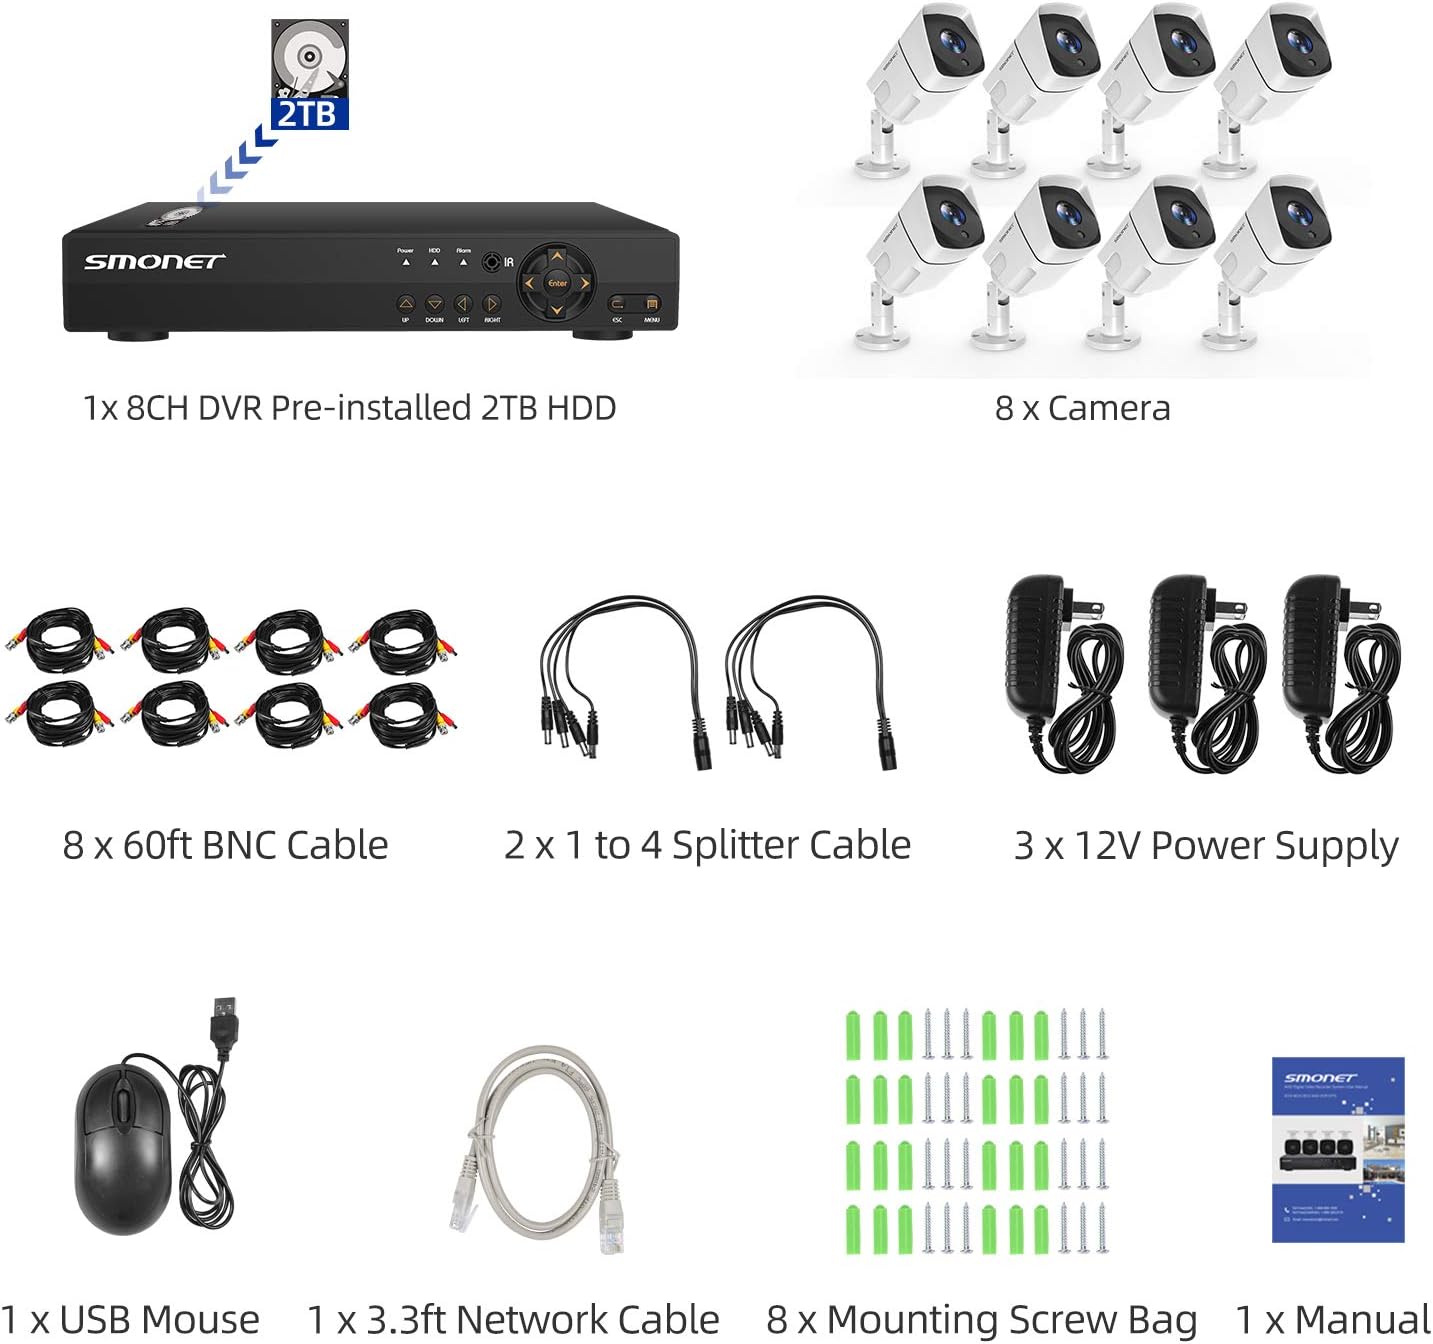
Сүрөт: бүттүview of the system components, including the DVR, 8 cameras, BNC cables, power supplies, splitter cables, USB mouse, network cable, and mounting screws.
- 1 x 8-Channel DVR (Digital Video Recorder) with pre-installed 2TB HDD
- 8 x 5MP FHD Wired Surveillance Cameras
- 8 x 60ft BNC кабелдери
- 2 x 1 to 4 Splitter Cables
- 3 x 12V Power Supplies
- 1 х USB чычкан
- 1 x 3.3ft Network Cable
- 8 x Монтаждык бурамалар баштыктары
- 1 x User Manual
2. Системаны орнотуу
Follow these steps to set up your SMONET security camera system. Ensure all components are connected correctly before powering on the system.
2.1 Байланыш бүттүview

Image: A visual guide illustrating the connections for the DVR, including monitor (VGA/HDMI), mouse, power supply, router, and camera inputs.
2.2 Этап-этабы менен орнотуу
- Connect Monitor to DVR: Connect a PC or TV monitor to the DVR using either a VGA or HDMI cable. Маанилүү: The DVR must be connected to a dedicated PC or TV monitor; it cannot be connected directly to a laptop or an all-in-one computer.
- Кубат жана чычкан туташуусу: Plug in the power supply for the DVR. Connect the USB mouse to one of the USB ports on the DVR.
- Тармактык туташуу (алыстан башкаруу үчүн милдеттүү эмес View): Connect the Router LAN Port to the DVR Ethernet port using the provided network cable. Ensure your router is a WAN (Wide Area Network) type for remote viewфункционалдуулугу.
- Camera Power Setup: Connect the 1 to 4 splitter adapter cable to a 12V power supply.
- Camera Video Connection: Connect the BNC cable from each camera to the splitter. Then, connect the BNC cable from the splitter to a VIDEO IN port on the DVR.
- Camera Power Connection: Connect the power cable from each camera to the 1 to 4 splitter cable.
Video: An official SMONET video demonstrating the step-by-step process of connecting the camera system components, including the DVR, monitor, mouse, network, and cameras.
3. Иштөө нускамалары
Once your system is set up, you can begin monitoring your property. This section covers the primary operational features.
3.1 Live View жана Жаздыруу

Image: Display of four camera feeds, indicating continuous 24/7 recording capability for both indoor and outdoor environments, under various lighting conditions.
- The system supports 24/7 continuous recording to the pre-installed 2TB hard drive.
- View live feeds directly on your connected monitor.
- Ойнотуу жазылган footage through the DVR interface.
3.2 Алыстан ViewМобилдик колдонмо аркылуу
Access your camera feeds remotely from your smartphone or tablet.
Image: A smartphone showing a live camera view, with icons for downloading the 'Danale' app from the App Store and Google Play, and compatibility with various devices.
- Ensure the DVR is connected to a WAN router via an Ethernet cable.
- Download the free 'Danale' mobile application from the App Store (for iOS) or Google Play (for Android).
- Follow the in-app instructions to add your DVR system and begin viewing live video remotely.
- Алыстан viewing is also supported on Windows PC, Apple iPad, Android iPad, Apple iPhone, and Android Phone.
3.3 Кыймылды аныктоо жана эскертүүлөр
Кыймылды аныктоо жана эскертүүлөрдү жөнөтүү үчүн системаңызды конфигурациялаңыз.

Image: A visual representation of motion detection, highlighting a person in a doorway, with a smartphone displaying a 'Motion Detection Alarm' notification.
- Access the DVR's menu to set up motion detection zones and sensitivity for each camera.
- Enable email alerts to receive notifications when motion is detected.
3.4 Түнкү көрүнүш
The cameras are equipped with night vision for clear monitoring in low-light conditions.

Image: A close-up of a SMONET camera, emphasizing its weatherproof design and suitability for both outdoor and indoor use, including night vision functionality.
- Cameras feature IR-LEDs for night vision up to 65ft.
- The IR-Cut filter ensures crisp and clear images in various lighting conditions.
4. Техникалык тейлөө
Туура тейлөө сиздин коопсуздук тутумуңуздун узак мөөнөттүү жана оптималдуу иштешин камсыз кылат.
4.1 Катуу дискти башкаруу
- The 2TB hard drive will automatically overwrite the oldest recordings when full.
- Regularly check the DVR settings to ensure proper hard drive management and recording schedules.
- Consider setting the system to reboot periodically and delete recordings older than a specified number of days to prevent the drive from constantly reporting as full.
4.2 Камераны тазалоо
- Periodically clean the camera lenses with a soft, dry cloth to remove dust, dirt, or smudges that may affect image clarity.
- For outdoor cameras, ensure no debris or spiderwebs obstruct the view.
4.3 Сырсөз коопсуздугу
- It is crucial to modify the default system administrator password immediately after initial setup to protect your video camera system from unauthorized access.
- Use a strong, unique password.
5. Кыйынчылыктарды
This section addresses common issues you might encounter with your SMONET security system.
- No Picture on Monitor: Ensure your DVR is connected to a dedicated PC or TV monitor via VGA or HDMI. Direct connection to a laptop or all-in-one computer will not display a picture. Verify all cables are securely connected.
- Алыстан View Иштебей жатат: Confirm the DVR is connected to a WAN router via an Ethernet cable. Remote viewing requires an internet connection. Ensure the 'Danale' app is correctly configured and the DVR is added.
- Hard Drive Shows Full: The system is designed to overwrite old recordings. If the drive consistently reports as full, check your recording settings and consider scheduling periodic reboots or older data deletion through the DVR menu.
- Camera Image Foggy or Night Vision Not Working: Check the camera lens for dirt, dust, or condensation. Ensure the camera's power and BNC connections are secure. If the issue persists, contact customer support.
- System Stops Recording: Verify that the recording schedule is correctly set in the DVR menu. Ensure the hard drive is functioning properly. If the system is connected to the internet, try disconnecting it temporarily to see if the issue resolves, then re-evaluate network settings.
6. Техникалык шарттар
Detailed technical specifications for the SMONET 5MP 8-Channel DVR Home Security Camera System.
| Өзгөчөлүк | Спецификация |
|---|---|
| Бренд | SMONET |
| Модель номери | SN-A88102T-SA-US |
| Байланыш технологиясы | Зымдуу |
| Видео тартуунун резолюциясы | 1920p (5MP) |
| Өзгөчөлүктөр | Night Vision, Waterproof |
| Каналдардын саны | 8 |
| Эстутум сактоо сыйымдуулугу | 2 ТБ (катуу диск) |
| Power Source | Электр зымдары |
| Элементтин өлчөмдөрү (L x W x Y) | 15.5 x 12 x 10.5 дюйм |
| Элемент Салмагы | 17.96 фунт |
| Төмөн жарык технологиясы | Түнкү көрүнүш |
| Дата биринчи жеткиликтүү | 17-февраль, 2020-жыл |
7. Кепилдик жана колдоо
For warranty information, technical assistance, or any questions regarding your SMONET security system, please contact SMONET customer support. Refer to the contact details provided with your product packaging or visit the official SMONET webсайт.


