Introduction
This manual provides essential information for the safe assembly, operation, and maintenance of your HAPPYGRILL GO-HG0439 Patio Heater. Please read all instructions carefully before use and retain this manual for future reference.
Маанилүү коопсуздук маалыматы
ЭСКЕРТҮҮ: Сыртта колдонуу үчүн гана. Бензинди же башка күйүүчү бууларды жана суюктуктарды ушул же башка шайманга жакын жерде сактабаңыз же колдонбоңуз.
Always ensure proper ventilation. Keep children and pets away from the heater. Maintain clear distances from combustible materials.
- Жылыткыч туруктуу, тегиз бетке коюлганын текшериңиз.
- Do not operate the heater in windy conditions without proper anchoring.
- Keep the area around the heater clear of combustible materials, gasoline, and other flammable vapors and liquids.
- Иштеп жатканда жылыткычты эч качан кароосуз калтырбаңыз.
- Always turn off the gas supply at the cylinder when the heater is not in use.
- Do not attempt to repair or alter the heater. Contact qualified service personnel.
Пакеттин мазмуну
Verify that all components are present before beginning assembly. If any parts are missing or damaged, do not attempt to assemble the product. Contact customer service for assistance.
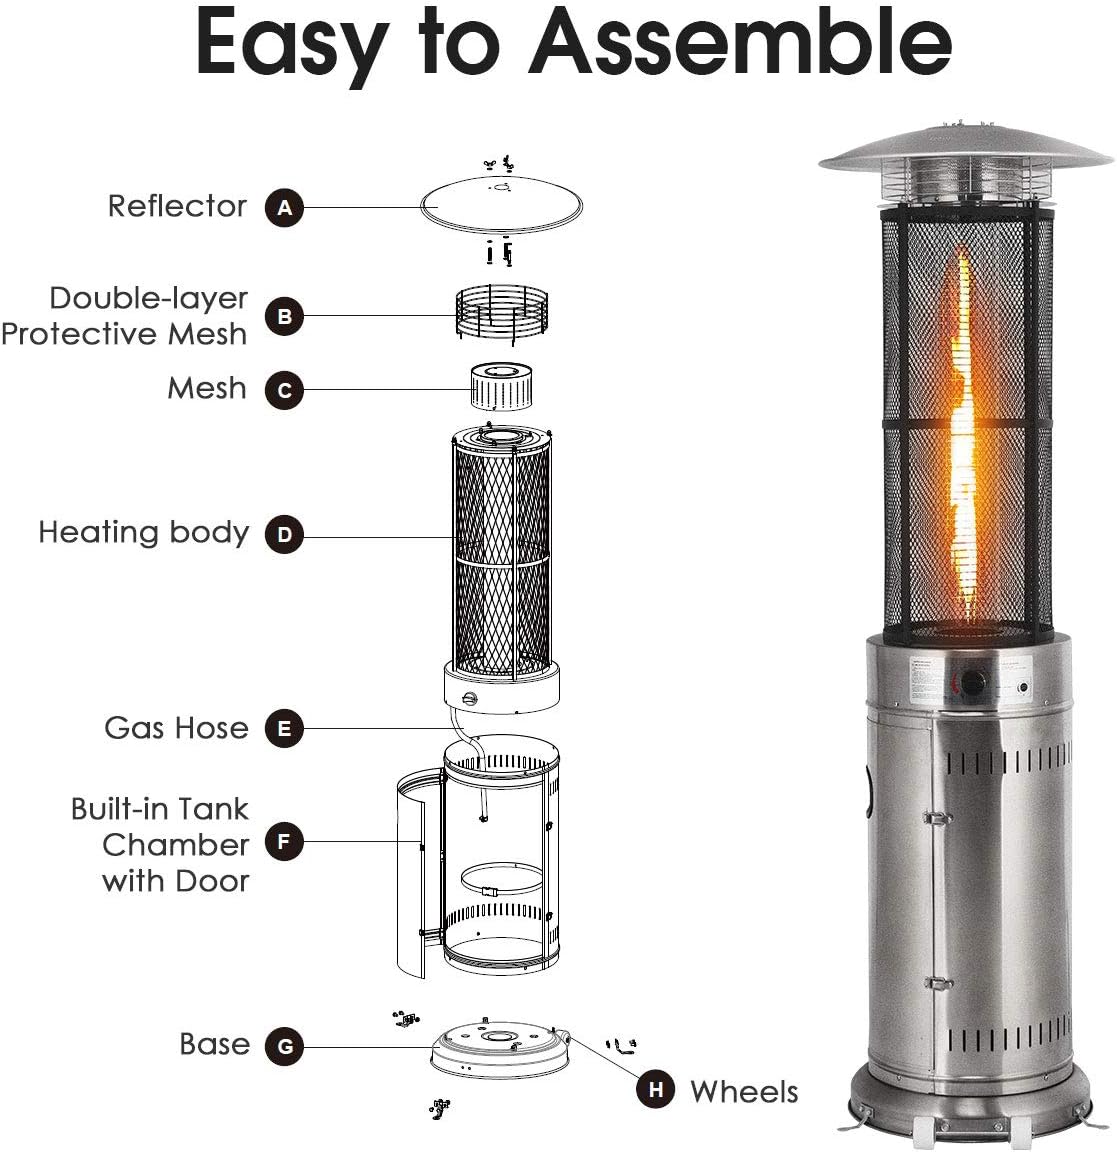
- Рефлектор
- Double-layer Protective Mesh
- Тор
- Жылытуучу дене
- Газ шланг
- Built-in Tank Chamber with Door
- База
- Wheels (pre-attached or to be attached)
- Аппараттык пакет
- Instruction Manual
Орнотуу жана чогултуу
Follow these steps to correctly assemble your patio heater. It is recommended to have two people for assembly.
- Компоненттерди таңгактан чыгаруу: Таңгактан кылдаттык менен бардык бөлүктөрүн алып салыңыз.
- Дөңгөлөктөрдү бекитүү (эгер алдын ала бекитилбеген болсо): Secure the flexible wheels to the base for easy transport.
- Assemble Base and Tank Chamber: Connect the tank chamber to the base. The built-in space behind the door is designed to hold a standard 20lb propane tank.
- Пропан баллонун орнотуу:
- Open the door of the tank chamber.
- Place a standard 20lb liquid propane gas tank (not included) into the chamber.
- Secure the tank with the elastic strap provided.
- Connect the gas hose and regulator to the propane tank. Ensure all connections are tight.

Сүрөттүн сүрөттөлүшү: A view of the lower section of the patio heater with its door open, showing a red 20lb propane cylinder being placed inside. An inset image highlights the excess flow valve connection to the tank. This demonstrates the correct method for installing the fuel source. - Assemble Heating Body and Mesh: Attach the heating body and the double-layer protective mesh around the glass heating column.
- Рефлекторду бекитүү: Secure the top reflector to the heater.
- Ground Fixers: Utilize the provided ground fixers to attach the heater to the ground for enhanced stability, especially in outdoor environments.
Иштөө нускамалары
Always follow these steps for safe ignition and operation of your HAPPYGRILL GO-HG0439 Patio Heater.

- Ачык газ клапаны: Fully open the gas valve on the propane tank.
- Prepare Control Knob: Depress the control knob and turn it clockwise to the "OFF" position.
- Ignite Pilot: Depress the control knob and turn it counter-clockwise to the "IGNITE" position, then to the "PILOT" position.
- Hold Pilot: Keep the control knob depressed for 60 seconds to allow the pilot light to establish.
- Керек болсо кайталаңыз: If the pilot light does not ignite, repeat step 3 several times until it lights.
- Жалынды тууралоо: Once the pilot is lit, release the control knob and turn it to the desired heat setting. The adjustable knob allows you to control the height and intensity of the flame.
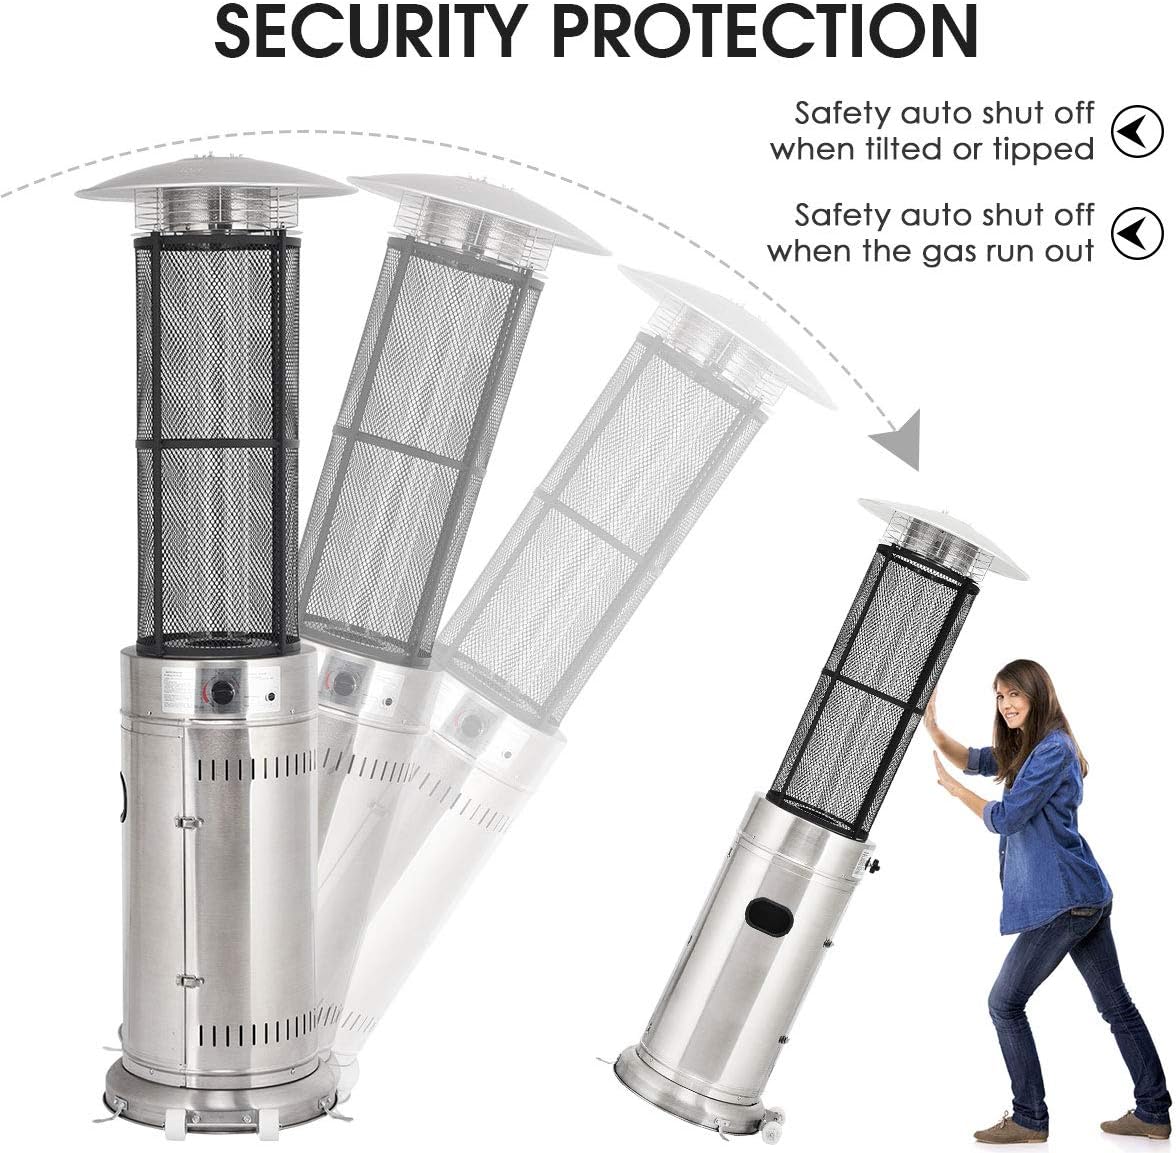
CAUTION: Always ensure the heater is stable and upright during operation. The heater features a safety auto shut-off tilt valve and will automatically turn off if tilted or if the gas supply runs out.
Техникалык тейлөө
Regular maintenance ensures optimal performance and longevity of your patio heater.
- Тазалоо: Сырткы беттерин жумшак, гamp кездеме. Абразивдүү тазалагычтарды же эриткичтерди колдонбоңуз.
- Рефлектор: Periodically inspect the top reflector for debris and clean as needed to ensure efficient heat distribution.
- Газ байланыштары: Regularly check all gas connections for leaks using a soapy water solution. Bubbles indicate a leak.
- Сактагыч: When not in use, especially during off-season, disconnect the propane tank and store the heater in a dry, protected area. Consider using a weather-resistant cover.
- Glass Tube: Inspect the glass heating column for cracks or damage. Replace if necessary.
Проблемаларды чечүү
| Көйгөй | Мүмкүн себеп | Чечим |
|---|---|---|
| Жылыткыч күйбөйт. | No gas supply, low gas pressure, igniter issue. | Ensure propane tank valve is fully open. Check for gas in the tank. Verify igniter spark. |
| Жалын алсыз же ырааттуу эмес. | Газ басымы төмөн, бакты жабык клапан жарым-жартылай жабылган, күйгүч бүтөлүп калган. | Ensure tank valve is fully open. Check for obstructions in the burner. Replace propane tank if empty. |
| Жылыткыч күтүлбөгөн жерден өчүп калат. | Heater tilted, gas supply ran out, safety sensor activated. | Ensure heater is upright. Check propane tank level. Allow heater to cool before restarting. |
Техникалык шарттар
| Өзгөчөлүк | Деталь |
|---|---|
| Бренд | HAPPYGRILL |
| Модель номери | GO-HG0439 |
| Жылуулук чыгаруу | 40,000 BTU |
| Күйүүчү май түрү | Пропан (LP газ) |
| Сунушталган танктын көлөмү | Standard 20lb Propane Tank |
| Материал | Premium Дат баспас болот |
| Продукциянын өлчөмдөрү | 21"D x 21"W x 72"H |
| Элемент Салмагы | 36 фунт |
| Өзгөчөлүктөр | Adjustable Heat, Wheels, True Flame, Safety Auto Shut-off (Tilt/Gas Out) |
| Колдонуу | Сыртта колдонуу үчүн гана |

Кепилдик маалымат
For specific warranty details, please refer to the warranty card included with your product or visit the official HAPPYGRILL webсайт. Сатып алуу квитанциясын кепилдик дооматтары үчүн сатып алуунун далили катары сактаңыз.
Кардарларды колдоо
If you have any questions, require assistance with assembly, operation, or troubleshooting that is not covered in this manual, please contact HAPPYGRILL customer service.
- Онлайн колдоо: зыярат кылыңыз Amazonдагы HAPPYGRILL дүкөнү Көп берилүүчү суроолор жана продукт маалыматы үчүн.
- Байланыш маалыматы: Продуктуңуздун таңгагына же расмий өкүлгө кайрылыңыз website for direct contact methods.

