1. Маанилүү коопсуздук нускамалары
Бул желдеткичти колдонуудан мурун бардык көрсөтмөлөрдү кунт коюп окуп чыгыңыз жана келечекте колдонуу үчүн сактап коюңуз. Бул көрсөтмөлөрдү аткарбоо электр тогуна урунууга, өрткө же олуттуу жаракат алууга алып келиши мүмкүн.
- Тазалоодон же тейлөөдөн мурун дайыма желдеткичти сууруп алыңыз.
- Желдеткичти шнур же сайгыч бузулган менен иштетпеңиз.
- Keep fingers and other objects away from the fan blades and openings.
- Желдеткичти нымдуу жерде колдонбоңуз же damp жерлер.
- Оңдоп кетүүдөн сактануу үчүн желдеткич туруктуу, түз бетке коюлганын текшериңиз.
- Бул желдеткич имараттын ичинде колдонуу үчүн гана.
2. Пакеттин мазмуну
Монтаждоо алдында бардык компоненттер бар экендигин текшериңиз:
- Вентилятор башынын жыйындысы (мотор, пышактар, алдыңкы жана арткы грильдер)
- Жөнгө салынуучу тирөөч
- Тегерек база
- Алыстан башкаруу
- User Manual
3. Орнотуу жана чогултуу
PELONIS пьедестал желдеткичин чогултуу үчүн төмөнкү кадамдарды аткарыңыз:
- Базаны тиркөө: Secure the adjustable stand pole to the round base. Ensure it is firmly tightened for stability.
- Бийиктигин тууралоо: Loosen the height adjustment knob on the stand pole, extend the pole to your desired height, and then tighten the knob securely.
- Mount Fan Head: Attach the fan head assembly to the top of the adjustable stand pole. Ensure it clicks into place or is securely fastened according to the specific model's mechanism.
- Secure Grills: Ensure both the front and rear fan grills are properly aligned and securely fastened to prevent access to the blades during operation.

Figure 3.1: Step-by-step assembly guide for the Pelonis 16-inch Pedestal Fan.

Figure 3.2: The fan features a sturdy, weighted base for enhanced stability.
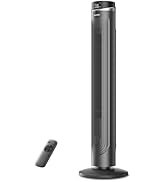
Figure 3.3: The fan's height can be adjusted to suit various needs, ranging from 3.5 feet to 4 feet.
4. Иштөө нускамалары
Your PELONIS Pedestal Fan offers multiple settings for personalized comfort.
4.1 Күйгүзүү/өчүрүү
- басыңыз Кубат баскычы on the control panel or remote control to turn the fan on or off.
4.2 Ылдамдык жөндөөлөрү
- The fan features 12 speed settings. Use the Ылдамдык баскычтары (usually '+' and '-') on the control panel or remote to adjust the airflow intensity.

Figure 4.1: The fan offers 12 customizable speed settings for varied airflow.
4.3 Термелүү функциясы
- басыңыз Термелүү баскычы (often an icon with arrows) on the control panel or remote to activate or deactivate the oscillation feature. This allows the fan head to sweep from side to side, distributing air across a wider area.

Figure 4.2: The fan provides 90-degree widespread oscillation for comprehensive air circulation.
4.4 Таймерди орнотуу
- The fan includes a 12-hour timer. Press the Таймер баскычы to set the fan to automatically turn off after a specified duration. Each press typically increases the timer by one hour.
4.5 Алыстан башкаруу
- The included remote control allows convenient operation of all fan functions from a distance. Ensure the remote has working batteries.

Figure 4.3: Operate all fan functions conveniently with the included remote control.
5. Техникалык тейлөө
Үзгүлтүксүз тазалоо желдеткичиңиздин оптималдуу иштешин жана узак мөөнөттүү иштешин камсыз кылат.
5.1 Желдеткичти тазалоо
- Тазалоодон мурун ар дайым желдеткичти розеткадан сууруп алыңыз.
- жумшак колдонуу, damp вентилятордун сырткы беттерин сүртүүчү чүпүрөк. Абразивдүү тазалагычтарды же эриткичтерди колдонбоңуз.
- To clean the fan blades, carefully remove the front grill. Wipe the blades with a soft, damp cloth. Ensure the blades are completely dry before reattaching the grill.
- Желдеткичти сууга батырбаңыз же мотор корпусуна суу тамчылап жибербеңиз.

Figure 5.1: The fan features an intensive fence design for safety, which can be disassembled for cleaning.
6. Кыйынчылыктарды
Эгер күйөрманыңызда көйгөйлөргө туш болсоңуз, төмөнкү жалпы көйгөйлөрдү жана чечимдерди караңыз:
- Желдеткич күйбөйт: Кубат шнуру иштеп жаткан электр розеткасына бекем сайылганын текшериңиз. Кубат баскычы басылганын текшериңиз.
- Алсыз аба агымы: Verify that the fan speed is set to a higher level. Check for any obstructions around the fan grills.
- желдеткич ызы-чуу болуп жатат: Ensure all parts are securely assembled. Check for any loose components or debris caught in the blades.
- Термелүү иштебей жатат: Confirm the oscillation button has been pressed. Check for any obstructions preventing the fan head from rotating.
- Пульт иштебей жатат: Алыстан башкаруу пультундагы батареяларды алмаштырыңыз. Алыстан башкаруу пульту менен желдеткичтин кабыл алгычынын ортосунда эч кандай тоскоолдуктар жок экенин текшериңиз.
7. Техникалык шарттар
| Өзгөчөлүк | Спецификация |
|---|---|
| Модель аты | PFS40D6ABB |
| Бренд | ПЕЛОНИС |
| Электр желдеткич дизайн | Кабат желдеткичи |
| Power Source | Электр зымдары |
| Продукциянын өлчөмдөрү | 15.75"D x 15.75"W x 51.18"H |
| Өзгөчө өзгөчөлүк | Adjustable Height, Oscillating, Remote Control |
| Ызы-чуу деңгээли | 38 децибел |
| Ватtage | 2.7 ватт |
| Blades саны | 5 |
| Аба агымынын кубаттуулугу | Мүнөтүнө 2520 куб фут |
| Blade Length | 16 дюйм |
| Тtage | 110 вольт |
| Кубат деңгээли саны | 12 |
| Мотор түрү | DC |
| Ички/тышкы колдонуу | Indoor |

Figure 7.1: Illustration of the fan's powerful and energy-efficient DC motor.
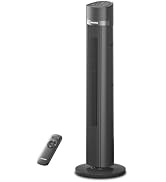
Figure 7.2: The fan operates at a low noise level of 38 dB, making it suitable for quiet environments like bedrooms.
8. Кепилдик жана колдоо
PELONIS products are designed for reliability and performance. This product comes with a 1-year limited warranty from the date of purchase. For warranty claims or technical support, please contact PELONIS customer service.
- Кардарларды тейлөө: Refer to the contact information provided on the PELONIS official webсайтка же продуктунун таңгагына.
- Онлайн ресурстар: зыярат кылыңыз Amazon'догу PELONIS дүкөнү кошумча продукт маалымат жана колдоо үчүн.


