1. Маанилүү коопсуздук нускамалары
Please read all instructions carefully before using this appliance and retain them for future reference. Failure to follow these instructions may result in electric shock, fire, or serious personal injury.
- Ар дайым түзмөктү жерге туташтырылган розеткага туташтырыңыз.
- Аппаратты бузулган шнур же сайгыч менен иштетпеңиз.
- Keep the unit away from flammable materials and open flames.
- Иштеп жаткан учурда блоктун айланасын туура желдетүүнү камсыз кылыңыз.
- Аба кирүүчү же чыгуучу жайга нерселерди салбаңыз.
- Тазалоодон же техникалык тейлөөдөн мурун блокту электр розеткасынан сууруп алыңыз.
- Бул шайман физикалык, сезүү же акыл-эс жөндөмү начар же тажрыйбасы жана билими жок адамдар (анын ичинде балдар) үчүн, эгерде алардын коопсуздугуна жооптуу адам тарабынан көзөмөлсүз же шайманды колдонуу боюнча көрсөтмө болбосо, колдонууга арналбайт.
2. Продукт бүтүп калдыview
The FlinQ Mobile Air Conditioner is a versatile unit designed to provide cooling, dehumidification, and fan functions for your living space. It is equipped with an energy-efficient design and comes with a window kit for easy installation.

Сүрөт 2.1: Алдыңкы view of the FlinQ Mobile Air Conditioner, showing the main air outlet and control panel area.

Figure 2.2: The mobile air conditioner unit, displaying its energy efficiency label (Class A) and the included remote control for convenient operation.
3. Компоненттер жана тетиктер
Familiarize yourself with the main components of your mobile air conditioner:
- Main Unit (with control panel)
- Чыгаруучу шланг
- Window Sealing Kit (adjustable window slider/plate)
- Алыстан башкаруу
- Drain Hose (for continuous drainage in dehumidification mode)
- Air Filters (located on the back/side)
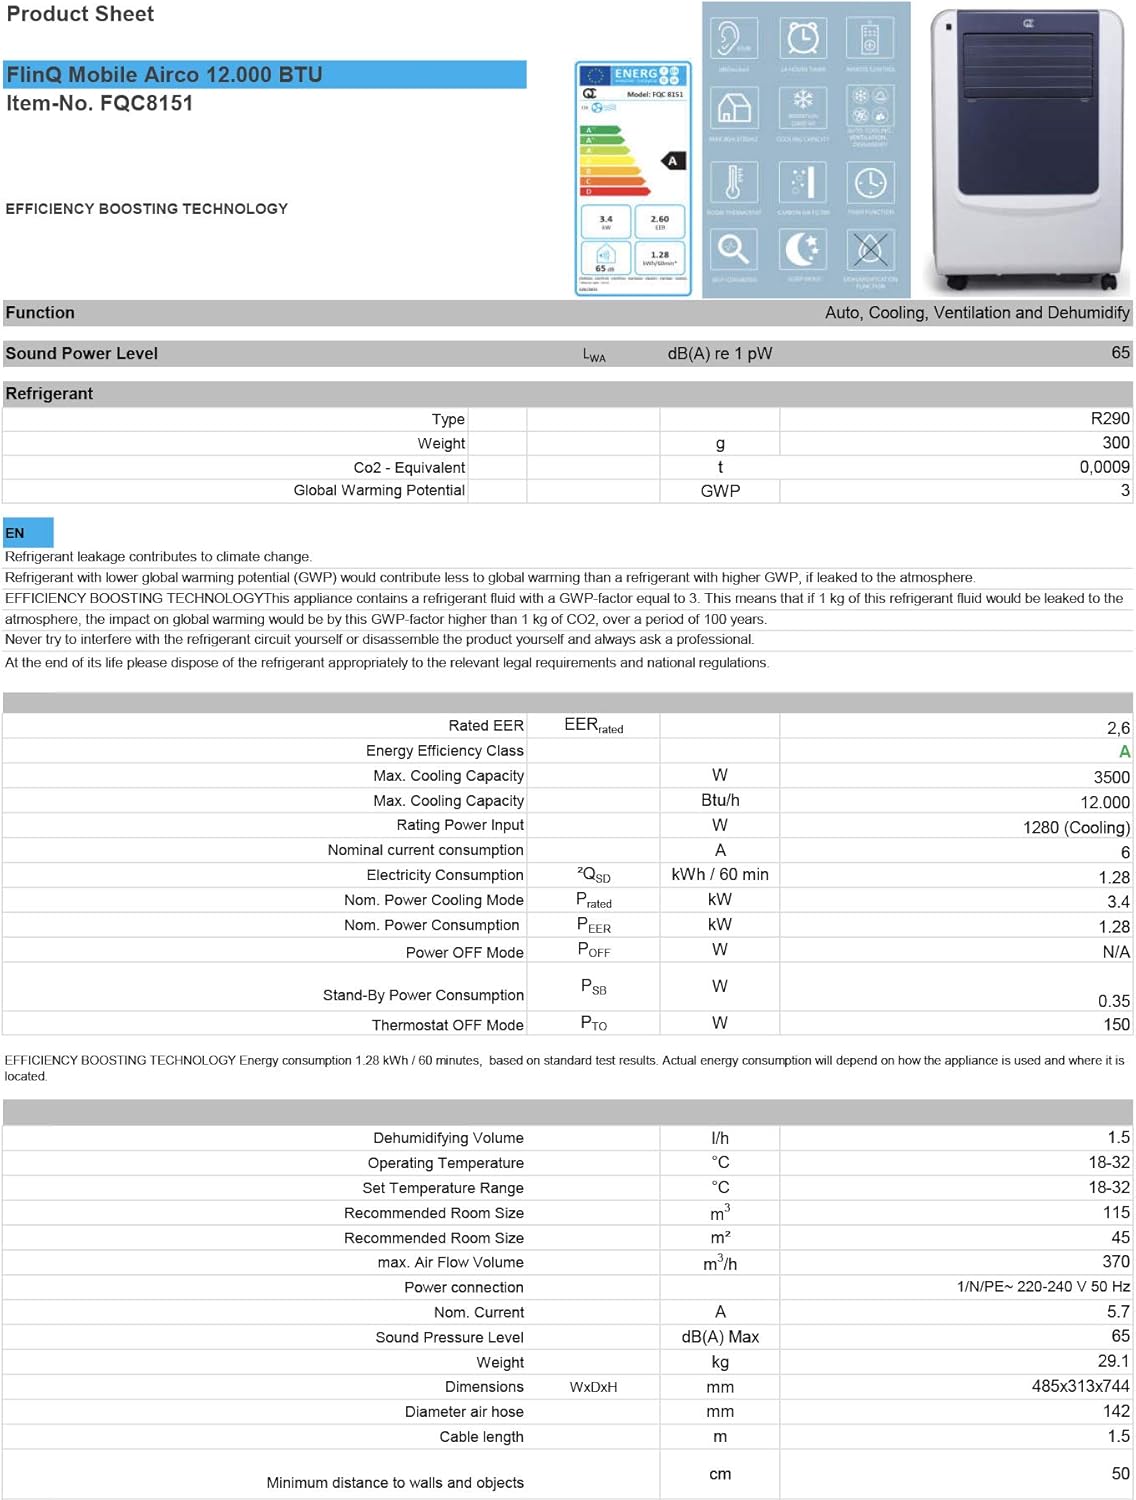
Figure 3.1: The remote control and a visual representation of the unit's key features, including noise level (65dB), 24-hour timer, cooling capacity (12000 BTU/h), room thermostat, carbon air filter, self-diagnosis, sleep mode, remote control function, timer function, auto cooling/fan/dehumidification, and dehumidification function.
4. Орнотуу жана орнотуу
4.1 Пакеттен чыгаруу
Carefully remove the air conditioner and all accessories from the packaging. Inspect for any damage during transit. Keep the original packaging for future storage or transport.
4.2 Орнотуу
Place the unit on a flat, stable surface. Ensure there is at least 30 cm (12 inches) of clear space around the unit for proper airflow. Do not place it near heat sources or in direct sunlight.
4.3 Терезе топтомун орнотуу
To ensure efficient cooling, the hot air extracted by the unit must be vented outside. Use the provided window sealing kit for this purpose.
- Чыгаруучу шланг туташтыргычын аппараттын артындагы аба чыгуучу тешикке бекитиңиз.
- Extend the exhaust hose and attach the window adapter to the other end.
- Adjust the window slider/plate to fit your window opening.
- Insert the window adapter into the opening of the window slider/plate.
- Close the window as much as possible to seal the opening around the kit, minimizing air leakage.

4.1-сүрөт: Каптал view of the mobile air conditioner, illustrating the connection point for the exhaust hose, which expels hot air from the room.
5. Иштөө нускамалары
5.1 Башкаруу панели
The control panel is located on the top of the unit and features various buttons and an LED display for setting modes, temperature, and timer functions.
5.2 Алыстан башкаруу
The remote control allows you to operate all functions of the air conditioner from a distance. Ensure the remote control batteries are inserted correctly.
5.3 Иштөө режимдери
Press the 'Mode' button to cycle through the available operating modes:
- Муздатуу режими: Бөлмөнү муздатуу үчүн. Температураны жөндөө баскычтарын колдонуп, каалаган температураңызды коюңуз.
- Нымсыздандыруу режими: Removes excess moisture from the air. The fan speed is typically fixed in this mode. Consider connecting a drain hose for continuous drainage.
- Күйөрман режими: Circulates air without cooling. You can adjust the fan speed (Low, Medium, High).

Сүрөт 5.1: Жакын пландан view of the adjustable louvers on the air conditioner's front panel, which direct the airflow.
6. Техникалык тейлөө
Үзгүлтүксүз тейлөө оптималдуу иштешин камсыз кылат жана кондиционериңиздин иштөө мөөнөтүн узартат.
6.1 Аба чыпкаларын тазалоо
The air filters should be cleaned every two weeks or more frequently depending on usage and air quality. Dirty filters reduce efficiency and can damage the unit.
- Кондиционерди розеткадан сууруп алыңыз.
- Locate and remove the air filters (usually on the back or side of the unit).
- Чыпкаларды агын суу астында (жылы, ысык эмес) жууп же чаң соргучту колдонуңуз.
- Allow the filters to air dry completely before reinserting them. Do not expose them to direct sunlight.

Figure 6.1: Illustration of how to remove the air filter from the mobile air conditioner for cleaning, highlighting the accessible filter panel.
6.2 Сууну агызуу
The unit collects condensed water during cooling and dehumidification. The internal tank will fill up, and the unit may stop operating when full. Drain the water regularly.
- Place a shallow pan or tray under the drain port (usually at the bottom rear of the unit).
- Суунун агып чыгышы үчүн дренаждык тығынды алып салыңыз.
- For continuous drainage in dehumidification mode, attach the provided drain hose to the drain port.
6.3 Сактоо
Аппаратты узак убакытка сактоодо:
- Агрегаттагы бардык сууну агызыңыз.
- Аба фильтрлерин тазалаңыз.
- Электр шнурунун розеткасын сууруп, аны тыкан ороп алыңыз.
- Агрегатты кургак, салкын жерде, эң жакшысы баштапкы таңгагында сактаңыз.
7. Кыйынчылыктарды
Кардарларды колдоо кызматына кайрылуудан мурун, кеңири таралган көйгөйлөр жана алардын чечимдери үчүн төмөнкү таблицаны караңыз:
| Көйгөй | Мүмкүн себеп | Чечим |
|---|---|---|
| Түзмөк күйбөйт | No power; Power cord not plugged in; Full water tank | Check power outlet; Plug in power cord; Drain water tank |
| Аппарат жетишсиз муздайт | Dirty air filters; Exhaust hose blocked/leaking; Room too large; Doors/windows open | Clean filters; Check hose for blockages/proper sealing; Ensure room size is within capacity; Close doors/windows |
| Бирдиги ызы -чуу | Unit not on a flat surface; Air filters dirty | Place on flat surface; Clean air filters |
| Агрегаттан суу агып жатат | Дренаждык тығын туура жабылбаган; Бирдик ийилген | Ensure drain plug is secure; Place unit on a level surface |
8. Техникалык шарттар
Technical details for the FlinQ Mobile Air Conditioner:
| Өзгөчөлүк | Нарк |
|---|---|
| Модель номери | 8720168680396 |
| Продукциянын өлчөмдөрү | 74 x 48 x 31 см |
| Элемент Салмагы | 29 g (Note: This weight seems unusually low for an AC unit, please refer to product packaging for accurate weight) |
| Ызы-чуу деңгээли | 65 дБ |
| Муздатуу кубаттуулугу | 12000 XNUMX BTU/саат |
| Сунушталган бөлмө өлчөмү | 45 м² чейин |
| Өзгөчөлүктөр | Алыстан башкаруу |
| Энергетикалык класс | A |

Figure 8.1: Official product sheet detailing technical specifications, energy consumption, cooling capacity, and dimensions of the FlinQ Mobile Air Conditioner.
9. Кепилдик жана колдоо
This FlinQ Mobile Air Conditioner comes with a limited warranty. Please refer to the warranty card included with your purchase for specific terms and conditions.
For technical support, service, or warranty claims, please contact your retailer or the manufacturer directly. Keep your proof of purchase for warranty validation.
Байланыш маалыматы:
- Бренд: FLINQ
- Webсайт: www.flinq.nl (Чыгample, please refer to actual product documentation for correct webсайт)
- Электрондук почта: support@flinq.nl (Чыгample, please refer to actual product documentation for correct email)


