Introduction
This manual provides comprehensive instructions for the installation, operation, and maintenance of your Lepro LE 50ft RGB 5050 LED Strip Lights. Please read this manual thoroughly before installation and use to ensure proper function and safety. Keep this manual for future reference.
Коопсуздук нускамалары
- Орнотуудан же техникалык тейлөөдөн мурун электр кубаты өчүрүлгөнүн текшериңиз.
- Бул продукт имараттын ичинде гана колдонуу үчүн иштелип чыккан. Сууга же жогорку нымдуулукка дуушар кылбаңыз.
- Do not connect the LED strip to the power supply while it is still coiled on the reel. Unroll the strip completely before powering on to prevent overheating.
- Use only the provided 12V ETL-listed power adapter. Using an incompatible power supply may damage the product and void the warranty.
- Do not bend the LED strip at sharp angles (less than 90 degrees) to avoid damaging the circuit board or LEDs.
- Балдар жетпеген жерде сактаңыз.
- If any damage is observed on the strip or power adapter, discontinue use immediately and contact customer support.
Пакеттин мазмуну

Image: The complete package contents including two rolls of LED strip lights, a remote control, a power adapter, and fixing clips with screws.
Төмөндө тизмеленген нерселердин баары пакетиңизге камтылганын текшериңиз:
- 2 x 24.6ft (total 50ft) RGB 5050 LED Strip Lights
- 1 x IR Remote Controller (44-key)
- 1 x 12V ETL-listed Power Adapter
- 1 x Control Box
- Клиптерди жана винттерди бекитүү
- Колдонуучунун Колдонмосу (бул документ)
Техникалык шарттар
| Модель номери | 410105-RGB-US |
| Ачык түс | RGB (Кызыл, Жашыл, Көк) |
| Жарык булагы түрү | 5050 LED |
| Жалпы узундук | 50 Feet (2 x 24.6ft rolls) |
| Метрге кеткен LEDдер | 30 LED |
| Power Source | Corded Electric, 12V Adapter |
| Ватtage | 36 Ватт |
| Controller Type | IR Remote Control (44-key) |
| Ички/тышкы колдонуу | Ичинде гана |
| Материал | Пластик |
| Продукциянын өлчөмдөрү | 5.31 x 3.15 x 5.35 дюйм (пакет) |
| Элемент Салмагы | 14.72 унция |
Орнотуу & Орнотуу
LED тилкелүү чырактарды туура орнотуу үчүн төмөнкү кадамдарды аткарыңыз:
- Бетти даярдоо:
Before attaching the LED strip, ensure the installation surface is clean, dry, and smooth. Wipe the surface with a clean cloth to remove dust or debris. This ensures optimal adhesion of the 3M adhesive backing.

Image: A hand wiping a wooden surface with a cloth, illustrating the first step of surface preparation.
- Компоненттерди туташтыруу:
Connect the 4-pin connector from the LED strip to the control box. Ensure the arrow mark on the strip's connector aligns with the arrow mark on the control box. Then, connect the DC wire from the power adapter to the control box. Finally, plug the power adapter into a standard electrical outlet.
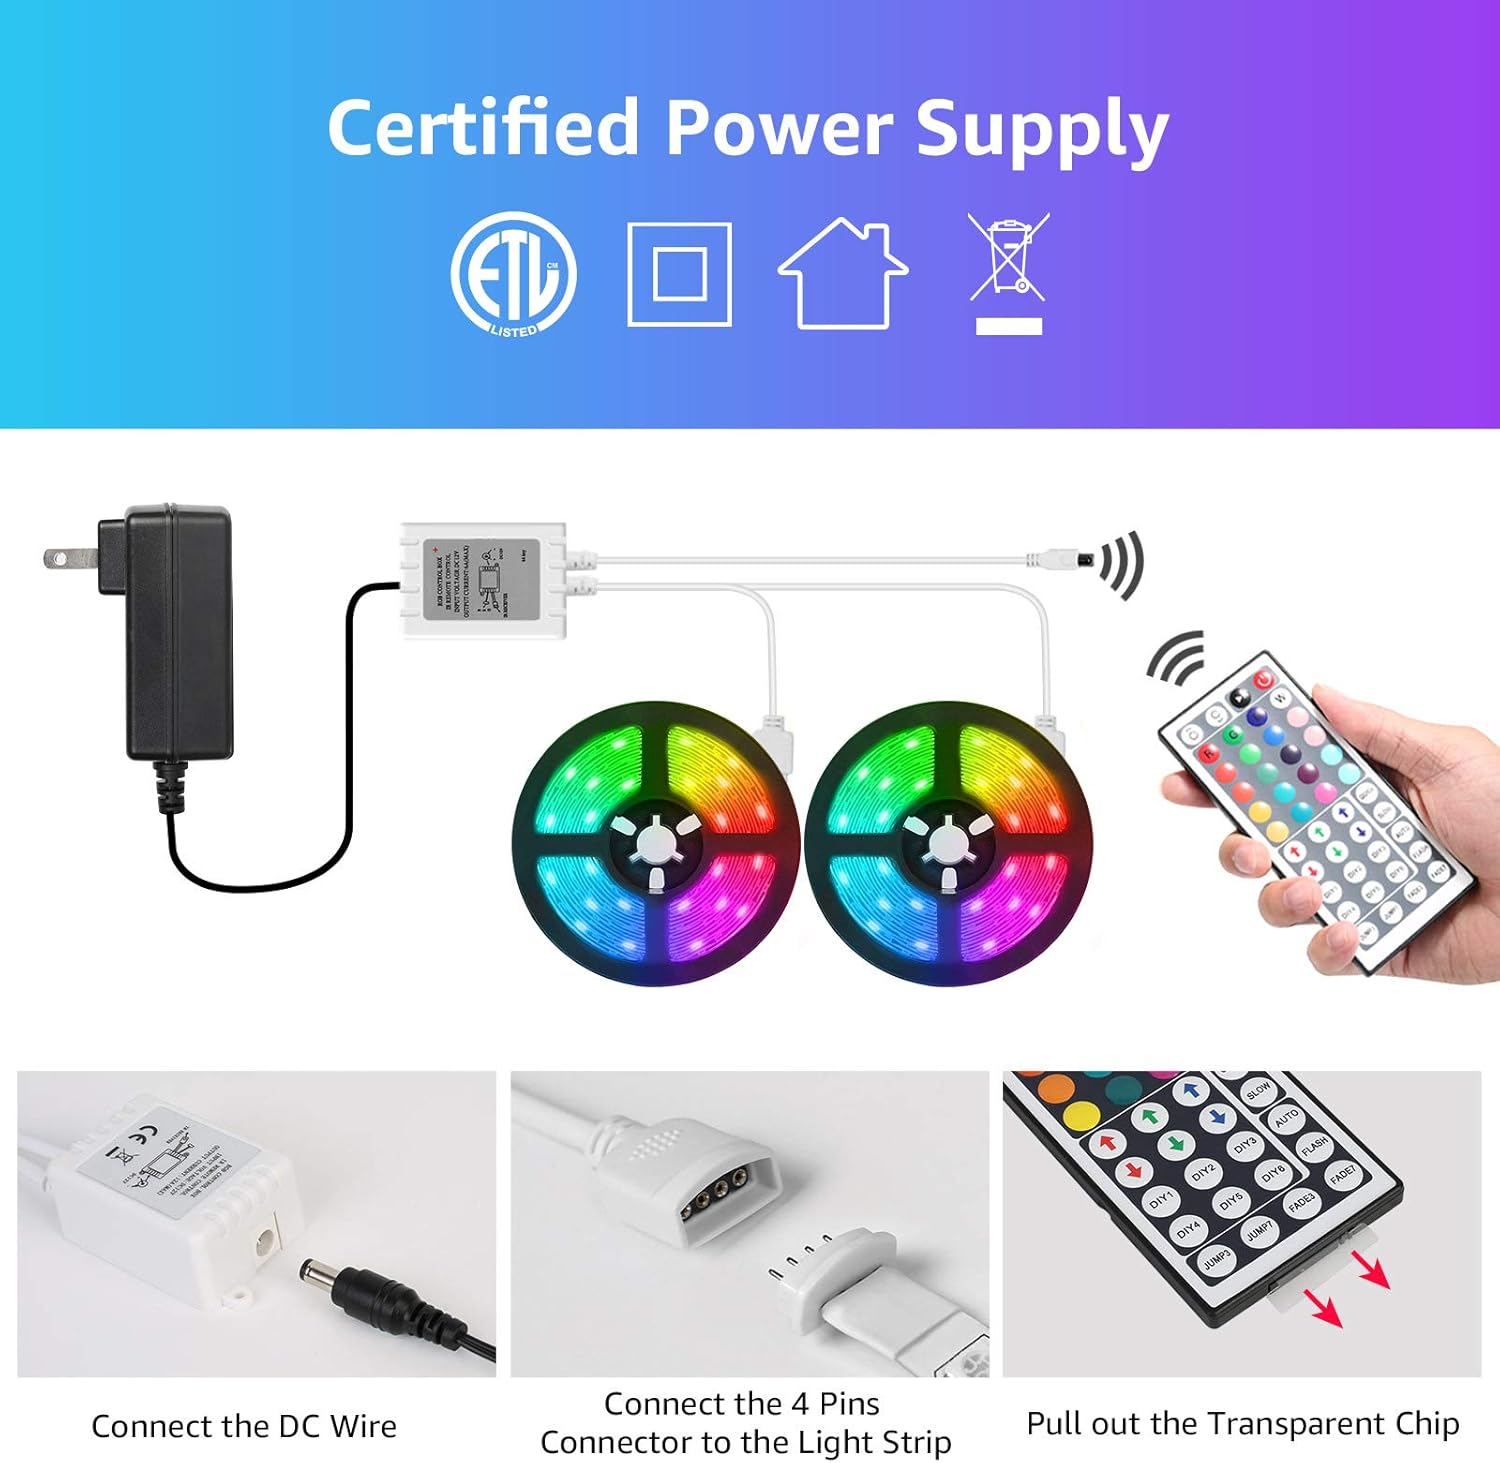
Image: A visual guide demonstrating how to connect the DC wire to the control box and the 4-pin connector to the LED strip, emphasizing arrow alignment.
Маанилүү: Ensure the "arrow" mark on the LED strip connector and the "12V" mark on the control box are on the same side for correct polarity.

Image: Detail of the RGB light strip, highlighting the 10mm 4-pin connector and the strong 3M self-adhesive backing for installation.
- LED тилкесин тиркөө:
Peel off the protective backing from the 3M adhesive on the back of the LED strip. Carefully press the strip onto the prepared surface, applying firm and even pressure along its entire length. For added security, use the included fixing clips and screws at regular intervals, especially around corners or areas with less adhesion.
Image: A hand demonstrating how to peel and attach the LED strip to a surface, showing the adhesive backing.
- Пультту даярдоо:
Before using the remote control, pull out the transparent plastic chip from the battery compartment. This activates the battery.
Image: A close-up showing a hand pulling the transparent plastic chip from the remote control, indicating battery activation.
Орнотуу боюнча демонстрациялык видео
Video: A demonstration of the Lepro LED Strip Lights in various indoor settings, showcasing color changes and potential applications. This video provides visual examples of how the lights can be installed and used to enhance different environments.
Операция
Your LED strip lights are controlled by the included 44-key IR remote control. Point the remote directly at the IR receiver on the control box for optimal response.
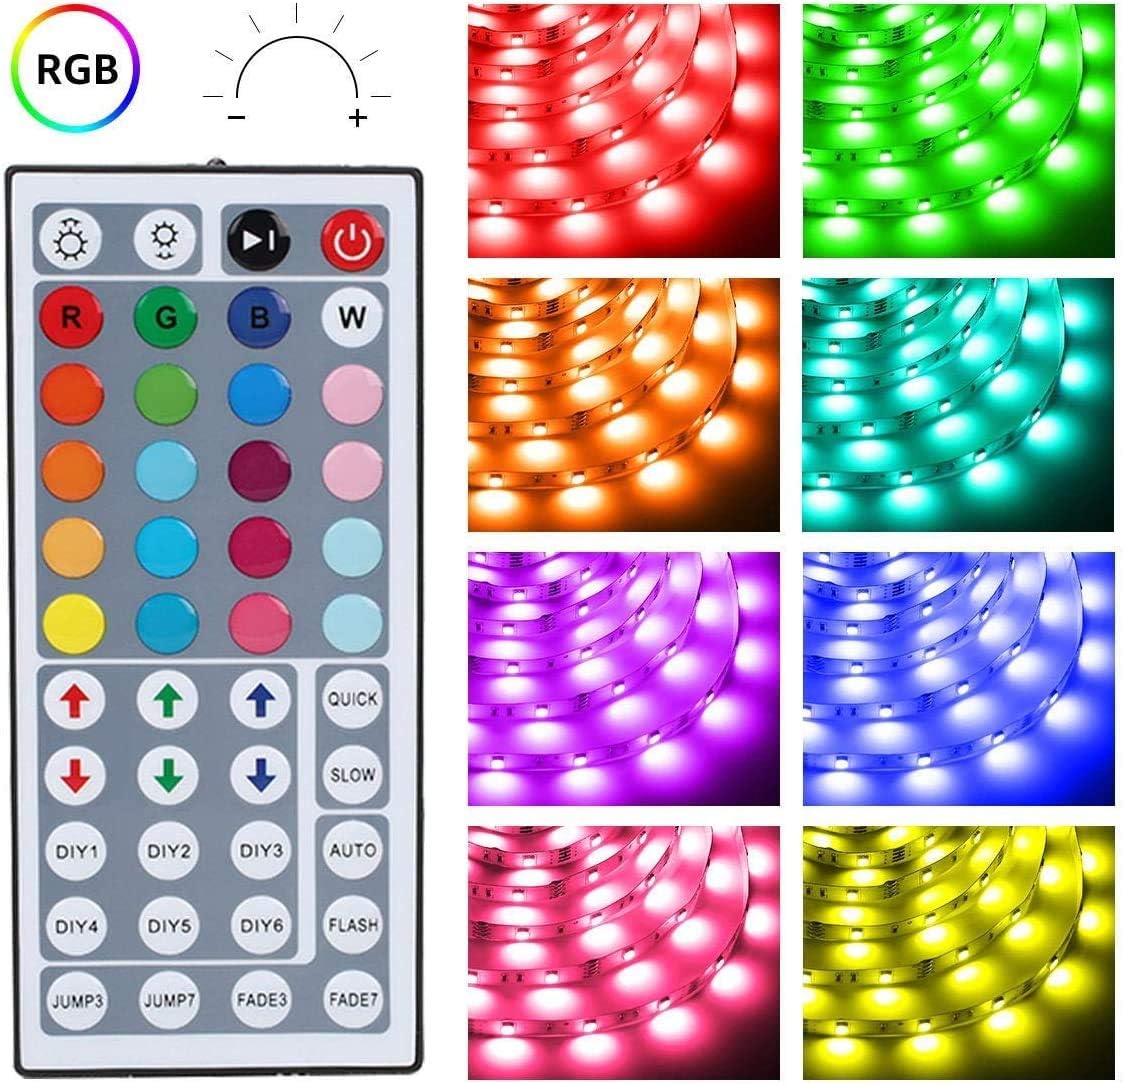
Сүрөт: деталдуу view of the 44-key remote control, showing buttons for power, brightness adjustment, RGB color selection, 6 DIY color buttons, and various dynamic modes like Jump, Fade, Quick, Slow, and Auto.
- Күйгүзүү/өчүрүү: басыңыз кызыл кубат баскычы чырактарды күйгүзүү же өчүрүү үчүн.
- Жарыктыкты жөндөө: колдонуу өйдө жана ылдый жебе баскычтары (above the R, G, B, W buttons) to increase or decrease brightness.
- Түс тандоо: Каалаганын басыңыз 20 color buttons to select a static color.
- Өз колуңуз менен жасалган түстөр:
- Бирин басыңыз DIY1-DIY6 buttons.
- колдонуу RGB up/down arrows to adjust the intensity of Red, Green, and Blue to create your desired custom color.
- Press the same DIY button again to save the custom color.
- Динамикалык режимдер:
- JUMP3 / JUMP7: Cycles through 3 or 7 colors with a jump effect.
- FADE3 / FADE7: Fades between 3 or 7 colors.
- QUICK / SLOW: Adjusts the speed of dynamic modes.
- АВТО: Cycles through all available dynamic modes.
- ФЛЕШ: Flashes through colors.
Техникалык тейлөө
- Тазалоо: Ensure the power is off and unplugged before cleaning. Gently wipe the LED strip with a dry, soft cloth. Do not use liquid cleaners or abrasive materials.
- Сактагыч: Эгерде чырактарды узак убакытка сактасаңыз, алардын таза жана кургак экенине ынаныңыз. Түз күн нурунан алыс, салкын, кургак жерде сактаңыз.
- Адгезия: If the adhesive begins to lose its stickiness, you can reinforce the strip with additional fixing clips or a suitable adhesive tape (not included).
Проблемаларды чечүү
| Көйгөй | Мүмкүн себеп | Чечим |
|---|---|---|
| Жарыктар күйбөйт. |
|
|
| Алыстан башкаруу жооп бербей жатат. |
|
|
| Түстөр туура эмес же дал келбеген. |
|
|
| LED тилкеси бетинен түшүп жатат. |
|
|
Кепилдик жана колдоо
Lepro products are designed for quality and reliability. For warranty information, technical support, or any questions regarding your LED strip lights, please contact Lepro customer service through the retailer where the product was purchased or visit the official Lepro webсайт.
Please have your model number (410105-RGB-US) and purchase details ready when contacting support.


