1. Киришүү
This manual provides detailed instructions for the safe and effective use of your PREXISO 2-in-1 Laser Tape Measure. This device combines a 135 ft (41 m) laser distance meter with a 16 ft (5 m) traditional tape measure, offering versatility for various measurement tasks. Please read this manual thoroughly before operating the device.

Image 1.1: The PREXISO 2-in-1 Laser Tape Measure, showing its compact design and included USB-C charging cable.
2. Коопсуздук маалыматы
ЭСКЕРТҮҮ: This product contains a Class 2 laser. Avoid direct eye exposure to the laser beam. Do not stare into the beam or view directly with optical instruments. Laser output is less than 1mW at 620-690nm.
- Аппаратты өзгөртүүгө же ажыратууга аракет кылбаңыз.
- Аппаратты балдар жетпеген жерде сактаңыз.
- Аппаратты ушул колдонмодо сүрөттөлгөн максатта гана колдонуңуз.
- Түзмөктү узак убакыт бою өтө жогорку температурага, нымдуулукка же түз күн нуруна дуушар кылбаңыз.
3. Продукт бүтүп калдыview
Familiarize yourself with the components of your PREXISO 2-in-1 Laser Tape Measure.

Image 3.1: Labeled diagram of the device, highlighting the USB-C charging port, belt clip, backlit color display, units/measuring reference button, laser beam outlet, lock, tape, on/measure/continuous measuring button, and function button for area/volume/Pythagorean modes.
Негизги компоненттер:
- Laser Beam Outlet: Emits the laser for distance measurement.
- Арткы жарык түстүү дисплей: Shows measurement data, battery status, and mode indicators.
- UNIT баскычы: Press to change the measuring reference point. Hold for 3 seconds to switch measurement units (M/In/Ft).
- FUNC баскычы: Press to cycle through measurement modes (Distance, Continuous, Area, Volume, Pythagorean).
- M Button (On/Measure): Powers on the device, initiates a laser measurement, or starts continuous measurement.
- Рулетка: Manual 16 ft (5 m) steel tape with magnetic hook.
- Blade Lock: Secures the tape measure blade in position.
- USB-C заряддоо порту: For recharging the internal Li-ion battery.
- Кур клип: Ыңгайлуу алып жүрүү үчүн.
4. Орнотуу
4.1 Аппаратты заряддоо
The device is powered by a rechargeable Li-ion battery. Before first use, or when the battery indicator on the display is low, charge the device using the provided Type-C charging cable.
- Түзмөктүн капталынан USB-C кубаттоо портун табыңыз.
- Connect the Type-C end of the charging cable to the device and the USB-A end to a compatible USB power adapter (not included) or computer port.
- The battery indicator on the display will show charging status. A full charge allows for approximately 5000 measurements.
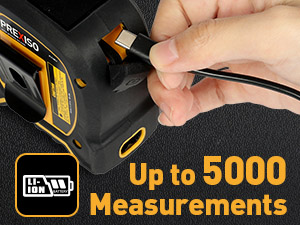

Image 4.1: The USB-C charging port and the device being charged, alongside an image demonstrating the belt clip for portability.
4.2 Күйгүзүү/өчүрүү
- Аппаратты күйгүзүү үчүн басыңыз M баскычын басыңыз. Дисплей күйөт.
- The device will automatically shut down after 30 seconds of inactivity to conserve battery.
5. Иштөө нускамалары
5.1 Using the Tape Measure
The manual tape measure extends up to 16 ft (5 m) and features a magnetic hook for secure attachment to ferrous materials. The blade is nylon-coated for durability and has clear markings on both sides.
- Pull the tape blade out to the desired length.
- To lock the blade in place, slide the blade lock button forward.
- To retract the blade, slide the blade lock button backward and guide the tape back into the housing.


Image 5.1: Demonstrating the blade lock button for speed control and the strong magnetic movable hook for accurate measurements.
5.2 Using the Laser Measure
The laser measure provides accurate digital measurements up to 135 ft (41 m). The display shows laser measurements, not the manual tape blade distance.

Image 5.2: Illustrates that the digital display shows laser distance measurements, not the length of the extended tape blade.
5.2.1 Changing Units and Reference Point
- Өлчөө бирдиктерин өзгөртүү үчүн: кармаңыз UNIT button for 3 seconds. The units will cycle through Meters (M), Inches (In), and Feet (Ft).
- To change the measuring reference point: басыңыз UNIT button briefly. The reference point can be set from the front or the rear of the device. This is crucial for accurate measurements.

Image 5.3: Instructions for changing measurement units by holding the UNIT button and changing the reference point by pressing it briefly.
5.2.2 Негизги аралыкты өлчөө
- баскычын басып, түзмөктү күйгүзүңүз M баскычы.
- Ensure the desired reference point and unit are selected.
- Лазерди бутага багыттаңыз.
- басыңыз M button again to take a single measurement. The result will appear on the display.
5.2.3 Үзгүлтүксүз өлчөө
In continuous measurement mode, the device constantly updates the distance as you move it, useful for finding minimum/maximum distances or marking specific points.
- Түзмөктү күйгүзүңүз.
- басыңыз M Лазерди иштетүү үчүн баскычты бир жолу басыңыз.
- кармаңыз M button for approximately 2 seconds to enter continuous measurement mode. The display will show real-time measurements.
- басыңыз M button again to stop continuous measurement and hold the last displayed value.
5.2.4 Аянтты өлчөө
This mode calculates the area of a rectangular space.
- басыңыз FUNC button until the area icon (rectangle) appears on the display.
- Take the first measurement (e.g., length) by pressing M.
- Take the second measurement (e.g., width) by pressing M.
- Түзмөк автоматтык түрдө аянтты эсептеп, көрсөтөт.

Image 5.4: Visual representation of using the laser measure for area calculation.
5.2.5 Көлөмдү өлчөө
This mode calculates the volume of a cubic space.
- басыңыз FUNC button until the volume icon (cube) appears on the display.
- Take the first measurement (e.g., length) by pressing M.
- Take the second measurement (e.g., width) by pressing M.
- Take the third measurement (e.g., height) by pressing M.
- Түзмөк автоматтык түрдө көлөмдү эсептеп, көрсөтөт.

Image 5.5: Visual representation of using the laser measure for volume calculation.
5.2.6 Pythagorean Measurement (2-Point)
This mode calculates an indirect height or distance using two measurements, based on the Pythagorean theorem.
- басыңыз FUNC button until the 2-point Pythagorean icon appears.
- Measure the hypotenuse (diagonal distance) by pressing M.
- Measure the horizontal distance by pressing M.
- The device will calculate and display the vertical height.

Image 5.6: Illustration of the 2-point Pythagorean measurement mode for indirect height calculation.
5.2.7 Pythagorean Measurement (3-Point)
This mode calculates an indirect height using three measurements, useful when the horizontal distance cannot be measured directly.
- басыңыз FUNC button until the 3-point Pythagorean icon appears.
- Measure the first hypotenuse (from device to top of object) by pressing M.
- Measure the second hypotenuse (from device to bottom of object) by pressing M.
- Measure the horizontal distance from the device to the base of the object by pressing M.
- The device will calculate and display the vertical height.

Image 5.7: Illustration of the 3-point Pythagorean measurement mode for indirect height calculation.
6. Техникалык тейлөө
- Тазалоо: Аппаратты жумшак менен сүртүңүз, гamp cloth. Do not use abrasive cleaners or solvents. Ensure the laser lens and display are kept clean for optimal performance.
- Сактагыч: Аппаратты түз күн нурунан жана экстремалдык температурадан алыс салкын, кургак жерде сактаңыз.
- Батарея: Батареянын иштөө мөөнөтүн сактоо үчүн, түзмөк көп колдонулбаса дагы, аны үзгүлтүксүз кубаттап туруңуз.
7. Кыйынчылыктарды
| Көйгөй | Мүмкүн себеп | Чечим |
|---|---|---|
| Түзмөк күйбөйт. | Батарея аз же түгөнүп калган. | Берилген USB-C кабели аркылуу аппаратты заряддаңыз. |
| Laser measurement is inaccurate. | Incorrect reference point selected. Dirty laser lens. Target surface is too reflective or too dark. | Verify the reference point setting. Clean the laser lens. Measure to a different surface or use a target plate. |
| Дисплей күңүрт же окулбайт. | Low battery. Extreme ambient light conditions. | Recharge the battery. Move to an area with less direct sunlight or adjust viewбурч. |
| Tape measure blade does not retract smoothly. | Debris in the housing. Blade lock engaged. | Ensure the blade lock is disengaged. Gently clean any visible debris. |
8. Техникалык шарттар
| Өзгөчөлүк | Спецификация |
|---|---|
| Модель номери | PLT40LIAU |
| Лазердик класс | 2-класс |
| Лазердик толкун узундугу | 620-690нм |
| Max Laser Output | <1мВт |
| Лазердик өлчөө диапазону | 135 фут (40 м) |
| Лазердик өлчөө тактыгы | ±1/8 inch (±3mm) at 135 ft |
| Өлчөөчү лентанын узундугу | 16 фут (5 м) |
| Батарея түрү | Кайра заряддалуучу литий полимери |
| Болжолдуу батареянын иштөө мөөнөтү | Up to 5000 measurements per charge |
| Дисплей түрү | Арткы жарык түстүү LCD |
| Материал | Акрилонитрил бутадиен стирол (ABS) |
| Иштөө температурасы | 32°F – 104°F (0°C – 40°C) |
| Сактоо температурасы | 14°F – 140°F (-10°C – 60°C) |
| IP рейтинги | IP54 |
| Продукциянын өлчөмдөрү | 8.51 x 8.51 x 4.32 см |
| Элемент Салмагы | 485 г |
9. Кепилдик жана колдоо
For warranty information or technical support, please refer to the documentation included with your purchase or visit the official PREXISO website. Contact details for customer service are typically provided on the product packaging or within the included user manual.


