1. Продукт бүтүп калдыview
The SCOSCHE GMT0312DDCS is a premium installation solution designed to facilitate the integration of an aftermarket double DIN car stereo into select 1994-2012 General Motors vehicles. This kit ensures a seamless fit and maintains essential vehicle features, providing a factory-installed appearance for your new audio system. It includes a dash kit, radio replacement interface with steering wheel control (SWC) harness, and an antenna adapter.
2. Коопсуздук маалыматы
- Always disconnect the negative battery terminal before beginning any electrical installation to prevent short circuits and electrical hazards.
- Орнотуу учурунда коопсуздук көз айнек сыяктуу тиешелүү жеке коргоочу шаймандарды тагыныңыз.
- Ensure all connections are secure and properly insulated to prevent electrical shorts or malfunctions.
- Refer to your vehicle's service manual for specific instructions on removing factory components.
- Орнотуу процессинин кандайдыр бир бөлүгүнө ишенбесеңиз, квалификациялуу адиске кайрылыңыз.
3. Пакеттин мазмуну
Орнотууну баштоодон мурун бардык компоненттер бар экендигин текшериңиз:
- Радио алкагы жана монтаждоо кронштейндери
- Жалгыз DIN чөнтөк
- Radio Replacement Interface with SWC Harness
- Антенна адаптери
- Instruction Manual
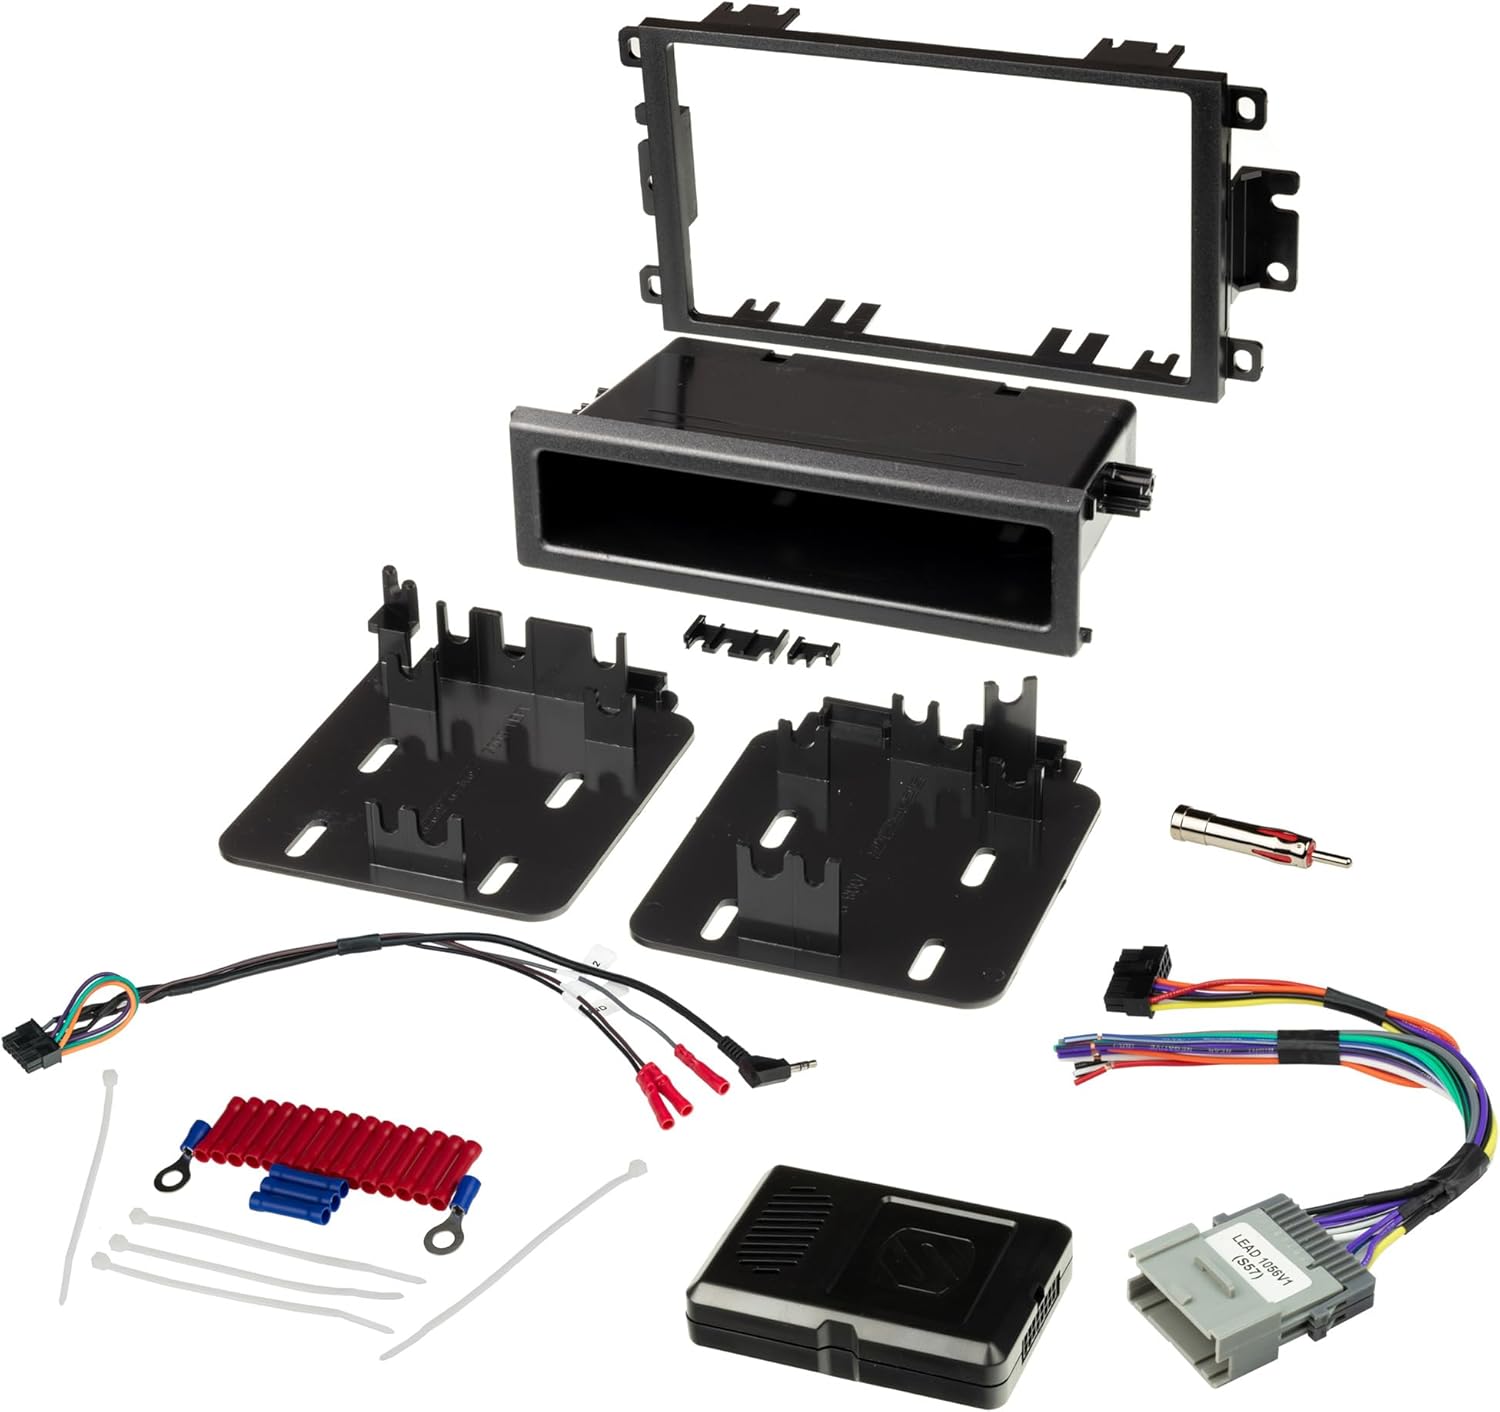
This image displays the complete set of components for the Scosche GMT0312DDCS installation kit. It includes the main dash bezel, mounting brackets, a single DIN storage pocket, the wiring harness with the interface module, an antenna adapter, and various small hardware pieces like screws and wire connectors.
4. Vehicle Compatibility and Sizing
This kit is designed for specific General Motors vehicles from 1994-2012. Please refer to the detailed fit guide provided in the images to confirm your vehicle's make, model, and year are supported. Ensure your aftermarket stereo fits within the specified dimensions.

This image illustrates the standard dimensions for Double DIN stereos, showing a maximum faceplate opening of 96.8mm x 173mm (approximately 3-13/16 inches x 6-13/16 inches). Some radios labeled as Double DIN may be oversized and require minor trimming of the kit for proper fitment.

This image displays the first page of the fit guide, listing compatible Buick, Cadillac, Chevrolet, and GEO models and their respective years. It also notes incompatibility with Digital "Premium Bose" Systems (RPO codes: Y91/Y92/Z75) and that OnStar features are not retained.

This image presents the second page of the fit guide, detailing compatible GMC, Honda, Hummer, Isuzu, Oldsmobile, Pontiac, Suzuki, and Toyota models and their years. It reiterates the incompatibility with Digital "Premium Bose" Systems and the non-retention of OnStar features.
5. Орнотуу боюнча колдонмо
Follow these steps for proper installation of your SCOSCHE GMT0312DDCS kit and aftermarket stereo.
5.1. Даярдоо
- Батареяны ажыратыңыз: Disconnect the negative battery terminal to prevent electrical shorts during installation.
- Review Көрсөтмөлөр: Carefully read the instructions provided with the kit and your new stereo.
5.2. Dash Disassembly
- Трим панелдерин алып салуу: Using a panel removal tool, carefully pry off any trim panels surrounding the factory radio.
- Завод радиосун бурап алыңыз: Locate and remove the screws securing the factory radio.
- Аспаптарды ажыратыңыз: Gently pull out the factory radio and unplug all electrical harnesses and the antenna cable from the back. Remove the factory radio.
5.3. Комплекттин жыйындысы
- Dash топтомун даярдаңыз: Based on the instructions for your specific vehicle and stereo, break off or remove any tabs from the mounting brackets that are not required for your application.
- Жаңы стерео орнотуу: Secure your new aftermarket stereo into the SCOSCHE dash kit mounting brackets using the screws provided with your new stereo.

This image demonstrates the versatility of the dash kit, showing how it can accommodate various types of aftermarket radios, including Double DIN, Single DIN (with the included storage pocket), and Floating Screen Radios that utilize a Single DIN mounting frame.
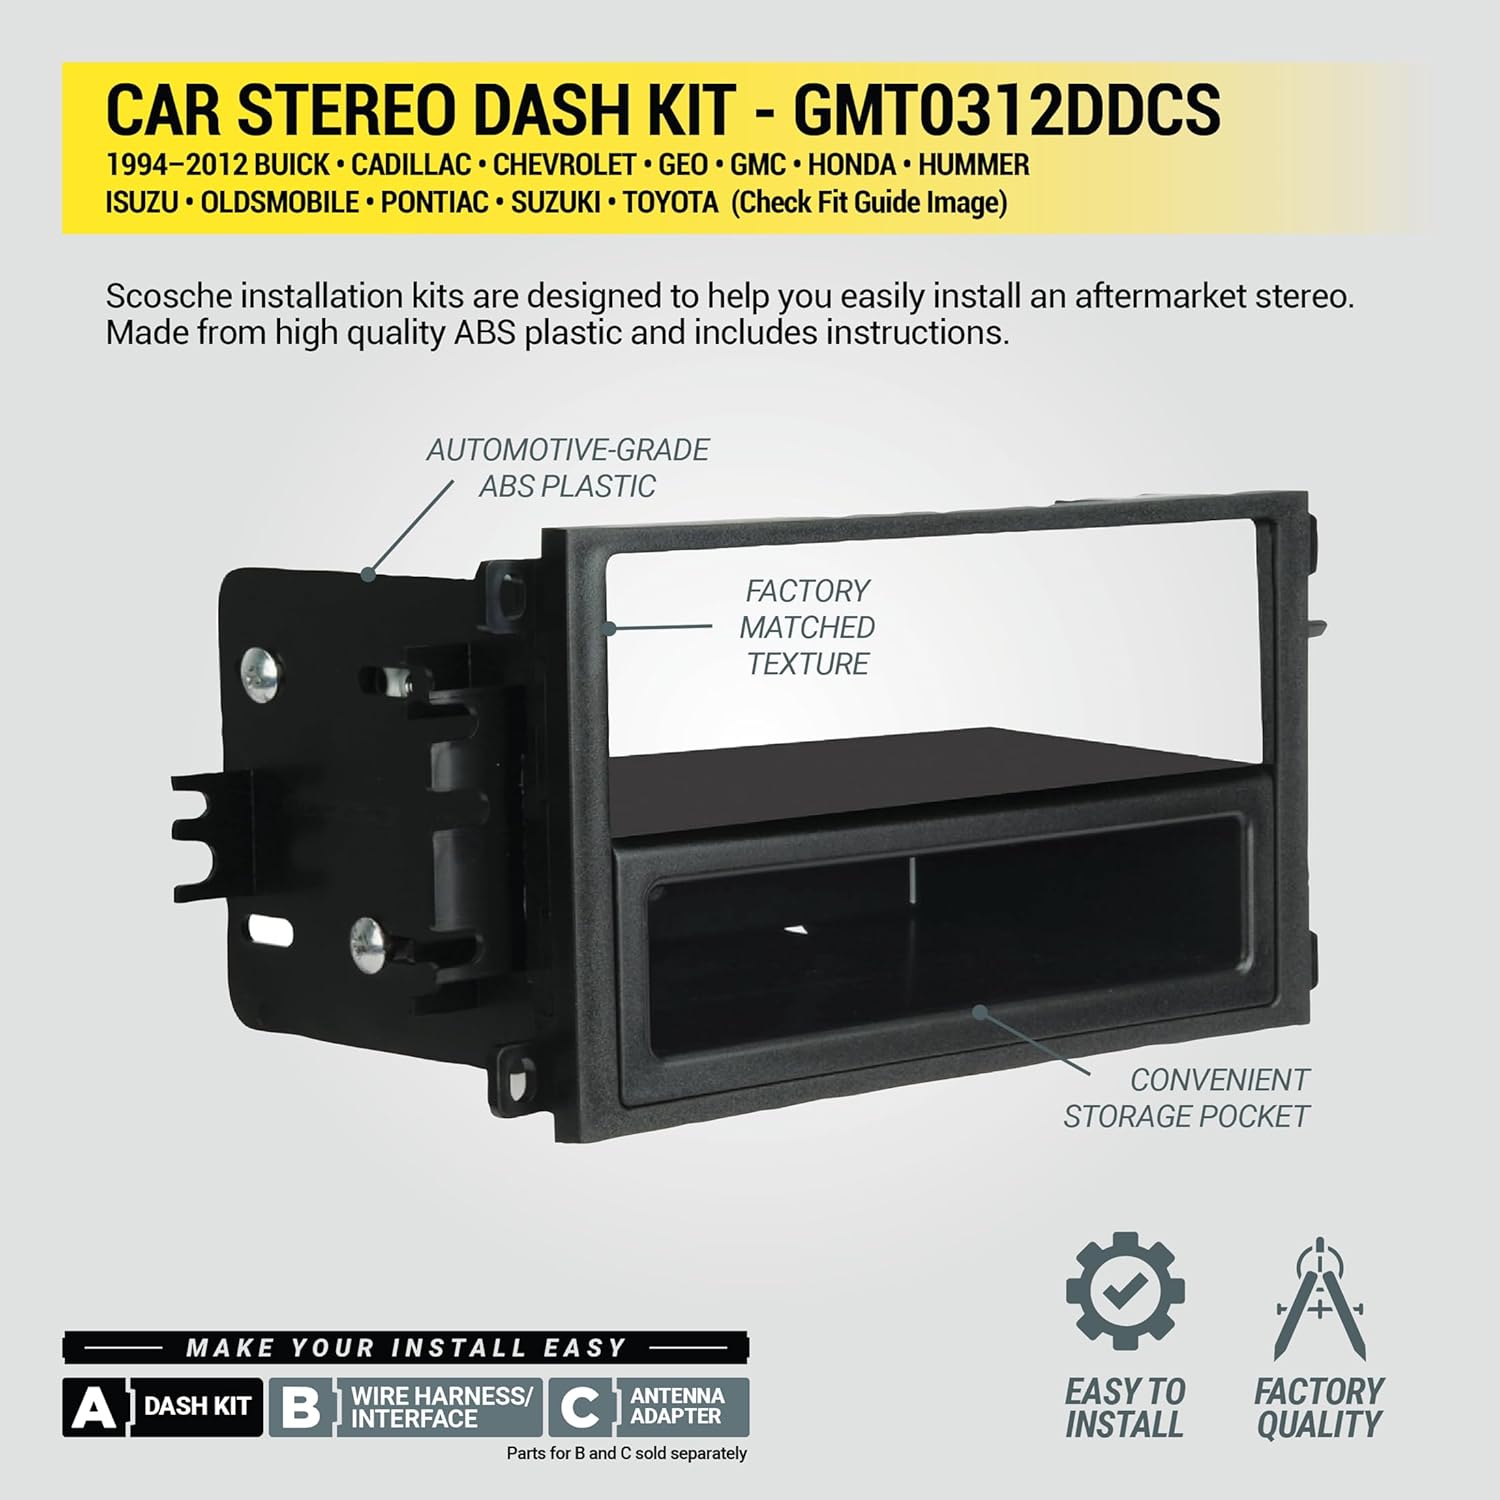
This image highlights the construction and features of the dash kit, noting it is made from automotive-grade ABS plastic with a factory-matched texture. It also points out the convenient storage pocket for Single DIN installations.

This image shows the main dash kit bezel and the separate single DIN pocket, which can be used when installing a single DIN stereo to fill the remaining space in the double DIN opening.
5.4. Зымдарды туташтыруу
- Туташтыргычтар: Using splice connectors (or soldering), connect the wires from your new stereo's harness to the SCOSCHE radio replacement interface harness, matching colors as indicated in the wiring diagram (see Section 6).
- Интерфейс байланыштары: Plug the vehicle harness into the SCOSCHE interface, and the SCOSCHE interface harness into your new radio. Connect the antenna adapter.

This image displays the radio replacement interface module and its associated wiring harness. The wires are color-coded and labeled for easy connection, and the harness quickly connects to the factory wiring while retaining steering wheel controls.
5.5. Кайра чогултуу жана сыноо
- Install Stereo: Carefully slide the assembled stereo and dash kit into the dashboard opening. Secure it with screws.
- Батареяны кайра туташтыруу: Терс батарея терминалын кайра туташтырыңыз.
- Сыноо функциялары: Turn on the radio and test all functions, including audio, balance, fade, and steering wheel controls.
- Trimди кайра орнотуу: Бардык алынып салынган кыркуучу панелдерди кайра орнотуңуз.
5.6. Орнотуу боюнча видео көрсөтмө
For a visual walkthrough of the installation process, please refer to the video below. This video demonstrates the general steps for installing an aftermarket car stereo using a Scosche kit, including dash disassembly, wiring, and reassembly.
6. EIA зымынын түс кодунун диаграммасы
The color codes used on this car stereo connector harness conform to the E.I.A. (Electronics Industry Association) standard. These colors may differ from the wiring codes found on your stereo. Always refer to your stereo owner's manual for specific wiring details before making any connections.

| Түс | Функция |
|---|---|
| Сары | 12V Battery : Constant (+) |
| Кызыл | 12V Battery : Switched (+) |
| Кара | Шасси жери (-) |
| Кара/Ак | Фабрика AmpЖер көтөргүч |
| Көк | Antenna Power (When Tuner is ON) |
| Көк/Ак | Ampкөтөргүч күйгүзүү |
| Ачык күрөң | Жарыктандыруу 12V |
| Кызгылт сары/Ак | Dash Light Dimmer 1V-12V |
| Кызгылт сары/Кара | Түңүлтүүчү жер (терс триггер чынжыры) |
| Күрөң | Телефон үнсүз |
| Ак | Сол алдыңкы динамик (+) |
| Ак/Кара | Сол алдыңкы динамик (-) |
| Боз | Оң алдыңкы динамик (+) |
| Боз/Кара | Оң алдыңкы динамик (-) |
| Жашыл | Сол арткы динамик (+) |
| Жашыл/Кара | Сол арткы динамик (-) |
| Кызгылт көк | Оң арткы динамик (+) |
| Кызгылт көк/кара | Оң арткы динамик (-) |
7. Продукттун спецификациялары
- Продукциянын өлчөмдөрү: 2.75 x 8.5 x 16.25 дюйм
- Элемент Салмагы: 15.2 унция
- Модель номери: GMT0312DDCS
- Материал: Automotive-grade ABS Plastic
- Шайкештик: Select 1994-2012 Buick, Cadillac, Chevrolet, GMC, GEO, Hummer, Isuzu, Oldsmobile, Pontiac, Suzuki, and Toyota vehicles. (Refer to fit guide for details)
- Radio Type Support: Double DIN, Single DIN (with included pocket), Floating Screen Radios with Single DIN mounting frame.
- Өзгөчөлүктөрү: Retains steering wheel controls, factory-matched texture.
8. Кепилдик жана колдоо
The SCOSCHE GMT0312DDCS is backed by Scosche's Limited Lifetime Warranty. For technical assistance or warranty claims, please contact Scosche customer support. Detailed contact information can be found on the official Scosche webсайт.


