1. Киришүү
This manual provides essential information for the proper installation, configuration, and operation of your GIGABYTE B550 AORUS ELITE AX motherboard. This motherboard is designed to support 3rd Gen AMD Ryzen Processors and offers advanced features for high-performance computing.

Сүрөт 1.1: Бүттүview of the GIGABYTE B550 AORUS ELITE AX Motherboard. This image displays the full motherboard with its various components, including the CPU socket, RAM slots, PCIe slots, and heatsinks.
Key features include a True 12+2 Phases Digital VRM Solution, advanced thermal design with enlarged surface heatsinks, an Ultra Durable PCIe 4.0 x16 Slot, dual ultra-fast NVMe PCIe 4.0/3.0 x4 M.2 slots with dual thermal guards, and integrated Intel WiFi 6 802.11ax with Bluetooth 5.
2. Орнотуу жана орнотуу
Орнотууну баштоодон мурун, системаңыздын өчүрүлгөнүн жана розеткадан суурулганын текшериңиз. Статикалык разрядды болтурбоо үчүн энелик платаны ар дайым четтеринен кармаңыз.
2.1. Компонентти идентификациялоо
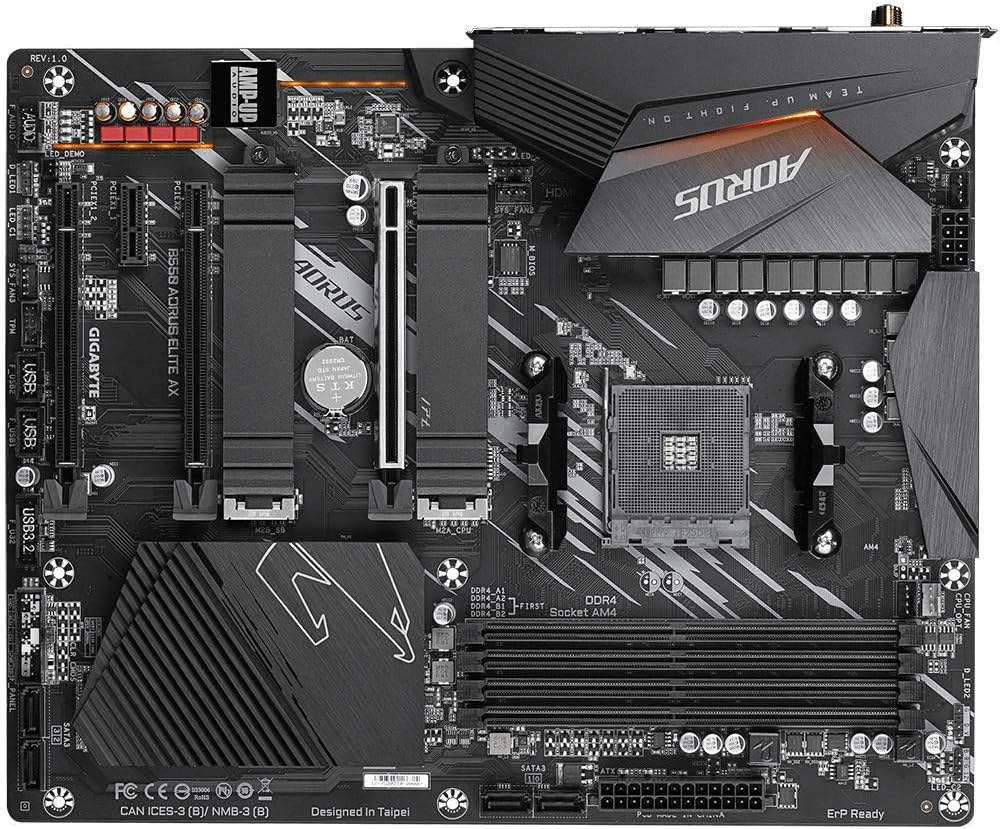
Сүрөт 2.1: жогорудан ылдыйга view of the GIGABYTE B550 AORUS ELITE AX Motherboard. This image highlights the layout of the CPU socket, four DDR4 DIMM slots, multiple PCIe slots, and two M.2 slots with their thermal guards.
2.2. CPU орнотуу
- Locate the AM4 CPU socket. Lift the load lever to open the socket.
- Carefully align the triangular mark on the CPU with the mark on the socket. Gently place the CPU into the socket without forcing it.
- Lower the load lever back into place to secure the CPU.
2.3. RAM орнотуу
This motherboard supports Dual Channel ECC/Non-ECC Unbuffered DDR4 memory across 4 DIMM slots.
- DIMM уячасынын эки учундагы клиптерди ачыңыз.
- DDR4 эстутум модулундагы оюкту DIMM уячасындагы ачкыч менен тууралаңыз.
- Эстутум модулунун эки учуна кысылганчалар орнотулганга чейин катуу басыңыз.
2.4. M.2 SSD орнотуу
The motherboard features dual ultra-fast NVMe PCIe 4.0/3.0 x4 M.2 slots with dual thermal guards.
- Unscrew and remove the M.2 thermal guard from the desired slot.
- M.2 SSDди уячага бурч менен салыңыз.
- Gently push down the SSD and secure it with the provided screw.
- Оптималдуу муздатуу үчүн M.2 термикалык коргоочусун кайра бекитиңиз.
2.5. PCIe картасын орнотуу
Install graphics cards or other expansion cards into the PCIe slots. The top slot is an Ultra Durable PCIe 4.0 x16 slot.
- Align the PCIe card with the chosen slot.
- Press down firmly until the card is fully seated and the retention clip engages.
2.6. Электр байланыштары
24-пин ATX негизги кубат туташтыргычын жана 8-пин CPU кубат туташтыргычын кубат булагыңыздан энелик платага туташтырыңыз.
2.7. Front Panel Connectors
Connect the power button, reset button, HDD LED, and USB/audio headers from your PC case to the corresponding pins on the motherboard. Refer to the motherboard diagram for exact pin locations.
2.8. Арткы I/O панели

Image 2.2: Rear I/O Panel of the GIGABYTE B550 AORUS ELITE AX Motherboard. This image shows the various ports available, including USB 3.2 Gen 1, USB 3.2 Gen 2, DisplayPort, HDMI, 2.5GbE LAN, Wi-Fi antenna connectors, and audio jacks. The pre-installed I/O shield is visible.
The motherboard features a pre-installed I/O shield for easy and quick installation. Connect your peripherals such as monitor, keyboard, mouse, and network cable to the appropriate ports on the rear I/O panel.
3. Иштөө нускамалары
3.1. Биринчи жүктөө
After assembling all components and connecting power, press the power button on your PC case. The system should power on and display the GIGABYTE splash screen.
3.2. BIOS/UEFIге кирүү
BIOS/UEFI орнотуунун утилитасына кирүү үчүн, басыңыз DEL key repeatedly during the initial boot process when the GIGABYTE logo appears. The BIOS allows you to configure system settings, boot order, and enable features like XMP for memory profiles.
3.3. Драйверди орнотуу
After installing your operating system, install the necessary drivers for the motherboard's components. These include chipset drivers, LAN drivers, Wi-Fi/Bluetooth drivers, and audio drivers. Drivers can typically be found on the GIGABYTE official webсиздин белгилүү бир энелик плата моделиңиз үчүн сайт.
4. Техникалык тейлөө
4.1. Системаны тазалоо
Regularly clean your computer's interior to prevent dust buildup, which can lead to overheating and reduced performance. Use compressed air to remove dust from fans, heatsinks, and other components. Ensure the system is powered off and unplugged before cleaning.
4.2. BIOS жаңыртуулары
GIGABYTE provides BIOS updates to improve system stability, add support for new hardware, and fix bugs. The B550 AORUS ELITE AX supports Q-Flash Plus, allowing you to update the BIOS without installing the CPU, memory, or graphics card. Refer to the GIGABYTE website for detailed instructions on using Q-Flash Plus and for the latest BIOS versions.
5. Кыйынчылыктарды
Бул бөлүм сиз кабылышы мүмкүн болгон жалпы көйгөйлөрдү карайт.
5.1. Кубат жок / Жүктөө жок
- Бардык электр кабелдери (24-пин ATX, 8-пин CPU) энелик платага жана кубат булагына бекем туташтырылганын текшериңиз.
- Кубат менен камсыздоонун которгучу 'ON' абалында экенин текшериңиз.
- Check that the front panel power button connector is correctly attached to the motherboard.
- Мүмкүн болсо, башка кубат менен сынап көрүңүз.
5.2. Дисплейдин чыгышы жок
- Ensure your monitor is connected to the graphics card (if installed) or the motherboard's HDMI/DisplayPort (if using an APU with integrated graphics).
- Графикалык картаны жана эстутум модулдарын кайра орнотуңуз.
- Орнотулган бир гана RAM таякчасы менен жүктөөгө аракет кылыңыз.
5.3. Bluetooth / Wi-Fi Connectivity Issues
- Ensure the external Wi-Fi antenna is securely connected to the rear I/O panel.
- Update your Wi-Fi and Bluetooth drivers to the latest version from the GIGABYTE webсайт.
- If Bluetooth devices disconnect after sleep mode, try disabling USB selective suspend settings in Windows Power Options or updating the BIOS to the latest version, as this has resolved similar issues in some cases.
5.4. BIOS Reset
If you encounter issues after changing BIOS settings, you may need to reset the BIOS to default settings. This motherboard does not feature a dedicated BIOS reset button. To clear CMOS (BIOS settings), power off your system, unplug it, and remove the small circular battery (CMOS battery) from the motherboard for a few minutes. Reinsert the battery and power on the system.
6. Техникалык шарттар
Below are the key technical specifications for the GIGABYTE B550 AORUS ELITE AX Motherboard:
| Өзгөчөлүк | Спецификация |
|---|---|
| Бренд | GIGABYTE |
| Модель аты | B550 AORUS ELITE AX |
| CPU розетка | Розетка AM4 |
| Шайкеш процессорлор | AMD 3-муун Ryzen |
| Чипсет түрү | AMD B550 |
| RAM эс технологиясы | DDR4 |
| Memory Speed | 2133 MHz (Base), up to 4733MHz (OC) |
| Эстутум сактоо сыйымдуулугу | 128 ГБ (макс.) |
| Зымсыз түрү | 802.11ax (Intel WiFi 6) |
| LAN | 2.5 Гигабит Ethernet |
| картриджа Slots | 1x PCIe 4.0 x16, 2x PCIe 3.0 x16 (x4 mode), 1x PCIe 3.0 x1 |
| M.2 Slots | 2x NVMe PCIe 4.0/3.0 x4 with Thermal Guards |
| USB 2.0 порттору | 2 (Арткы) |
| USB 3.2 Gen 1 порттору | 4 (Арткы) |
| USB 3.2 Gen 2 порттору | 2 (Rear, Type-A) |
| Video Output | HDMI, DisplayPort |
| Аудио | Realtek ALC1200 Codec, AMP-UP Audio |
| Форма фактору | ATX |
| Элемент Салмагы | 4.07 фунт |
| Продукциянын өлчөмдөрү | 13.18 x 10.62 x 3.14 дюйм |
7. Кепилдик маалыматы
GIGABYTE products are covered by a limited warranty. The specific terms and duration of the warranty may vary by region and product type. Please retain your proof of purchase for warranty claims. For detailed warranty information, including coverage, limitations, and the claims process, please visit the official GIGABYTE webсайтына кириңиз же жергиликтүү сатуучуңузга кайрылыңыз.
8. Техникалык колдоо
If you encounter issues that cannot be resolved using this manual or require further assistance, please contact GIGABYTE technical support. You can find support resources, FAQs, driver downloads, and contact information on the official GIGABYTE webсайт:
When contacting support, please have your motherboard model (B550 AORUS ELITE AX) and a detailed description of your issue ready.


