1. Киришүү
Thank you for choosing the USX MOUNT UL Listed Heavy Duty TV Wall Mount. This product is engineered for secure and versatile mounting of televisions ranging from 32 to 90 inches and weighing up to 150 lbs. It features a full-motion design with swivel, tilt, and leveling adjustments, along with an 8-inch horizontal sliding function for optimal TV positioning. Please read this manual thoroughly before installation and retain it for future reference.

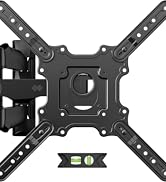
1-сүрөт: USX MOUNT Heavy Duty TV Wall Mount with bubble level and cable ties.
2. Коопсуздук боюнча маанилүү маалымат
- ЭСКЕРТҮҮ: This product is designed for use in wood stud, solid concrete, or brick walls only. Жалгыз гипсокартон үстүнө ОРНОТПОЙТ.
- Ensure your TV's weight and VESA pattern are within the specified limits of this mount.
- Жыгач мыктарды так табуу үчүн ар дайым мык издегичти колдонуңуз.
- If mounting to concrete or brick, appropriate concrete anchors are required. Contact USX MOUNT if you need these anchors.
- Installation should be performed by at least two people due to the weight and size of the TV and mount.
- Do not overtighten screws, as this may damage the wall or TV.
- Орнотуу учурунда балдарды жана үй жаныбарларын алыс кармаңыз.
3. Пакеттин мазмуну
Verify that all components are present and undamaged before beginning installation. If any parts are missing or defective, please contact USX MOUNT customer support.
- TV Wall Mount Assembly
- Сыналгы кронштейндери (2 даана)
- Дубал плитасы
- көбүк деңгээли
- Кабель байламталары (3 даана)
- Standard Mounting Hardware (various screws, washers, spacers for different TV types)
2-сүрөт: Бардык компоненттер пакетте камтылган.
4. Талап кылынган куралдар (камтылган эмес)
- Аргымак
- Электрдик бургу
- Level (a small one is included, but a larger one may be helpful)
- Карандаш
- Тасма өлчөгүч
- Филлипс баш бурагычы
- Socket Wrench (e.g., 13mm)
- Балка (бетон анкерлер үчүн)
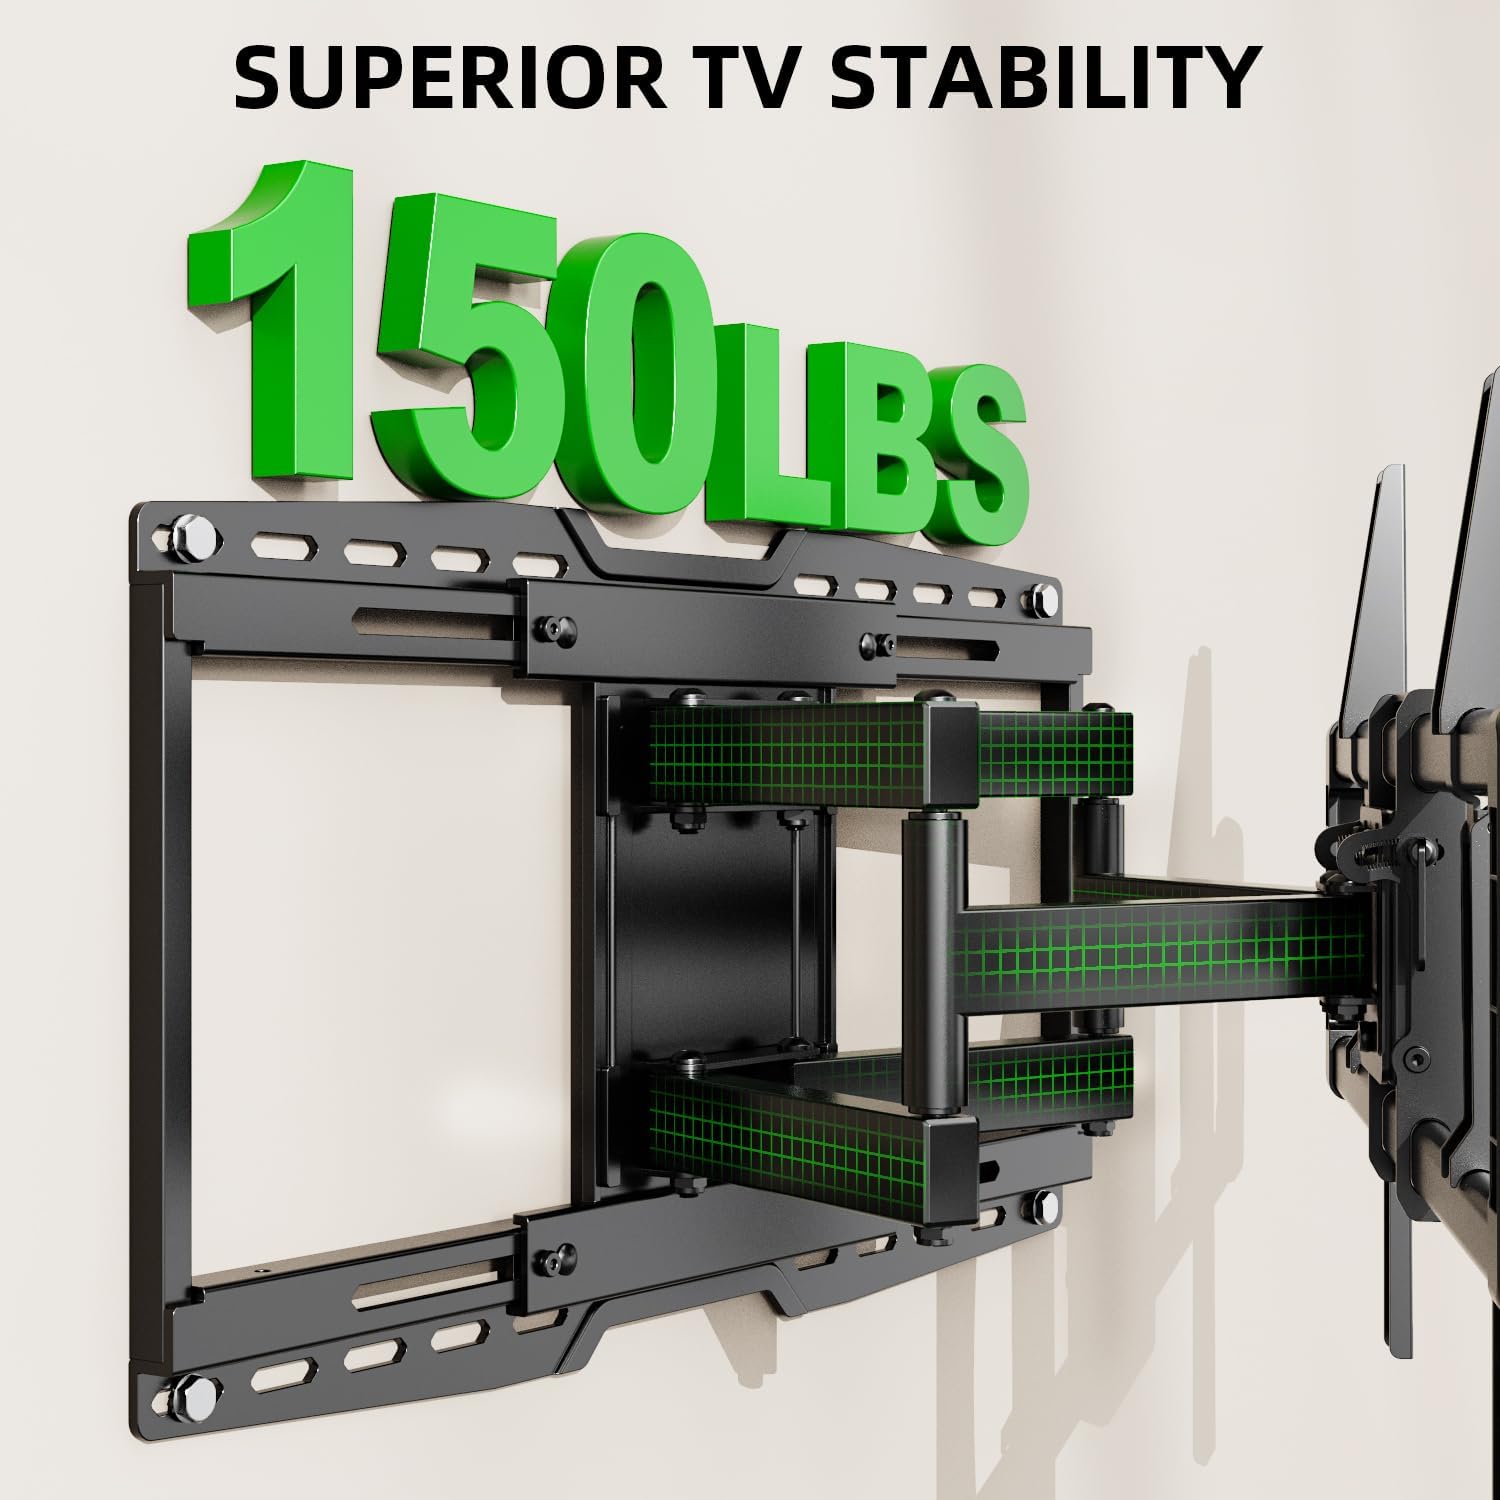
5. Продукттун спецификациялары
| Өзгөчөлүк | Спецификация |
|---|---|
| Модель номери | XML018-1 |
| Туура келген сыналгы өлчөмдөрү | 32 - 90 дюйм |
| Максималдуу жүктөө жөндөмдүүлүгү | 150 фунт (68.2 кг) |
| VESA шайкештиги | Max 600x400mm, Min 200x100mm |
| Кыймыл түрү | Articulating, Swivel, Tilt |
| Тит бурч | +5° / -15° |
| Swivel Angle | +/-45° |
| Дубалга чейинки аралык | 3.35 - 19.09 дюйм |
| Horizontal Sliding | 8 inches (left or right) |
| Compatible Wall Types | Wood studs (8", 12", 16", 18", 24"), Solid concrete wall, Brick wall |
| Материал | Эритме болот |

3-сүрөт: Available VESA patterns and how to measure your TV's VESA.
6. Орнотуу боюнча колдонмо
6.1. Орнотууга чейинки текшерүү тизмеси
- Confirm your TV's size and weight are within the mount's specifications.
- Verify your TV's VESA mounting pattern.
- Identify your wall type (wood studs, concrete, or brick).
- Gather all necessary tools and included hardware.
4-сүрөт: Confirm TV and wall compatibility before installation.
6.2. Кадам-кадам орнотуу
1-кадам: Телевизордун кашааларын сыналгыга бекитиңиз
- Carefully place your TV face-down on a soft, clean surface.
- Align the TV brackets with the mounting holes on the back of your TV.
- Select the appropriate screws, washers, and spacers from the hardware kit. For flat TV backs, spacers may not be needed. For irregular or curved TV backs, use spacers to ensure a secure fit without damaging the TV.
- Secure the brackets to the TV using a screwdriver. Do not overtighten.
5-сүрөт: TV brackets attached to the back of the television.
Видео 1: This video demonstrates the process of attaching the TV brackets to the television, including considerations for different TV back types.
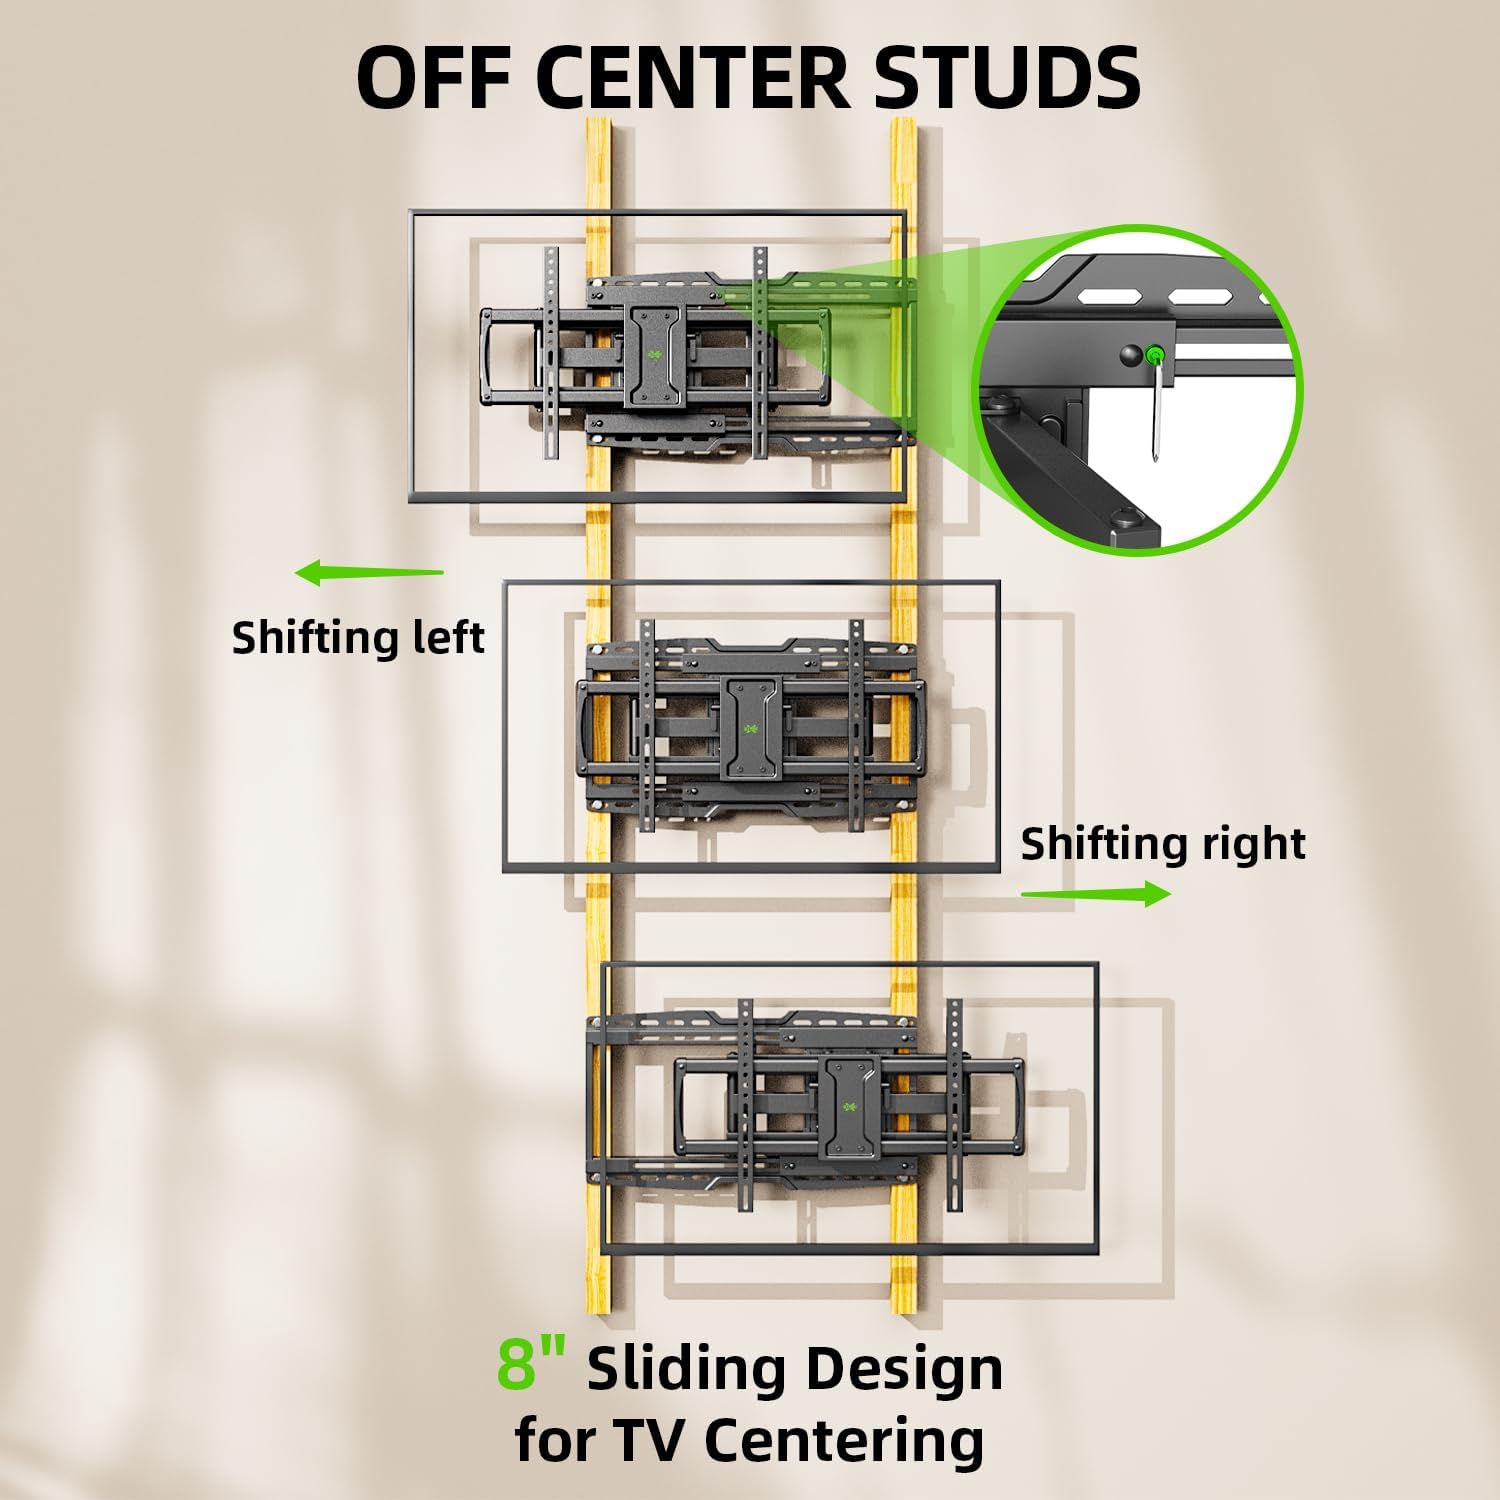
Step 2: Locate Wall Studs and Mark Drilling Points
- Use a stud finder to locate the edges and center of two adjacent wood studs. Mark the center of each stud.
- Hold the wall plate against the wall at your desired height and use a level to ensure it is perfectly horizontal. Mark the drilling points through the wall plate's holes onto the wall.
- The mount features an 8-inch horizontal sliding design, allowing you to center your TV even if your studs are off-center. Plan your wall plate placement accordingly.

6-сүрөт: The 8-inch sliding design allows for TV centering even with off-center studs.
3-кадам: Дубал плитасын дубалга бекитиңиз
Жыгачтан жасалган дубалдар үчүн:
- Drill pilot holes at the marked locations using a 7/32 inch (5.5 mm) drill bit. Ensure the depth is sufficient for the lag bolts.
- Attach the wall plate to the wall using the provided lag bolts and washers. Tighten securely with a socket wrench.
For Solid Concrete or Brick Walls:
- Drill pilot holes at the marked locations using a 3/8 inch (10 mm) drill bit. Ensure the depth is sufficient for the concrete anchors.
- Insert the concrete anchors into the pilot holes, tapping gently with a hammer if necessary until flush with the wall surface.
- Attach the wall plate to the wall using the provided lag bolts and washers, screwing them into the anchors. Tighten securely.

7-сүрөт: Compatible wall types for installation. Do not install on drywall alone.
Видео 2: This installation video demonstrates locating studs, drilling, and securing the wall plate for various wall types.
Step 4: Hang TV onto Wall Plate
- With assistance, carefully lift the TV and hook the attached TV brackets onto the wall plate.
- Телевизордун дубалга орнотулган пластинага бекем орнотулганын текшериңиз.
- Engage the safety screws or locking mechanisms on the TV brackets to prevent accidental dislodging.

8-сүрөт: Бүттүview of the TV mounting process, including hanging and securing the TV.
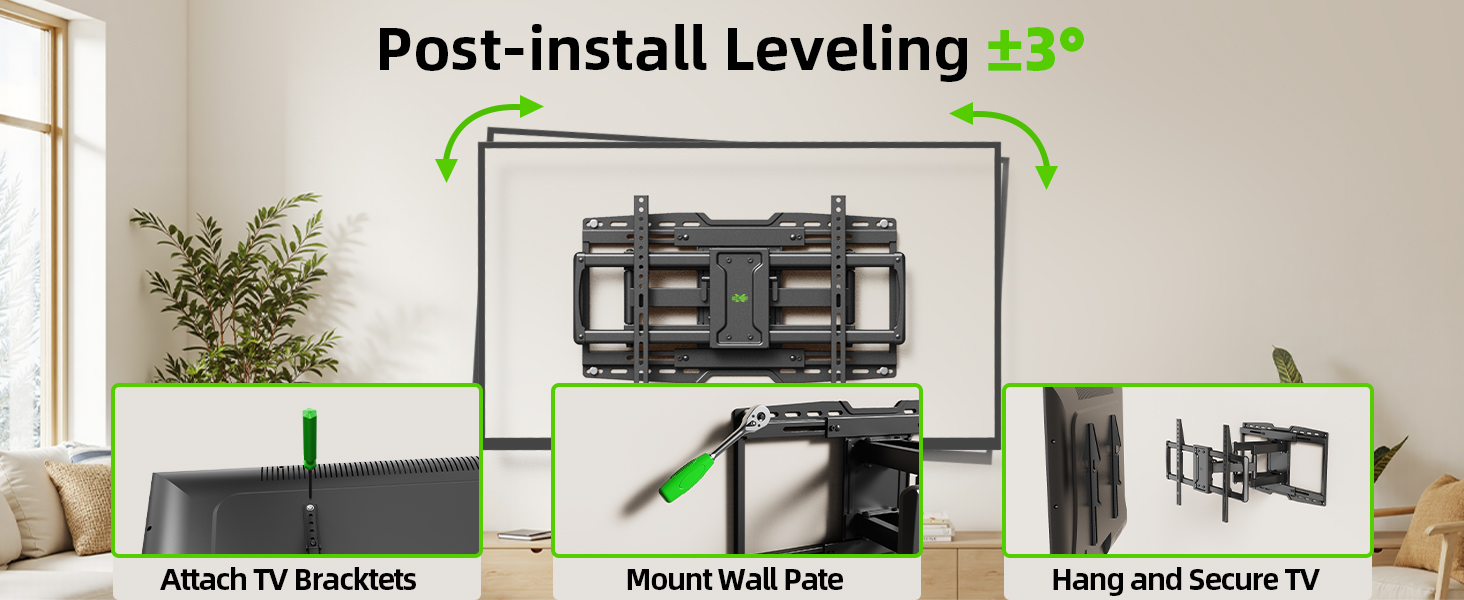
Step 5: Leveling Adjustment
- After hanging the TV, use the horizontal post-installation leveling screws to fine-tune the TV's level. This allows for a +/-3° adjustment.
- Use the included bubble level or a larger level to achieve perfect horizontal alignment.
9-сүрөт: Post-installation leveling screws for precise alignment.
7. Иштөө нускамалары
7.1. жантайып тууралоо
The mount allows for a tilt range of +5° (upward) to -15° (downward). This feature is useful for reducing glare and optimizing viewбурчтар.
- Locate the tilt handles on the TV brackets.
- Loosen the tilt handles to adjust the TV to your desired vertical angle.
- Tighten the tilt handles to secure the TV in position.

10-сүрөт: Adjusting the TV tilt for comfortable viewing.
7.2. Swivel and Extension/Retraction
The full-motion arms allow the TV to swivel up to +/-45° and extend from 3.35 inches to 19.09 inches from the wall.
- Gently pull the TV away from the wall to extend the articulating arms.
- Carefully pivot the TV left or right to achieve the desired swivel angle.
- To retract, push the TV back towards the wall until it is in the desired position.

11-сүрөт: ийкемдүү viewing with extension, retraction, and swivel capabilities.
7.3. Horizontal Sliding
The mount features an 8-inch horizontal sliding function on the wall plate, allowing you to shift the TV left or right by up to 8 inches after installation, ensuring perfect centering.
- Gently slide the TV along the wall plate to adjust its horizontal position.
- Ensure the TV is securely positioned after adjustment.
8. Техникалык тейлөө
- Мезгил-мезгили менен бардык бурамалар менен байланыштарды текшерип туруңуз, алар бекем жана бекем бойдон калууда.
- Монтажды жумшак, кургак чүпүрөк менен тазалаңыз. Абразивдүү тазалагычтардан же эриткичтерден качыңыз.
- Эгерде муунтуучу колдор катып калса, айланма чекиттерге бир аз өлчөмдө силикон негизиндеги майлоочу май сүйкөөгө болот.
9. Кыйынчылыктарды
9.1. TV is not level after installation
- Use the horizontal post-installation leveling screws (as described in Section 6.2, Step 5) to adjust the TV's angle by +/-3°.
9.2. Difficulty moving the TV (stiff arms)
- Кабельдер жабышып же кыймылга тоскоолдук кылбагандыгын текшериңиз.
- Apply a small amount of silicone-based lubricant to the articulating joints if movement remains stiff.
9.3. TV is not centered on the wall
- Utilize the 8-inch horizontal sliding feature of the mount to reposition the TV left or right on the wall plate.
10. Кепилдик жана колдоо
This USX MOUNT product is manufactured by X-MOUNT LIMITED. For specific warranty details, please refer to the product packaging or visit the official USX MOUNT website. If you require concrete anchors not included in your package, or have any questions or concerns regarding installation or operation, please contact USX MOUNT customer support.


