1. Киришүү
This manual provides comprehensive instructions for the installation, operation, and maintenance of your AZZA CSAZ-340F CELESTA ATX Mid Tower Gaming Case. Please read this manual thoroughly before beginning installation to ensure proper setup and to maximize the performance and longevity of your system components.

1-сүрөт: The AZZA CSAZ-340F CELESTA Mid Tower ATX Case, showcasing its design and form factor.
2. Коопсуздук маалыматы
- Always disconnect the power supply from the wall outlet before installing or removing any components inside the case.
- Электростатикалык разряддан (ЭСР) келип чыккан зыянды алдын алуу үчүн бардык компоненттерди этияттык менен кармаңыз. Антистатикалык билек боону колдонууну карап көрүңүз.
- Keep the case and components away from liquids and excessive moisture.
- Ашыкча ысып кетүүнүн алдын алуу үчүн корпустун айланасында туура желдетүүнү камсыз кылыңыз.
- Do not attempt to modify the case structure or components, as this may void your warranty and pose safety risks.
- Keep small parts and packaging materials out of reach of children.
3. Пакеттин мазмуну
Төмөндө тизмеленген нерселердин баары пакетиңизде бар экенин текшериңиз:
- AZZA CSAZ-340F CELESTA ATX Mid Tower Gaming Case
- Кошумча кутуча (бурамаларды, тирөөчтөрдү, кабель байлагычтарды ж.б. камтыйт)
- Колдонуучунун Колдонмосу (бул документ)
4. Техникалык шарттар
The following table details the technical specifications of the AZZA CSAZ-340F CELESTA case:
| Өзгөчөлүк | Спецификация |
|---|---|
| Бренд | AZZA |
| Модель аты | CSAZ-340F CELESTA |
| Иштин түрү | Ара Tower |
| Motherboard шайкештиги | ATX, Micro ATX, Mini ITX |
| Түс | Кара |
| Материал | Металл |
| Кубат менен камсыздоону орнотуу түрү | Төмөнкү тоо |
| Муздатуу ыкмасы | Аба |
| Fan Size (Included/Supported) | 120mm (Rear included), Supports 120mm/140mm |
| Максималдуу GPU узундугу | 320мм |
| CPU муздаткычтын максималдуу бийиктиги | 165мм |
| Максималдуу PSU узундугу | 160мм |
| 3.5" HDD Support | 2 |
| 2.5" SSD Support | 4/6 (depending on configuration) |
| Алдыңкы желдеткичти колдоо | 3 x 120 мм же 3 x 140 мм |
| Top Fan Support | 2 x 120 мм же 2 x 140 мм |
| Rear Fan Support | 1 x 120 мм |
| Алдыңкы радиаторду колдоо | Up to 280mm/360mm |
| Жогорку Радиатор колдоо | 2 x 120mm (from image) |
| Арткы радиатор колдоо | 1 x 120mm (from image) |
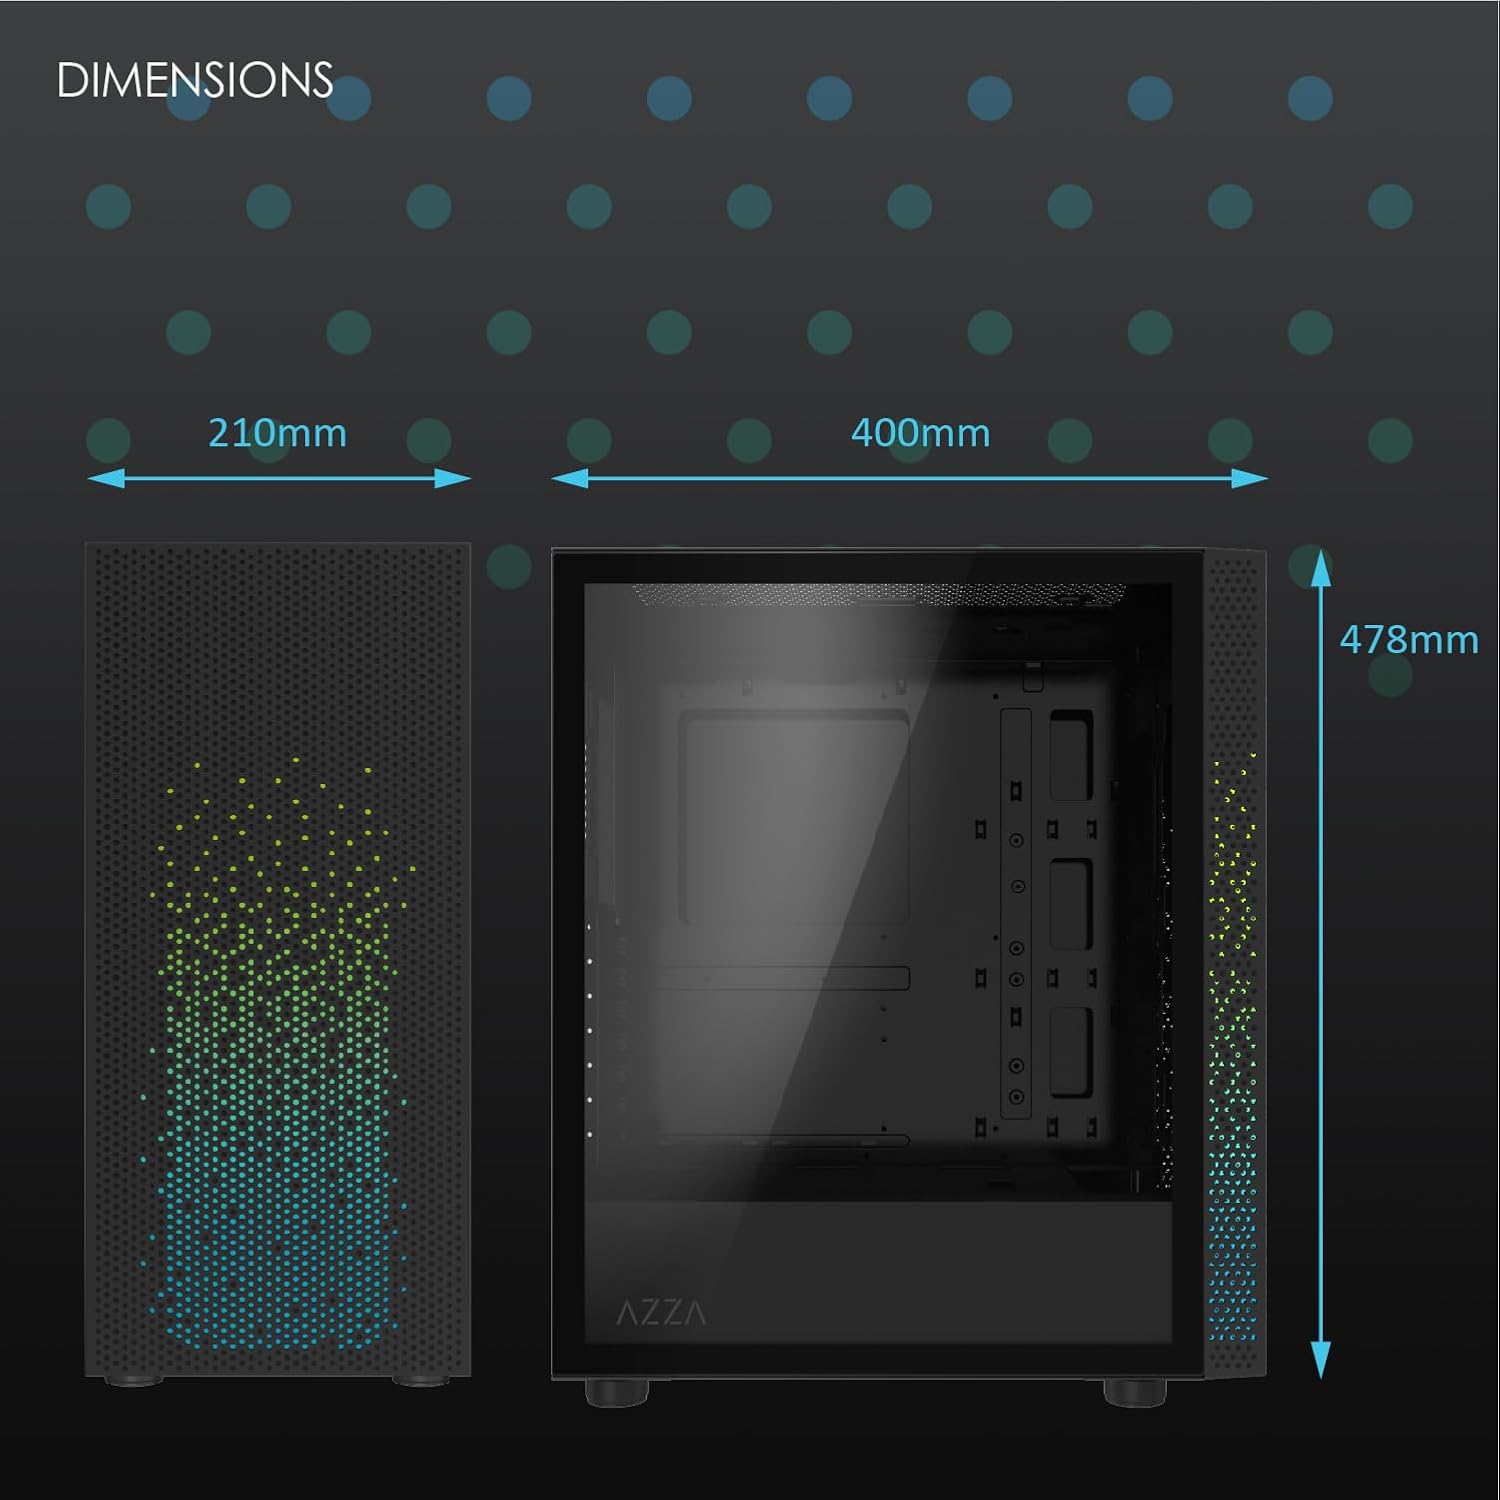
2-сүрөт: Physical dimensions of the AZZA CSAZ-340F CELESTA case: 210mm (width), 400mm (depth), 478mm (height).

3-сүрөт: Diagram illustrating fan and radiator mounting options for the AZZA CSAZ-340F CELESTA case, including front, top, and rear configurations.

4-сүрөт: Internal component support diagram for the AZZA CSAZ-340F CELESTA, showing maximum dimensions for CPU cooler, GPU, and PSU, along with drive bay locations.
5. Орнотуу жана орнотуу
Follow these steps to install your components into the AZZA CSAZ-340F CELESTA case.
5.1 Ишти даярдоо
- Корпусту тегиз, туруктуу бетке коюңуз.
- Remove the side panels. Typically, these are secured with thumbscrews at the rear of the case.
5.2 Motherboard орнотуу
- Install the I/O shield (if not pre-installed) into the rear opening of the case.
- Ensure the correct standoffs are installed for your ATX, Micro-ATX, or Mini-ITX motherboard. Adjust or add standoffs as needed using the provided tools.
- Этияттык менен энелик платаңызды буроо тешикчелерин тегиздеп, стендтерге жайгаштырыңыз.
- Энелик платаны аксессуарлар кутучасындагы тиешелүү бурамалар менен бекитиңиз. Ашыкча бекемдебеңиз.
5.3 Электр менен камсыздоо блогун (PSU) орнотуу
- Position the PSU in the bottom rear compartment of the case, ensuring the fan faces downwards (if there's a filtered vent) or upwards.
- Secure the PSU to the case with the provided screws from the rear.
- Керектүү электр кабелдерин кабелди башкаруу кесиктери аркылуу өткөрүңүз.
5.4 Сактоочу дискти орнотуу (HDD/SSD)
- 3.5" HDD: Locate the drive cage. Slide the 3.5" HDDs into the drive trays and secure them, often tool-less or with screws.
- 2.5" SSD: Mount 2.5" SSDs to the dedicated mounting points on the motherboard tray or drive cage using screws.
- Connect SATA data and power cables to the installed drives.
5.5 Графикалык картаны (GPU) орнотуу
- Керектүү PCIe уячасынын капкактарын корпустун арткы бөлүгүнөн алып салыңыз.
- Carefully insert your graphics card into the appropriate PCIe slot on the motherboard until it clicks into place.
- Графикалык картаны бурамалар менен корпуска бекитиңиз.
- Connect any required PCIe power cables from the PSU to the graphics card.
5.6 CPU Cooler Installation
Install your CPU cooler according to its specific manufacturer instructions. Ensure it does not exceed the maximum height of 165mm.
5.7 Желдеткичти жана Радиаторду орнотуу
Корпус ар кандай желдеткич жана радиатор конфигурацияларын колдойт:
- Алдыңкы: Up to 3 x 120mm or 3 x 140mm fans, or radiators up to 280mm/360mm.
- Жогорку: Up to 2 x 120mm or 2 x 140mm fans, or 2 x 120mm radiators.
- Арткы: 1 x 120mm fan (pre-installed) or 1 x 120mm radiator.
Mount fans and radiators using the appropriate screws and ensure proper airflow direction.
5.8 Кабелди башкаруу
Кабелдерди өткөрүү жана бекитүү үчүн энелик плата лотогунун артындагы кабелдерди башкаруу кесиктерин жана бекитүүчү чекиттерди колдонуңуз. Бул аба агымын жана эстетиканы жакшыртат.
5.9 Жыйынтыктоочу Ассамблея
- Double-check all connections and ensure no cables are obstructing fans.
- Reattach the side panels.
- Connect external peripherals (monitor, keyboard, mouse, etc.) and the power cable.
6. Системаны иштетүү
Once all components are installed and connected, you can power on your system. The front panel features power and reset buttons, along with USB and audio ports for convenient access.

5-сүрөт: Close-up of the AZZA CSAZ-340F CELESTA's front panel, highlighting the integrated lighting effects.
7. Техникалык тейлөө
- Чаң чыпкалары: Regularly clean the dust filters (if present) to maintain optimal airflow and cooling performance.
- Ички тазалоо: Periodically open the case and use compressed air to remove dust from components and fans. Ensure the system is powered off and unplugged before cleaning.
- Тышкы тазалоо: Сырткы беттерин жумшак менен сүртүңүз, гamp кездеме. Катуу химиялык заттардан алыс болуңуз.
8. Кыйынчылыктарды
Көйгөйгө туш болсоңуз, көйгөйлөрдү чечүүнүн төмөнкү жалпы кадамдарын карап көрүңүз:
- Система күйбөй жатат:
- Кубат кабелинин кубат булагына жана розеткага бекем туташтырылганын текшериңиз.
- Check that the PSU switch is in the "ON" position.
- Verify all internal power connections (24-pin ATX, 8-pin CPU, PCIe power) are seated correctly.
- Алдыңкы панелдин кубат баскычынын кабелдери энелик платага туура туташтырылганын ырастаңыз.
- Дисплей чыгышы жок:
- Мониторуңуз графикалык картага туташтырылганын текшериңиз (эгер сиз интеграцияланган графиканы колдонбосоңуз, энелик платанын интеграцияланган графикалык портторуна эмес).
- Графикалык картаны PCIe слотуна кайра орнотуңуз.
- Check monitor input selection.
- Ашыкча ысып кетүү:
- Verify all case fans are spinning and oriented correctly for airflow.
- Чаң чыпкаларын жана ички компоненттерин тазалаңыз.
- Ensure CPU cooler is properly seated and making good contact with the CPU.
9. Кепилдик жана колдоо
For warranty information and technical support, please refer to the official AZZA website or contact AZZA customer service directly. Keep your proof of purchase for warranty claims.
AZZA Official Webсайт: www.azza.com


