1. Киришүү
This manual provides comprehensive instructions for the SHARKOON Elite Shark CA300T Extended ATX PC Case. It covers the product's features, setup procedures, operational guidelines, maintenance tips, troubleshooting solutions, and detailed technical specifications. Please read this manual thoroughly before installation and use to ensure optimal performance and longevity of your PC case.
2. Негизги өзгөчөлүктөрү
- Футуристтик дизайн: The CA300T features an expressive front panel with a geometric pattern, framed by brushed aluminum, giving it a distinctive and modern aesthetic.
- Advanced Airflow: Equipped with three pre-installed 120mm RGB LED fans at the front and one at the rear, ensuring consistent airflow. The front panel includes a mesh grille for optimal ventilation, and the top panel offers a perforated cover for additional fan/radiator mounting.
- Illuminated I/O Panel: The side-mounted I/O panel includes standard audio ports, USB 3.0 ports, and a USB-C port, all featuring their own RGB illumination.
- Температуралуу айнек панелдери: Two tempered glass side panels provide a clear view of internal components. The right-side panel is partially tinted to conceal the power supply tunnel while highlighting SSDs or HDDs.
- Кең ички: Designed to accommodate large components, including graphics cards up to 42.5 cm, power supplies up to 24 cm, and CPU coolers up to 16.5 cm.
- Натыйжалуу кабелдик башкаруу: Features a spacious, foldable cable compartment and a sliding cable cover to keep wiring organized and out of sight.
- Сактоо параметрлери: Supports up to seven 2.5-inch drives or four 3.5-inch drives.
3. Пакеттин мазмуну
The SHARKOON Elite Shark CA300T PC Case package typically includes:
- SHARKOON Elite Shark CA300T PC Case (White)
- Pre-installed 120mm RGB LED Fans (3x Front, 1x Rear)
- Аксессуарлар кутучасы (буроолор, кабелдик байланыштар, бекиткичтер ж.б.)
- Колдонуучунун Колдонмосу (бул документ)
Note: Specific contents may vary slightly. Please check the packaging for a complete list.
4. Орнотуу нускамалары
Follow these steps to set up your SHARKOON Elite Shark CA300T PC case and install your components.
4.1. Ишти даярдоо
- Ишти таңгактан чыгаруу: Этияттык менен анын кутусунан PC кутусун алып салуу.
- Каптал панелдерин алып салуу: Unscrew the thumbscrews on the rear of the case for both tempered glass side panels. Gently slide and lift the panels to remove them. Place them on a soft, flat surface to prevent scratches.
- Аксессуар кутусу: Кошумча жабдуулар кутучасын кутучанын ичинен табыңыз, анда бардык керектүү бурамалар жана бекитүүчү жабдыктар бар.
4.2. Motherboard орнотуу
- Standoffs орнотуу: Ensure the correct standoffs are installed for your motherboard form factor (ATX, SSI EEB). The case typically has pre-installed standoffs for standard ATX.
- I/O Shield орнотуу: If your motherboard requires an external I/O shield, install it into the rear opening of the case before mounting the motherboard.
- Mount Motherboard: Carefully place your motherboard onto the standoffs, aligning the screw holes. Secure the motherboard with the provided screws.
4.3. Электр менен камсыздоо блогун (PSU) орнотуу
- Кызмат орду: PSU The PSU mounts at the rear bottom of the case. Slide your PSU into the designated compartment from the rear.
- Коопсуз PSU: Align the PSU with the screw holes and secure it with the provided screws from the rear of the case.
- Кабелдик башкаруу: Route PSU cables through the cutouts to the back of the motherboard tray for organized cable management.
4.4. Сактоочу дискти орнотуу
The CA300T supports various drive configurations:
- 2.5-inch Drives (SSDs): Mount SSDs to the dedicated brackets behind the motherboard tray or within the PSU shroud.
- 3.5-inch Drives (HDDs): Install HDDs into the drive cages located under the PSU shroud.
4.5. Видеокартаны жана кеңейтүү картасын орнотуу
- Slot капкактарын алып салуу: Корпустун артындагы керектүү кеңейтүү уячасынын капкактарын алып салыңыз.
- Картаны орнотуу: Графикалык картаңызды же башка кеңейтүү карталарын энелик платадагы тиешелүү PCIe уячаларына салыңыз.
- Коопсуз карта: Secure the card with the provided screws.
4.6. Алдыңкы панелдин кабелдерин туташтыруу
Connect the front panel cables (USB 3.0, USB-C, HD Audio, Power Switch, Reset Switch, Power LED, HDD LED) to their corresponding headers on your motherboard. Refer to your motherboard manual for exact pin layouts.
4.7. Жыйынтыктоочу жыйын
- Кабелдик башкаруу: Use the cable ties and routing channels to organize all internal cables behind the motherboard tray.
- Каптал панелдерди кайра бекитүү: Carefully reattach both tempered glass side panels and secure them with the thumbscrews.
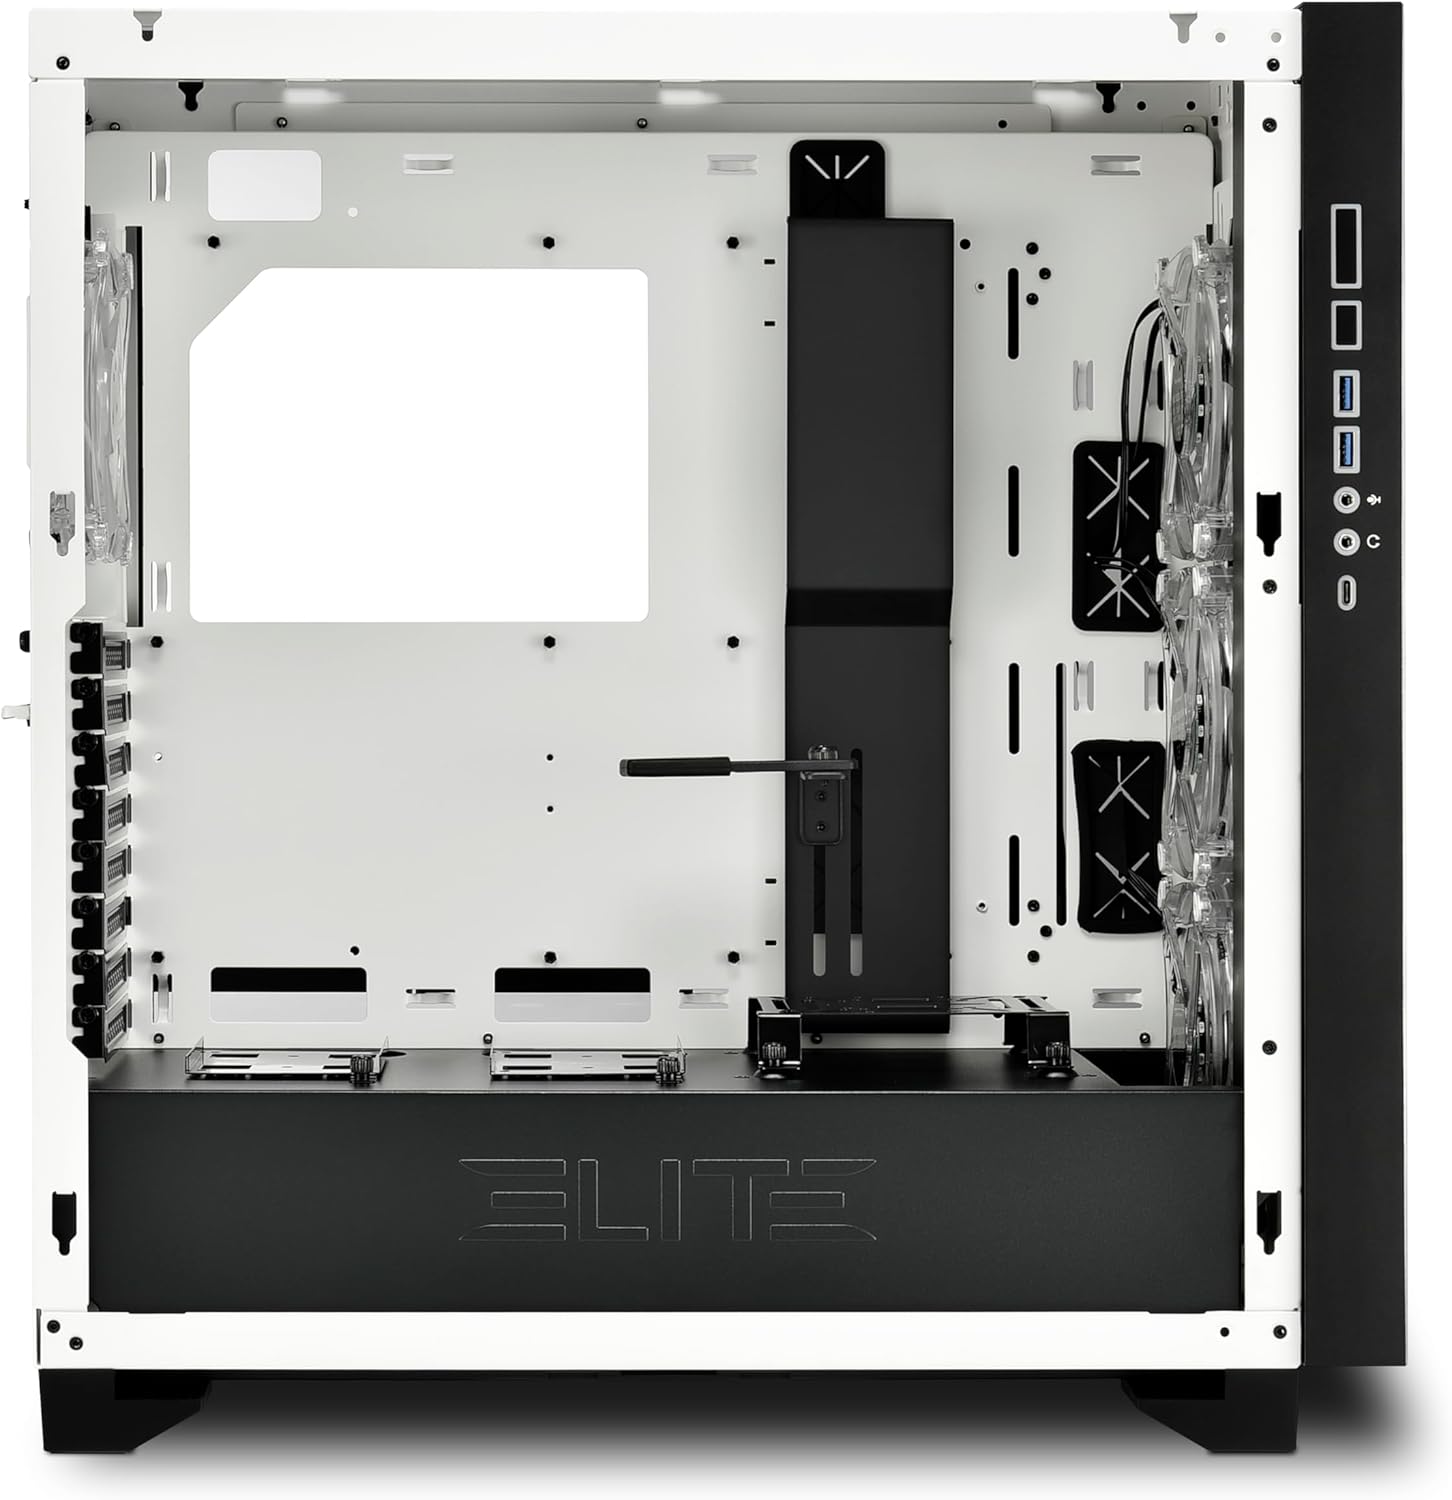
1-сүрөт: Интерьер view of the CA300T, highlighting component space.
5. Иштөө нускамалары
5.1. Системаны иштетүү
After all components are installed and cables are connected, plug your power supply into a wall outlet and flip the PSU's power switch to the 'ON' position. Press the power button on the case's front I/O panel to start your computer.
5.2. RGB жарыкты башкаруу
The pre-installed RGB fans and illuminated I/O panel can be controlled via your motherboard's RGB software (if compatible) or a dedicated RGB controller if included with your motherboard or purchased separately. Refer to your motherboard manual for specific RGB header locations and software instructions.
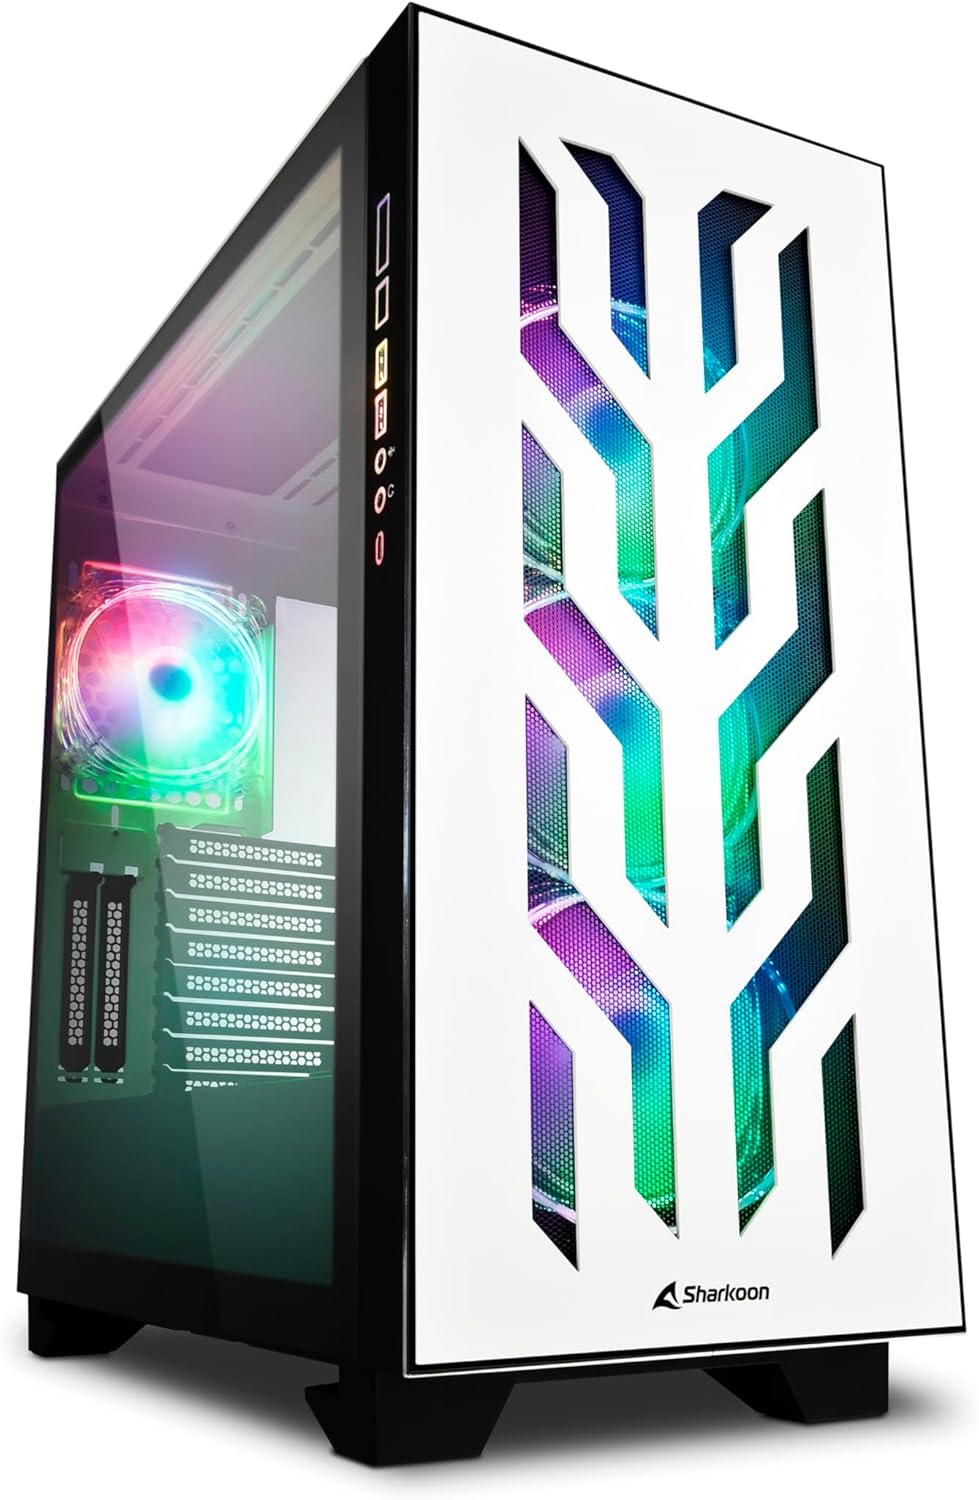
Figure 2: The CA300T with its illuminated RGB fans and distinctive front panel.
6. Техникалык тейлөө
Компьютериңиздин компоненттеринин иштөө мөөнөтүн узартууга жана үзгүлтүксүз техникалык тейлөө анын оптималдуу иштешин камсыз кылууга жардам берет.
6.1. Чаң чыпкасын тазалоо
The CA300T includes magnetic dust filters. It is recommended to clean these filters every 1-3 months, depending on your environment, to maintain optimal airflow and prevent dust buildup inside the case.
- Чыпкаларды табыңыз: Identify the dust filters on the top, front, and bottom of the case.
- Чыпкаларды алып салуу: Gently pull or slide out the magnetic dust filters.
- Таза чыпкалар: Use a soft brush, vacuum cleaner, or rinse with water (ensure completely dry before reinstallation) to remove accumulated dust.
- Чыпкаларды кайра орнотуу: Place the clean filters back into their respective positions.
6.2. Жалпы тазалоо
For external surfaces, use a soft, damp cloth to wipe down the case. Avoid abrasive cleaners or solvents that could damage the finish or tempered glass.

3-сүрөт: Жогорку view of the CA300T, showing the perforated top panel.
7. Кыйынчылыктарды
Бул бөлүм орнотуу же иштетүү учурунда пайда болушу мүмкүн болгон жалпы көйгөйлөрдү карайт.
7.1. Система күйбөй жатат
- Check PSU: Ensure the power supply unit is properly connected to the wall outlet and the PSU's power switch is in the 'ON' position.
- Алдыңкы панелдин байланыштары: Verify that the power switch cable from the case's front panel is correctly connected to the motherboard's power header.
- Internal Power Cables: Confirm that all necessary power cables (24-pin ATX, CPU 8-pin, GPU PCIe) are securely connected to the motherboard and components.
7.2. Fans Not Spinning / RGB Not Lighting Up
- Желдеткич туташуулары: Ensure all fan power cables are securely connected to the motherboard's fan headers or a fan controller.
- RGB Connections: Verify that RGB cables are correctly connected to the motherboard's RGB headers or a dedicated RGB controller.
- Software/Controller: Check your motherboard's BIOS/UEFI settings or RGB software to ensure fans and RGB lighting are enabled and configured correctly.
7.3. USB Ports Not Functioning
- Internal USB Headers: Confirm that the internal USB 3.0 and USB-C cables from the case's front panel are securely connected to the corresponding headers on your motherboard.
- Motherboard Drivers: Ensure all necessary motherboard chipset and USB drivers are installed.
8. Техникалык шарттар
| Бренд | Шаркун |
| Модель аты | CA300T |
| Түс | Ак |
| Иштин түрү | Extended ATX Tower |
| Материал | Металл, чыңдалган айнек |
| Motherboard шайкештиги | ATX, SSI EEB |
| PSU монтаждоо | Арткы тоо |
| Муздатуу ыкмасы | Аба |
| Алдын ала орнотулган күйөрмандар | 4x 120mm RGB LED Fans (3x Front, 1x Rear) |
| Алдыңкы I / O порттору | USB 3.0 (x2), USB-C (x1), Audio In/Out |
| GPU'нун максималдуу узундугу | 42.5 см |
| Макс. CPU муздаткычтын бийиктиги | 16.5 см |
| Макс. PSU узундугу | 24 см |
| Drive Bays | Up to 7x 2.5" or 4x 3.5" |
| Сунушталган колдонуу | Оюндар |
9. Кепилдик жана колдоо
9.1. Продукцияга кепилдик
The SHARKOON Elite Shark CA300T PC Case comes with a 2 жылдык кепилдик on spare parts. This warranty covers defects in materials and workmanship under normal use. Please retain your proof of purchase for warranty claims.
9.2. Программалык камсыздоону жаңыртуу
Software updates, if applicable for any integrated components or controllers, are guaranteed until 13-апрель, 2030-жыл.
9.3. Кардарларды колдоо кызматы
For technical assistance, warranty claims, or further inquiries, please contact Sharkoon customer support through their official website or the retailer where the product was purchased. Have your product model and proof of purchase ready when contacting support.