Introduction
Сатып алганыңыз үчүн рахматasing the Salange Mini Projector. This portable projector is designed to provide a versatile and immersive viewing experience for various applications, from home entertainment to outdoor movie nights. Featuring Full HD support, high brightness, and multiple connectivity options, it offers a convenient solution for projecting content from smartphones, gaming consoles, and other media devices. This manual provides detailed instructions for setup, operation, maintenance, and troubleshooting to ensure optimal performance and longevity of your device.
Коопсуздук маалыматы
Проекторду колдонуудан мурун бардык коопсуздук нускамаларын кылдат окуп чыгыңыз. Бул колдонмону келечекте маалымат алуу үчүн сактаңыз.
- Вентиляция тешиктерин жаппаңыз. Ашыкча ысып кетүүнүн алдын алуу үчүн проектордун айланасында адекваттуу аба агымын камсыз кылыңыз.
- l болгондо проектордун объективине тике карабаamp күйүк. Жарык жарык көзгө зыян келтириши мүмкүн.
- Use only the power adapter supplied with the projector. Using an unauthorized adapter may cause damage or fire.
- Проекторду жамгырдын, нымдуулуктун же экстремалдык температуранын таасиринде калтырбаңыз.
- Проекторду туруксуз беттерге коюудан алыс болуңуз.
- Чагылгандуу жаан учурунда же көпкө чейин колдонулбаган учурда электр шнурун сууруп коюңуз.
- Проекторду өз алдынча оңдоого аракет кылбаңыз. Бардык тейлөө иштерин квалификациялуу адистерге тапшырыңыз.
Кутуда эмне бар
Бардык буюмдар кутудан чыгарылганда бар экенин текшериңиз:
- 1 x Salange Mini Projector (Model P62H / HY300US)
- 1 x Алыстан башкаруу
- 1 x HDMI кабели
- 1 x AV сигнал кабели
- 1 x Кубат кабели
- 1 х Колдонуучунун колдонмосу (Бул документ)

Figure 1: Salange Mini Projector with remote control.
Продукт бүттүview
Familiarize yourself with the main components and ports of your Salange Mini Projector.

2-сүрөт: жогорудан ылдыйга view of the Salange Mini Projector, highlighting its compact design.
Front Panel
- Проекциялык линза: Emits the image onto the screen or wall.
- Фокус шакеги: Проекцияланган сүрөттүн ачыктыгын тууралайт.
- Негизги ташты оңдоо: Сүрөттүн трапеция сымал бурмаланышын оңдойт.
Rear Panel (Connectivity)

3-сүрөт: Арткы view of the projector, illustrating its multiple connection ports.
- HDMI порту: Connects to devices like laptops, gaming consoles (PS5), Fire TV Stick, Roku, etc.
- USB Ports (USB-1, USB-T): Connects USB drives for media playback.
- AV порт: Connects to older devices using an AV cable.
- VGA порту: VGA чыгышы бар компьютерлерге туташат.
- Аудио чыгышы (3.5 мм): Тышкы динамиктерге же кулакчындарга туташат.
- Кубат киргизүү: Кубат адаптерин туташтырат.
Жайгашуу
1. Жайгаштыруу
Place the projector on a stable, flat surface. Ensure there are no obstructions to the projection path or the ventilation openings. The ideal projection distance ranges from 2.6 ft to 18.0 ft, yielding screen sizes from 30 inches to 176 inches. For optimal viewing, a darker environment is recommended.

Figure 4: Recommended projection distances and screen sizes for the projector.
3. Power Connection
Connect the power cable to the projector's power input port, then plug the other end into a power outlet.
3. Фокус жана негизги ташты тууралоо
After powering on, adjust the focus ring on the top of the projector until the image is clear. If the image appears trapezoidal, use the keystone correction dial to square the image.
4. Түзмөктөрдү туташтыруу
Проектор ар кандай киргизүү булактарын колдойт:
- HDMI: Connect your laptop, gaming console, or streaming device (e.g., Fire TV Stick) using an HDMI cable.
- USB: Insert a USB flash drive into one of the USB ports for direct media playback.
- OF: AV чыгышы бар түзмөктөргө туташуу үчүн берилген AV кабелин колдонуңуз.
- VGA: Connect to a computer using a VGA cable.
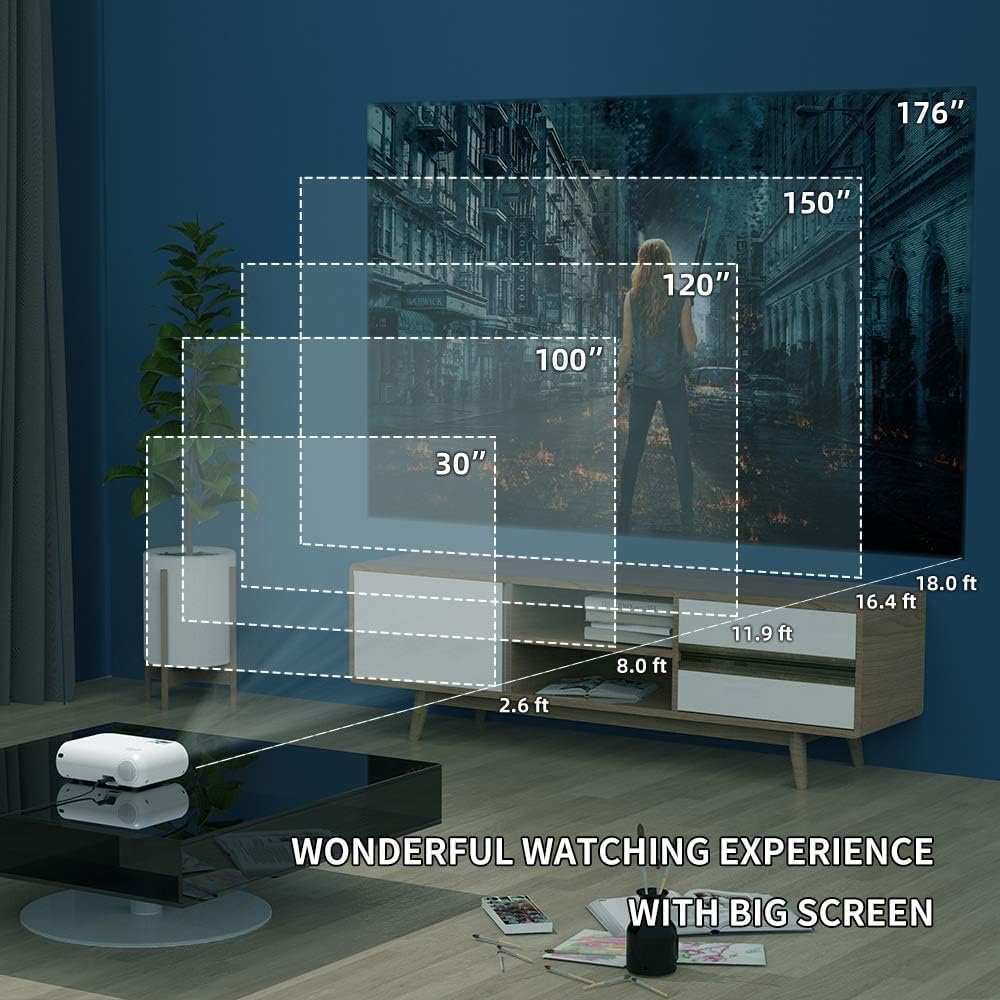
Figure 5: The projector's compatibility with multiple devices, including laptops, smartphones, and gaming consoles.
Иштөө нускамалары
1. Күйгүзүү / Өчүрүү
Проектордун же пульттун кубат баскычын басып, блокту күйгүзүңүз же өчүрүңүз.
2. Киргизүү булагын тандоо
Use the "Source" button on the remote or projector to cycle through available input sources (HDMI, USB, AV, VGA, WiFi).
3. Зымсыз экранды чагылдыруу (WiFi)
The Salange Mini Projector supports wireless screen mirroring for both iOS and Android devices via WiFi connection.

Figure 6: Wireless screen mirroring in action, showing a smartphone's display projected.
IOS түзмөктөрү үчүн:
- Select "Screen Mirroring for iOS System" on the projector's input menu.
- Connect your iOS device to the projector's WiFi network (e.g., "RKcast-xxxxxx"). The password is usually displayed on the projector screen.
- On your iOS device, open Control Center and tap "Screen Mirroring" (or "AirPlay Mirroring").
- Select the projector's name (e.g., "RKcast-xxxxxx") from the list to begin mirroring.
Android түзмөктөрү үчүн:
- Select "Screen Mirroring for Android System" on the projector's input menu.
- On your Android device, enable "Wireless Display," "Multi-screen," "Smart View," or similar function (names vary by device).
- Select the projector's name from the detected devices to connect.
Note: Due to copyright restrictions, direct screen mirroring of certain streaming services like Netflix, Amazon Prime Video, and Hulu is not supported. For these services, it is recommended to use an external streaming device like an Amazon Fire TV Stick connected via HDMI.
Video 1: Official demonstration of the Salange Mini Projector's wireless screen mirroring capabilities and general usage.
4. Аудио чыгаруу
The projector has built-in Hi-Fi dual stereo speakers. For enhanced audio, connect external speakers or headphones to the 3.5mm audio out port.
Техникалык тейлөө
1. Объективди тазалоо
Оптикалык линзалар үчүн атайын иштелип чыккан жумшак, мамыксыз чүпүрөктү колдонуңуз. Абразивдүү тазалоочу каражаттарды же линзаны чийип салуучу чүпүрөктөрдү колдонбоңуз.
2. Проектордун корпусун тазалоо
Сыртын жумшак, кургак чүпүрөк менен сүртүңүз. Өжөр тактар үчүн бир аз сүртүңүзamp кездеме, андан кийин кургак аарчый колдонсо болот.
3. Сактоо
When not in use, store the projector in a cool, dry place, away from direct sunlight and excessive dust. It is recommended to use the original packaging for storage.
Проблемаларды чечүү
| Көйгөй | Мүмкүн себеп | Чечим |
|---|---|---|
| Сүрөт чагылдырылган жок | Power not connected; Incorrect input source; Lens cap on. | Электр кубатына туташууну текшериңиз; Туура киргизүү булагын тандаңыз; Линзанын капкагын алып салыңыз. |
| Сүрөт бүдөмүк | Фокустан тышкары; Проекциянын аралыгы туура эмес. | Фокус шакекчесин тууралаңыз; проекциялоо аралыгын тууралаңыз. |
| Сүрөт трапеция түрүндө | Проектор экранга перпендикуляр эмес. | Adjust keystone correction dial. |
| Үн жок | Volume too low; Muted; External audio device not connected or configured. | Increase volume; Unmute; Check external audio connections and settings. |
| Зымсыз чагылдыруу иштебейт | Incorrect WiFi connection; Device compatibility; App restrictions. | Ensure correct WiFi network and password; Verify device compatibility; Use HDMI for restricted content. |
Техникалык шарттар
| Өзгөчөлүк | Деталь |
|---|---|
| Бренд | Саландж |
| Модель номери | HY300US |
| Колдоого алынган резолюция | 1920x1080P |
| Жарыктык | 9600L |
| Контраст катышы | 10000:1 |
| Байланыш технологиясы | WIFI, HDMI, USB, AV, VGA |
| Динамик түрү | Built-In Hi-Fi Dual Stereo Speakers |
| Lamp Жашоо | 60,000 саатка чейин |
| Продукциянын өлчөмдөрү | 6.69 x 3.74 x 3.74 дюйм |
| Элемент Салмагы | 3.08 фунт |

Figure 7: Visual representation of the projector's upgraded brightness (9600 Lux) and color contrast.
Кепилдик жана колдоо
Salange provides lifetime professional technical support for this product. For any questions, issues, or warranty claims, please contact Salange customer service through the retailer's platform or the official Salange website. Please have your model number (HY300US) and purchase details ready when contacting support.
Көбүрөөк маалымат алуу үчүн, киргиле Salange Store on Amazon.


