1. Продукт бүтүп калдыview
This manual provides comprehensive instructions for the installation, operation, and maintenance of your Akia Screens 104-inch Motorized Electric Remote Controlled Drop Down Projector Screen. Designed for optimal viewing experience, this screen features a MaxWhite 2 material, 1.1 gain, and is compatible with 4K Ultra HD and Active 3D projection. It is suitable for both ceiling and wall mounting in various environments such as offices and home theaters.

Сүрөт: Akia Screens 104 дюймдук моторлуу проектордун экраны, көрсөтүүasing its sleek design and compatibility with 4K, 8K, 3D, and HDR content.
2. Коопсуздук маалыматы
- Орнотуудан жана иштетүүдөн мурун бардык нускамаларды кылдат окуп чыгыңыз.
- Ensure the power supply matches the requirements specified on the product label.
- Do not attempt to disassemble or modify the screen. Refer all servicing to qualified personnel.
- Keep the screen away from heat sources, direct sunlight, and moisture.
- Use caution when mounting. Ensure ladders or step stools are on solid footing. Two people are recommended for hoisting the screen overhead.
3. Пакеттин мазмуну
Орнотууну баштоодон мурун бардык компоненттер бар экендигин текшериңиз:
- Motorized Projector Screen Unit
- Инфракызыл (IR) алыстан башкаруу
- Орнотулган инфракызыл сенсору бар дубал кутучасынын контроллери
- RJ50 Port for wired 12-volt trigger feature
- Installation Kit (mounting hardware for wall or ceiling)
- Колдонуучунун Колдонмосу (бул документ)
4. Орнотуу жана орнотуу
Follow these steps for proper installation of your projector screen. For a visual guide, please refer to the official installation video below.
Video: Official Akia Electric Motorized Projector Screen Installation Guide. This video demonstrates the unboxing, measuring, hardware installation, hanging, and initial operation of the screen.
4.1 кутудан чыгаруу
Carefully open the packaging and remove the screen unit and accessories. Inspect for any visible damage before proceeding.
Сүрөт: А view of the projector screen components after unboxing, including the screen unit and accessories.
4.2 Measuring and Mounting Points
Determine the desired location for your screen. The screen can be mounted on a wall or ceiling. Identify the flush wall mounting points and ceiling suspended loops on the screen casing. Measure the distance between these points to accurately mark your installation location.

Image: Close-up of the screen casing showing flush wall mounting points and ceiling suspended loops, along with a tape measure indicating dimensions.
4.3 Install Hardware
Using the provided installation kit, securely attach the mounting hardware to your wall or ceiling at the marked locations. Ensure the hardware is firmly anchored to studs or appropriate structural supports.
4.4 Hanging the Screen
With assistance, carefully lift the screen unit and attach it to the installed mounting hardware. Ensure the screen is level and securely fastened. Two people are recommended for this step to prevent injury or damage to the screen.
4.5 Кубат туташтыруу
Plug the screen's power cord into a standard electrical outlet. The screen is designed for plug-and-play operation.
4.6 Initial Screen Lowering
Using the remote control, press the 'down' button to fully lower the screen for the first time. This will set the initial lower limit. The screen features user-friendly programmable vertical drop position for easy adjustment.
5. Иштөө нускамалары
5.1 Алыстан башкаруунун иштеши
The screen comes with an Infrared (IR) remote control and a wall box controller. Use the remote to raise or lower the screen. The wall box controller has a built-in IR sensor for convenient control.

Image: The remote control and wall box controller for the projector screen, illustrating the control system.
5.2 12-Volt Trigger Feature
The 12V trigger feature allows the screen's UP/DOWN operation to synchronize with your projector's power cycle via the wall box controller. Connect your projector's 12V trigger output to the RJ50 port on the wall box controller using a compatible cable (not included). When the projector powers on, the screen will automatically lower; when it powers off, the screen will retract.

Image: Diagram illustrating the 12-volt trigger feature, showing how the screen's movement synchronizes with the projector's power state.
6. Өзгөчөлүктөрү жана компоненттери
- Экран материалы: MaxWhite 2, 1.1 Gain. Multi-layer weave with a 180-degree wide viewing angle. Fully black-backed front projection screen with a textured surface.
- Чечимди колдоо: 4K Ultra HD and Active 3D Projection Ready.
- Сертификаттар: GreenGuard and GreenGuard GOLD Certified | UL 2818.
- Casing: Durable metal housing for wall or ceiling installations.
- Masking Borders: Standard black-masking borders provide an increase in picture contrast.
- Мотор системасы: Tubular motor for swift operation and product longevity.

Сүрөт: деталдуу view of the screen's casing and black masking borders, highlighting the 4:3 aspect ratio.

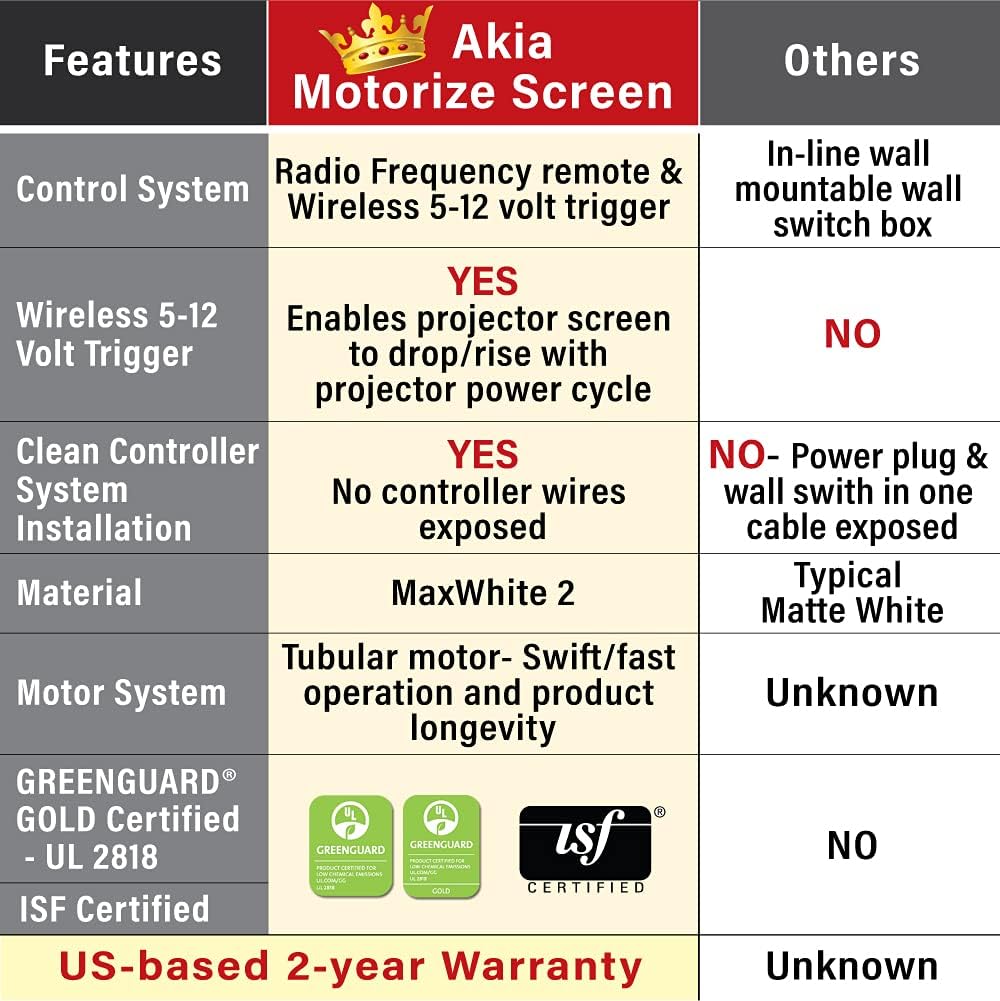
Image: A comparison table highlighting key features of the Akia Motorize Screen, including control system, 12-volt trigger, material, motor system, and certifications.
7. Техникалык тейлөө
Проектордун экранынын узак мөөнөттүү иштешин жана оптималдуу иштешин камсыз кылуу үчүн, төмөнкү техникалык тейлөө көрсөтмөлөрүн аткарыңыз:
- Тазалоо: The screen surface is easy to clean with mild soap and water. Use a soft, damp cloth and gently wipe the surface. Avoid abrasive cleaners or harsh chemicals.
- Чаңдандыруу: Regularly dust the screen casing and surface with a soft, dry cloth to prevent dust buildup.
- Сактагыч: Экран көпкө чейин колдонулбаган учурда, анын толугу менен ордуна тартылып турганын текшериңизasing to protect the screen material.
8. Кыйынчылыктарды
If you encounter issues with your projector screen, consider the following common troubleshooting steps:
- Экран жооп бербейт:
- Электр шнурунун розеткага бекем сайылганын текшериңиз.
- Пульттун батарейкалары түгөнүп калбасын текшериңиз.
- Verify that the IR sensor on the wall box controller is not obstructed.
- Screen Not Fully Extending/Retracting:
- Check for any physical obstructions preventing the screen's movement.
- The screen has a programmable vertical drop position. If it's not extending fully, you may need to reset or adjust the lower limit setting (refer to specific instructions in the full product manual if available).
- Wrinkles or Creases on Screen:
- Minor creases from shipping may naturally smooth out over time with regular use.
- Ensure the screen is properly installed and tensioned.
For persistent issues, please contact customer support as detailed in the Warranty & Support section.
9. Техникалык шарттар
| Өзгөчөлүк | Деталь |
|---|---|
| Диагоналдык өлчөмү | 104 дюймдук |
| ViewӨлчөмү (бийиктиги x туурасы) | 62.2-inch H x 83.1-inch W |
| Аспект катышы | 4:3 HD форматында |
| Жалпы кеңейтилген өлчөм (бийиктиги x кеңдиги) | 71.7-inch H x 94.5-inch W (with Black Metal Housing) |
| Продукт Салмагы | 19.07 фунт |
| Материал | Металл (c)asing), MaxWhite 2 (screen) |
| Монтаж түрү | Дубалга орнотуу жана шыпка орнотуу |
| Шайкештик | Not compatible with UST (Ultra Short Throw) Projectors |
Image: Diagram showing the overall and viewing dimensions of the 104-inch Akia motorized projector screen.
10. Кепилдик жана колдоо
Akia Screens өз продукцияларына ар тараптуу колдоо көрсөтөт:
- Кепилдик: 2-Year Manufacturer's Warranty by ISO9001 manufacturer since 2004.
- Техникалык колдоо: Өмүр бою техникалык колдоо электрондук почта аркылуу жеткиликтүү, Web Chat, or Toll-Free phone call by a U.S. Based Professional Service Team.
Жардам алуу үчүн, расмий Akia Screens сайтына кириңиз webсайтка же алардын колдоо тобуна түздөн-түз кайрылыңыз.

Image: Visual representation of Akia Screens' US-based stock, service, and lifetime tech support, along with the 2-year warranty badge.


