1. Киришүү
This manual provides comprehensive instructions for the installation, operation, and maintenance of the SINOTIMER TM919B 30A Programmable Electronic Timer Switch. This device is designed to automatically control the ON/OFF switching of various electrical appliances based on user-defined daily or weekly programs. Please read this manual carefully before installation and use to ensure proper function and safety.
2. Коопсуздук маалыматы
WARNING: Risk of electric shock. Installation should only be performed by a qualified electrician or trained personnel.
- Always disconnect power at the circuit breaker before installing or servicing the timer switch.
- Бардык зымдарды туташтыруу коопсуз жана жергиликтүү электр коддоруна ылайык экенин текшериңиз.
- 30А максималдуу жүк рейтингинен ашпаңыз.
- This device is intended for indoor use only. Avoid exposure to moisture or extreme temperatures.
- Агрегатты өз алдынча бөлүүгө же оңдоого аракет кылбаңыз. Квалификациялуу тейлөө кызматкерлерине кайрылыңыз.
3. Продукт бүтүп калдыview
The SINOTIMER TM919B is a digital timer switch featuring a large LCD display, multiple programming options, and a manual override function. It is designed for DIN rail mounting.
3.1. Компоненттер жана башкаруу элементтери
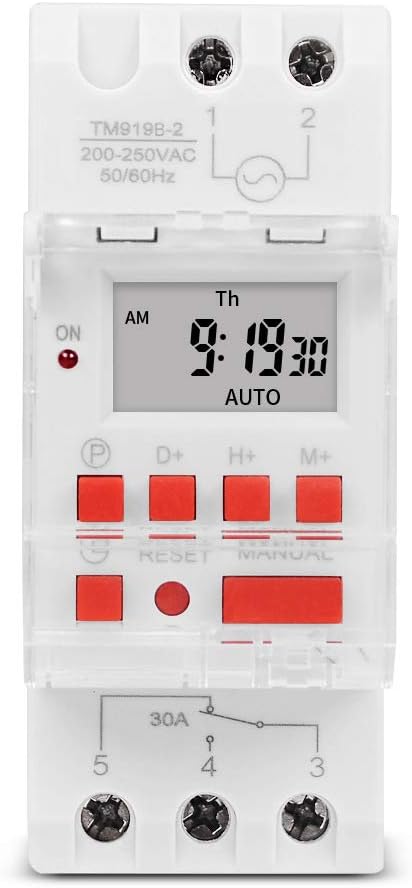
1-сүрөт: Фронт view of the TM919B timer switch, showing the LCD display, control buttons, and terminal connections.

2-сүрөт: Бурчтуу view of the TM919B with the transparent protective cover open, revealing the programming buttons (P, D+, H+, M+, RESET, MANUAL).
- LCD дисплей: Учурдагы убакытты, күндү жана программанын абалын көрсөтөт.
- P (Program) Button: Enters/exits program setting mode.
- D+ (Day) Button: Adjusts day of the week in setting modes.
- H+ (Hour) Button: Adjusts hour in setting modes.
- M+ (Minute) Button: Adjusts minute in setting modes.
- RESET баскычы: Clears all settings and resets the timer to factory defaults.
- КОЛ МЕНЕН БАШКАРУУ баскычы: КҮЙҮК, АВТОМАТТЫК жана ӨЧҮРҮҮ режимдеринин ортосунда которуштурат.
- Терминал байланыштары: For power input and load output.
4. Техникалык шарттар
| Өзгөчөлүк | Спецификация |
|---|---|
| Модел | TM919B |
| Тtage | 220V (AC200-250V) |
| Жыштык | 50/60 Гц |
| Max Load | 30A (каршылыктуу жүк) |
| Программалар | 16 ON/OFF programs per day/week |
| Минималдуу интервал | 1 мүнөт |
| Батареянын камдык көчүрмөсү | Built-in rechargeable battery (for memory retention) |
| Монтаждоо | 35 мм DIN темир жол |
| Өлчөмдөр | 3-сүрөттү караңыз |

3-сүрөт: Detailed dimensions of the TM919B timer switch, showing height, width, and depth measurements.
5. Орнотуу жана орнотуу
Follow these steps for safe and correct installation of your timer switch.
5.1. Монтаждоо
- Негизги автоматтык өчүргүчтө электр кубаты өчүрүлгөнүн текшериңиз.
- Mount the TM919B onto a standard 35mm DIN rail. The device features a clip mechanism on the back for secure attachment.
- Press the orange clip at the bottom of the unit to release it from the DIN rail if removal is necessary.

4-сүрөт: Side view of the TM919B, highlighting the orange DIN rail mounting clip.

5-сүрөт: Артка view of the TM919B, illustrating the DIN rail mounting mechanism.
5.2. Электр схемасы
Refer to the diagram below for correct wiring connections. Ensure all connections are tight and insulated.

6-сүрөт: Side view of the TM919B showing the wiring diagram printed on the casing. Terminals 1 and 2 are for power input (L and N). Terminals 3, 4, and 5 are for load output (Common, Normally Open, Normally Closed).
- 1 жана 2-терминалдар: Power Input (L - Live, N - Neutral). Connect your 220V AC supply here.
- Терминал 3: Common (COM) for the output relay.
- Терминал 4: Normally Open (NO) output. The load will be powered when the timer is ON.
- Терминал 5: Normally Closed (NC) output. The load will be powered when the timer is OFF.
For typical applications where the load is switched ON by the timer, connect the load between Terminal 3 (COM) and Terminal 4 (NO).
6. Иштөө нускамалары
6.1. Initial Setup and Reset
- After connecting power, the display may be blank or show random characters. Press the RESET button with a pointed object (e.g., a pen tip) to clear all memory and reset the timer. The display will show "0:00" and "MO".
- Allow the internal battery to charge for at least 30 minutes before programming for optimal performance and memory retention during power outages.
6.2. Учурдагы убакытты жана күндү коюу
- басып, кармап туруңуз D+ button to set the current day of the week (MO, TU, WE, TH, FR, SA, SU).
- басып, кармап туруңуз H+ button to set the current hour (0-23).
- басып, кармап туруңуз M+ button to set the current minute (0-59).
- Release the buttons when the correct time and day are displayed. The timer will automatically save the settings.
6.3. КҮЙГҮЗҮҮ/ӨЧҮРҮҮ ЦИКЛДЕРИН ПРОГРАММАЛОО
The TM919B supports up to 16 ON/OFF programs. Each program consists of an ON time and an OFF time.
- басыңыз P button once. The display will show "1 ON". This is for the first ON program.
- Колдонуу D+ to select the day(s) for this program. Options include:
- MO TU WE TH FR SA SU (Every day)
- MO (Monday only)
- TU (Tuesday only)
- ...
- Дүй Ш Ш Ш П Ж (жумуш күндөрү)
- SA SU (Weekends)
- MO TU WE (Mon-Wed)
- TH FR SA (Thu-Sat)
- MO WE FR (Mon, Wed, Fri)
- TU TH SA (Tue, Thu, Sat)
- MO TU WE TH FR SA (Mon-Sat)
- Колдонуу H+ жана M+ to set the desired ON hour and minute.
- басыңыз P button again. The display will show "1 OFF". This is for the first OFF program.
- Колдонуу D+, H+, жана M+ to set the desired OFF day, hour, and minute. Ensure the OFF time is after the ON time for the same program.
- Repeat steps 1-5 for additional ON/OFF programs (up to 16). If you don't need all 16 programs, simply press P to cycle through unused programs until you return to the current time display.
- To exit programming mode and save settings, press the clock button (usually labeled with a clock icon, or simply wait for 30 seconds without input).
6.4. Кол менен өзгөртүү
басыңыз КОЛ иштөө режимдерин которуу үчүн баскычты басыңыз:
- КҮЙҮК: Таймердин чыгышы бардык программаларды этибарга албай, үзгүлтүксүз КҮЙҮК абалда турат.
- АВТО: Таймер программаланган КҮЙГҮЗҮҮ/ӨЧҮРҮҮ циклдерине ылайык иштейт. Бул стандарттуу иштөө режими.
- ӨЧҮК: Таймердин чыгышы бардык программаларды этибарга албай, үзгүлтүксүз ӨЧҮК абалда турат.
Таймердин коюлганын текшериңиз АВТО for programmed operation.
7. Техникалык тейлөө
- The TM919B is designed for maintenance-free operation.
- Сыртын жумшак, кургак чүпүрөк менен тазалаңыз. Абразивдүү тазалоочу каражаттарды же эриткичтерди колдонбоңуз.
- Ensure the internal battery is charged by keeping the unit powered for at least 24 hours initially, and periodically thereafter, to maintain time and program memory during power outages.
8. Кыйынчылыктарды
| Көйгөй | Мүмкүн себеп | Чечим |
|---|---|---|
| Дисплей бош. | Электр менен камсыздоо жок; ички батареясы түгөндү. | Check power connections. Allow unit to charge for 30 minutes. |
| Timer not switching load. | Incorrect wiring; timer in MANUAL ON/OFF mode; incorrect program settings. | Verify wiring (refer to Figure 6). Ensure timer is in AUTO mode. Check program times and days. |
| Электр энергиясы өчүрүлгөндөн кийин программалар жоголотtage. | Internal battery not fully charged or faulty. | Ensure unit is powered for at least 24 hours to fully charge the battery. If problem persists, contact support. |
| Баскычтар жооп бербейт. | Unit frozen; temporary glitch. | басыңыз RESET баскычы. |
9. Кепилдик жана колдоо
SINOTIMER products are manufactured to high-quality standards. For warranty information or technical support, please refer to the documentation provided with your purchase or visit the official SINOTIMER webсайт. Сатып алганыңыздын далили катары сатып алуу дүмүрчөгүңүздү сактаңыз.
For further assistance, you may contact SINOTIMER customer service through their official channels.


