1. Маанилүү коопсуздук нускамалары
Read and understand all safety warnings and instructions before operating this welding machine. Failure to follow these instructions may result in electric shock, fire, serious injury, or death.
- Электр Шок: Welding current can cause fatal electric shock. Do not touch live electrical parts. Wear dry, insulating gloves and protective clothing.
- Түтүн жана газдар: Welding produces fumes and gases hazardous to health. Work in a well-ventilated area. Use an exhaust fan or fume extractor.
- Арк нурлары: Дого нурлары көздү жана терини күйгүзүшү мүмкүн. Тиешелүү көлөкө чыпкасы бар ширетүүчү туулга жана коргоочу кийим кийиңиз.
- Өрт жана жарылуу: Ширетүүчү учкундар жана ысык металл өрткө же жарылууга алып келиши мүмкүн. Тез күйүүчү материалдарды ширетүү аймагынан алыс кармаңыз. Өрт өчүргүчтү оңой колдо кармаңыз.
- Ысык бөлүктөрү: Welded parts and equipment can be hot. Allow them to cool before handling.
- Кардиостимулятор: Persons with pacemakers should consult their doctor before welding.
- Тейлөө: Only qualified personnel should perform maintenance and repairs. Disconnect power before servicing.
2. Продукт бүтүп калдыview
The Yamato MIG 140S is an inverter welding machine designed for MIG/MAG welding processes. It offers compact design and efficient performance for various welding tasks.
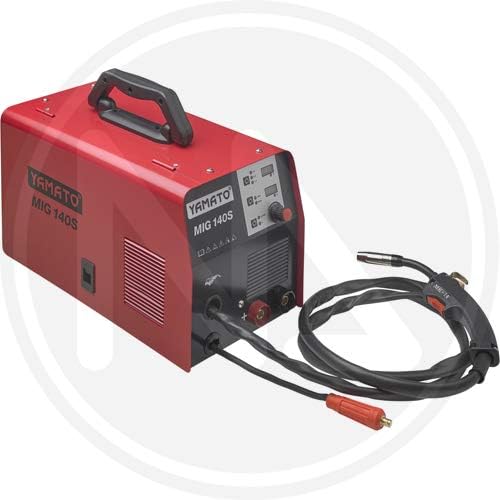
2.1-сүрөт: Фронт view of the Yamato MIG 140S Inverter Welding Machine. The red main unit features a top handle for portability, ventilation grilles on the side, and a control panel on the front. The control panel includes indicator lights and adjustment knobs. Connected to the unit are the MIG torch with its cable and a separate cable for the ground clamp.
2.1 Компоненттер жана башкаруу элементтери
- Негизги блок: The compact red housing containing the inverter power source.
- туткасы: Integrated on top for easy transport.
- Башкаруу панели: Located on the front, includes:
- Кубаттуулук көрсөткүчү: Машина күйгүзүлгөндө жарык берет.
- Overload Indicator Light: Illuminates if the machine overheats or is overloaded.
- Тtage/Current Adjustment Knob: Controls the welding output.
- Wire Feed Speed Adjustment Knob: Controls the speed at which the welding wire is fed.
- MIG шамы: Used to deliver welding wire, shielding gas, and welding current to the workpiece.
- Ground Clamp: Connects to the workpiece to complete the welding circuit.
- Газ киргизүү: Connection point for the shielding gas cylinder (typically on the rear, not visible in image).
- Зым менен берүүчү: Internal mechanism for feeding welding wire (accessed via a side panel, not visible in image).
3. Орнотуу
Before operating the welding machine, ensure proper setup to guarantee safety and optimal performance.
- Жайгашкан жери: Place the welding machine on a stable, level surface in a well-ventilated area, away from flammable materials. Ensure adequate space around the machine for airflow.
- Кубат туташуу: Connect the machine's power cord to a suitable electrical outlet. Verify that the power supply matches the machine's requirements (voltagд жана ampөчүрүү).
- Ground Clamp Байланыш: Жерге туташтыргычты бекем бекитиңизamp to a clean, bare metal section of the workpiece. Ensure good electrical contact.
- MIG Torch Connection: Ensure the MIG torch is properly connected to the machine's front panel.
- Shielding Gas Connection (if applicable):
- Connect the gas hose from the machine's gas inlet to a suitable shielding gas cylinder (e.g., Argon/CO2 mix for MIG, or CO2 for MAG).
- Install a gas regulator onto the cylinder and set the gas flow rate according to your welding application (typically 10-15 liters/minute).
- Welding Wire Installation:
- Open the wire feeder compartment (usually a side panel).
- Mount the welding wire spool onto the spindle, ensuring it rotates freely.
- Thread the wire through the guide tube and feed rollers. Adjust the tension on the feed rollers to prevent slipping or crushing the wire.
- Feed the wire through the torch liner until it emerges from the contact tip. Ensure the contact tip matches the wire diameter.
4. Иштөө нускамалары
Follow these steps for safe and effective operation of your Yamato MIG 140S welding machine.
- Жеке коргонуу каражаттары (ЖКК): Always wear appropriate PPE, including a welding helmet, welding gloves, flame-resistant clothing, and safety shoes.
- Күйгүзүү: Turn on the main power switch of the welding machine. The power indicator light should illuminate.
- Параметрлерди коюу:
- тууралаңыз Тtage/Current Adjustment Knob to the desired setting based on the material thickness and type of welding wire.
- тууралаңыз Wire Feed Speed Adjustment Knob. The wire feed speed should generally correspond to the voltage setting for a stable arc.
- Test Weld: Before welding on your actual workpiece, perform a test weld on a scrap piece of the same material to fine-tune your settings.
- Ширетүү техникасы:
- Hold the MIG torch at a consistent angle (typically 10-15 degrees from vertical in the direction of travel).
- Maintain a consistent stick-out (the length of wire extending from the contact tip).
- Press the trigger on the torch to initiate the arc and wire feed.
- Move the torch steadily along the joint, creating a consistent weld bead.
- Ширетүүнү токтотуу үчүн триггерди бошотуңуз.
- Муздатуу: Allow the machine to cool down after extended use. The fan will continue to run to dissipate heat.
- Өчүрүү: Once finished, turn off the main power switch and disconnect the machine from the power supply. Close the gas cylinder valve.
5. Техникалык тейлөө
Үзгүлтүксүз тейлөө ширетүүчү машинаңыздын узак мөөнөттүү жана коопсуз иштешин камсыздайт.
- Күнүмдүк/Колдонуунун алдында:
- Inspect all cables for damage (cuts, fraying). Replace damaged cables immediately.
- Check the MIG torch nozzle and contact tip for spatter buildup. Clean or replace as necessary.
- жерди камсыз кылуу clamp makes good contact and is free of corrosion.
- Weekly/After Use:
- Clean the exterior of the machine with a dry, soft cloth.
- Use compressed air to blow out dust and debris from the ventilation grilles. Ensure power is disconnected before doing so.
- Check the wire feed rollers for wear and cleanliness. Clean any wire residue.
- Мезгил-мезгили менен:
- Inspect the torch liner for blockages or wear. Replace if wire feeding becomes inconsistent.
- Бардык электр байланыштарын бекемдигин текшериңиз.
- Сактагыч: Store the machine in a clean, dry environment, protected from dust and moisture.
6. Кыйынчылыктарды
Бул бөлүмдө иштөө учурунда кездешиши мүмкүн болгон жалпы көйгөйлөрдүн чечимдери камтылган.
| Көйгөй | Мүмкүн себеп | Чечим |
|---|---|---|
| Машина иштебейт. | Электр менен камсыздоо жок; электр шнуру бузулган; ички сактагыч күйүп кеткен. | Check power outlet and circuit breaker. Inspect power cord. Contact service if fuse is suspected. |
| No arc when trigger is pressed. | Poor ground connection; no welding wire; incorrect settings; faulty torch. | Жерге туташтырууну камсыз кылыңызamp is clean and secure. Check wire spool and feed. Verify voltage/current settings. Inspect torch for damage. |
| Wire feed is inconsistent or stops. | Wire spool tangled; feed roller tension incorrect; dirty/worn torch liner; wrong contact tip size. | Untangle wire. Adjust feed roller tension. Clean or replace torch liner. Ensure contact tip matches wire diameter. |
| Poor weld quality (porosity, spatter). | Insufficient shielding gas; incorrect voltage/wire speed; dirty workpiece; wrong wire type. | Check gas cylinder and flow rate. Adjust welding parameters. Clean workpiece thoroughly. Use appropriate welding wire. |
| Overload indicator light is on. | Machine overheated due to extended use or insufficient ventilation. | Stop welding and allow the machine to cool down. Ensure ventilation grilles are clear. Reduce duty cycle. |
7. Техникалык шарттар
Technical specifications for the Yamato MIG 140S Inverter Welding Machine.
- Модел: MIG 140S
- Өндүрүүчү: Yamato
- Модель номери: 8000071806091
- Продукциянын өлчөмдөрү (L x W x Y): 29 x 13 x 24 см (болжол менен 11.4 x 5.1 x 9.4 дюйм)
- Салмагы: 542.06 grams (approximately 1.2 lbs) - Note: This weight appears unusually low for a welding machine. Please verify with product packaging or official documentation.
- Кубат түрү: Электр зымы менен
- Түсү: Red (as depicted in product images)
- ASIN: B08NP8BG5F
8. Колдоо жана байланыш маалыматы
For technical assistance, spare parts, or warranty inquiries, please contact your retailer or the manufacturer's customer service department. Keep your purchase receipt and model number handy when contacting support.
Manufacturer: Yamato
Модель номери: 8000071806091


