1. Киришүү
This user manual provides comprehensive instructions for the installation, operation, and maintenance of the Hanwha Techwin XRN-2010A Network Video Recorder (NVR). The XRN-2010A is a high-performance 32-channel 4K NVR designed for professional surveillance applications, supporting up to 8 internal HDDs for extensive storage.
Сураныч, туура жана коопсуз иштешин камсыз кылуу үчүн продуктуну колдонуудан мурун бул колдонмону кылдат окуп чыгыңыз.
2. Коопсуздук маалыматы
Always adhere to the following safety precautions to prevent damage to the product or injury to yourself and others:
- Ensure the NVR is connected to a grounded power outlet.
- Do not expose the NVR to water or moisture.
- NVR c ачпаңызasinг. Бардык тейлөөлөрдү квалификациялуу кызматкерлерге тапшырыңыз.
- Place the NVR in a well-ventilated area to prevent overheating.
- Use only specified power adapters and accessories.
3. Продукциянын өзгөчөлүктөрү
The Hanwha Techwin XRN-2010A NVR offers a robust set of features for advanced video surveillance:
- 32 channel network video recorder, supporting up to 12 MP resolution per channel.
- Supports H.265/H.264/MJPEG video compression formats.
- Maximum 8 internal HDDs for storage, with a total capacity of up to 48TB.
- HDMI/VGA local dual monitor output, with HDMI supporting up to UHD (4K) resolution.
- iSCSI storage supported for expanded storage capabilities.
- ONVIF camera compliant for broad compatibility with IP cameras.
- Includes QR code for easy mobile app access and setup.
- Features ARB & failover (N+1) for enhanced reliability.
- Incorporates WiseStream compression technology for efficient bandwidth and storage usage.
- Supports fisheye dewarping on web and CMS.
4. Физикалык мүнөздөмө
Familiarize yourself with the front and rear panels of the XRN-2010A NVR.
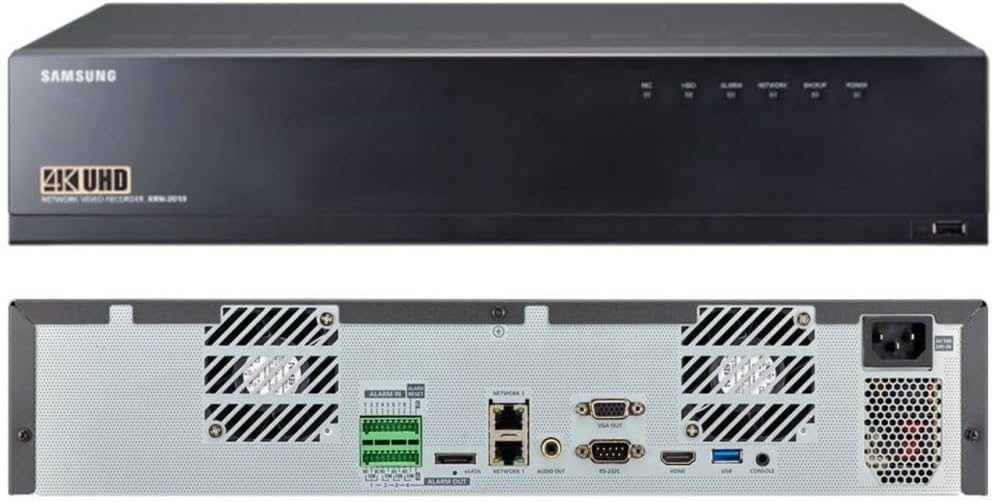
Figure 4.1: Front and Rear Panels of the XRN-2010A NVR. The top image shows the front panel with the Samsung logo (note: product is Hanwha Techwin, branding may vary), 4K UHD designation, and status indicators. The bottom image displays the rear panel with various input/output ports including alarm terminals, network ports, video outputs (VGA, HDMI), USB, and power input.
4.1 алдыңкы панели
- Статус көрсөткүчтөрү: LEDs for HDD activity, Recording, Alarm, Network status, Backup, and Power.
- USB порт: For connecting external devices such as a mouse or USB storage for backup.
4.2 Арткы панель
- Alarm In/Out: Terminals for connecting external alarm sensors and alarm output devices.
- Network Ports (NETWORK 1, NETWORK 2): RJ45 ports for connecting to the local area network (LAN).
- eSATA порту: For connecting external SATA storage devices.
- Аудио чыгышы: For connecting to an audio output device.
- VGA чыгышы: Video output port for connecting to a VGA monitor.
- RS-232C: Serial port for communication with other devices.
- HDMI Чыгышы: High-Definition Multimedia Interface output for connecting to an HDMI monitor, supporting up to 4K resolution.
- USB порттору: Additional USB ports for peripherals.
- Консол порту: For system console access.
- Кубат киргизүү: AC power input for the NVR.
5. Орнотуу колдонмосу
Follow these steps to set up your XRN-2010A NVR:
- Пакеттен чыгаруу жана текшерүү: Carefully remove the NVR from its packaging and inspect for any signs of damage.
- Install HDDs (if not pre-installed): If HDDs are not included or pre-installed, refer to the separate HDD installation guide for your model.
- Мониторду туташтыруу: Connect a monitor to the NVR using either the HDMI or VGA port.
- Чычканды туташтыруу: Connect a USB mouse to one of the USB ports on the NVR.
- Тармакка туташуу: Connect the NVR to your network router or switch using an Ethernet cable plugged into a Network port.
- Туташуу кубаты: Connect the power cord to the NVR's power input and then to a grounded electrical outlet.
- Күйгүзүү: Press the power button on the NVR. The system will boot up.
- Баштапкы конфигурация: Follow the on-screen wizard for initial setup, including setting up administrator password, network settings, date/time, and adding IP cameras.
6. Иштөө нускамалары
This section covers basic operation of the XRN-2010A NVR.
6.1 Live View
After logging in, the NVR will display the live view of connected cameras. You can switch between different camera layouts and views using the on-screen controls.
6.2 Жазуу
The NVR is configured to record based on your settings (continuous, motion detection, alarm event). Recording status can be monitored via the front panel LED indicators and the on-screen display.
- Жазуу графиги: Configure recording schedules for each camera through the NVR's menu system.
- Окуяны жаздыруу: Set up motion detection or alarm input triggers for event-based recording.
6.3 Ойнотуу
Кайраview foo жазылганtage:
- Access the Playback menu from the main interface.
- Select the camera(s) and the date/time range for playback.
- Foo аркылуу өтүү үчүн ойнотуу башкаруу элементтерин (ойнотуу, тындыруу, алдыга жылдыруу, артка түрүү) колдонуңузtage.
6.4 Алыстан кирүү жана мобилдик тиркеме
The XRN-2010A supports remote access via web browser and a dedicated mobile application. Use the QR code provided with the product or found in the NVR's system information to easily download and configure the mobile app for remote viewжана контролдоо.
For detailed instructions on remote access setup, refer to the NVR's on-screen help or the Hanwha Techwin support webсайт.
7. Техникалык тейлөө
Regular maintenance ensures optimal performance and longevity of your NVR.
- Тазалоо: Periodically clean the exterior of the NVR with a soft, dry cloth. Ensure ventilation openings are free from dust and obstructions.
- Программалык камсыздоонун жаңыртуулары: Check the Hanwha Techwin website regularly for firmware updates. Keeping your NVR's firmware up-to-date ensures access to the latest features and security patches.
- Маалыматтын камдык көчүрмөсү: Regularly back up important recorded footage to external storage devices (e.g., USB drive, network storage) to prevent data loss.
- HDD ден соолугун текшерүү: Monitor the health status of your installed HDDs through the NVR's system menu. Replace failing drives promptly.
8. Кыйынчылыктарды
Бул бөлүмдө сиз кабылышы мүмкүн болгон жалпы маселелерди чечүү жолдору каралган.
| Көйгөй | Мүмкүн себеп | Чечим |
|---|---|---|
| Күч жок | Power cord disconnected; Power outlet faulty; NVR power supply issue. | Check power cord connection; Test power outlet; Contact technical support if issue persists. |
| Видео чыгаруу жок | Monitor cable loose/faulty; Incorrect video output selected; Monitor input not set correctly. | Check HDMI/VGA cable connections; Ensure monitor is on correct input; Restart NVR. |
| Cannot Access NVR via Network | Network cable disconnected; Incorrect IP address; Firewall blocking connection. | Verify network cable connection; Check NVR's IP address and network settings; Disable firewall temporarily for testing. |
| Жаздыруу жок | HDDs not installed/initialized; Recording schedule not set; Camera not connected/configured. | Check HDD status; Configure recording schedule; Ensure cameras are properly added and online. |
For more complex issues, please refer to the detailed troubleshooting guide available on the Hanwha Techwin support webсайтка же алардын техникалык колдоосуна кайрылыңыз.
9. Техникалык шарттар
Key technical specifications for the Hanwha Techwin XRN-2010A NVR:
| Өзгөчөлүк | Деталь |
|---|---|
| Модел | XRN-2010A |
| Каналдар | 32 канал |
| Max чечим | Up to 12 MP per channel |
| Видеону кысуу | H.265, H.264, MJPEG |
| Max Recording Bandwidth | 256 Мбит/сек |
| Ички HDD уячалары | 8 (Max 48TB total) |
| Тышкы сактагыч | eSATA, iSCSI |
| Video Output | HDMI (up to 4K UHD), VGA |
| Байланыш | Ethernet (2x RJ45), USB, RS-232C |
| Өлчөмдөр | 22 x 20 x 8 дюйм (Пакет) |
| Салмагы | 18 фунт (буюм) |
| Өндүрүүчү | Hanwha Techwin |
10. Кепилдик жана колдоо
For detailed warranty information, please refer to the official Hanwha Techwin webсайтка же продуктуңузга кошулган кепилдик картасы. Кепилдиктин шарттары жана шарттары аймакка жана сатуучуга жараша өзгөрүшү мүмкүн.
For technical support, product registration, or to download the latest software and documentation, please visit the official Hanwha Techwin support portal:


