1. Киришүү
The IOGEAR GCS1932H is a 4-Port 4K KVMP Switch designed to provide seamless control of two computers from a single console. This device integrates a keyboard, mouse, and 4K HDMI monitor, along with a 2-Port USB 3.1 Gen1 Hub and audio support, enhancing productivity and workspace efficiency. It supports superior video quality up to Cinema 4K (4096 x 2160 @60Hz) and is HDCP 2.2 compliant with HDR support.
This manual provides detailed instructions for setting up, operating, and maintaining your IOGEAR GCS1932H KVMP Switch, along with troubleshooting tips and product specifications.

1-сүрөт: Бурчтуу view of the IOGEAR GCS1932H KVMP Switch.
2. Пакеттин мазмуну
Пакетти ачкандан кийин бардык буюмдар бар экенин жана жакшы абалда экендигин текшериңиз:
- 1 x IOGEAR GCS1932H 4-Port 4K KVMP Switch
- 2 x HDMI кабелдери
- 2 x USB 3.0 кабелдери
- 2 x Audio Cables
- 1 х кубат адаптери
- 1 х Кубат кабели

Figure 2: Package contents of the IOGEAR GCS1932H.
3. Орнотуу жана орнотуу
Follow these steps to connect your IOGEAR GCS1932H KVMP Switch to your computers and peripherals.
3.1 Арткы панелдин үстүндөview

3-сүрөт: Арткы панелдик байланыштар.
3.2 Туташуу кадамдары
- Өчүрүлгөн компьютерлер: Ensure both computers you intend to connect are powered off before beginning the installation.
- Консоль түзмөктөрүн туташтыруу:
- Connect your HDMI monitor to the HDMI Console Out port on the rear of the KVMP switch.
- Connect your USB keyboard and mouse to the dedicated USB консолу ports (marked with keyboard and mouse icons) on the rear of the KVMP switch.
- If using external speakers or headphones, connect them to the Аудио чыгышы port on the rear of the KVMP switch.
- Connect Computers to KVMP Switch: For each computer (CPU 1 and CPU 2):
- Connect one end of an HDMI cable to the computer's HDMI output and the other end to the corresponding HDMI Кирүү port (CPU 1 or CPU 2) on the KVMP switch.
- Connect one end of a USB 3.0 cable to a USB port on the computer and the other end to the corresponding USB Кирүү port (CPU 1 or CPU 2) on the KVMP switch.
- If using audio, connect one end of an audio cable to the computer's audio output and the other end to the corresponding Аудио кириш port (CPU 1 or CPU 2) on the KVMP switch.
- Туташуу кубаты: Берилген кубат адаптерин туташтырыңыз DC5V port on the rear of the KVMP switch, then plug the power adapter into a power outlet.
- Күйгүзүү: Power on the KVMP switch, then power on your connected computers.
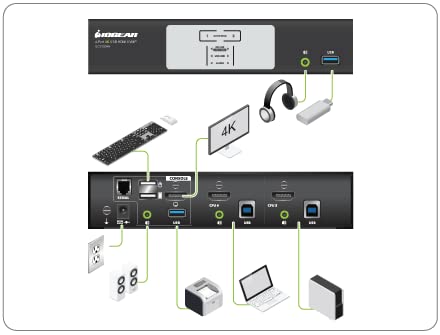
Figure 4: Typical connection diagram.
4. Иштөө нускамалары
IOGEAR GCS1932H туташкан компьютерлердин ортосунда которулуунун бир нече ыкмаларын сунуштайт.
4.1 Front Panel Overview

Figure 5: Front panel controls and indicators.
4.2 Компьютерлердин ортосунда которулуу
- Алдыңкы панелдеги баскычтар: Press the corresponding numbered button (1 or 2) on the front panel to switch to the desired computer. The "Selected" LED will illuminate for the active port.
- Ыкчам баскычтар: Use specific keyboard hotkey combinations to switch between computers. Refer to the full product manual (usually available on the manufacturer's website) for a complete list of hotkey commands. A common hotkey sequence involves pressing the Scroll Lock key twice, followed by the port number.
- Mouse Switching: Some configurations allow switching by double-clicking the middle mouse button. This feature may need to be enabled or configured.
- RS-232 буйругу: For advanced users, the switch can be controlled via RS-232 commands. Consult the detailed technical manual for programming instructions.
4.3 USB 3.1 Gen1 Hub
The KVMP switch includes a 2-Port USB 3.1 Gen1 Hub with SuperSpeed 5Gbps transfer rate. These ports are located on the rear panel (next to the console USB ports) and one on the front panel. You can connect USB peripherals such as printers, external hard drives, or webcams to these ports, and they will be shared between the connected computers.
4.4 Audio Functionality
The switch supports audio pass-through, allowing you to share speakers or headphones between the connected computers. Ensure audio cables are properly connected from your computers to the switch, and your speakers/headphones are connected to the audio output on the switch.
5. Техникалык тейлөө
Proper maintenance ensures the longevity and optimal performance of your IOGEAR GCS1932H KVMP Switch.
- Тазалоо: Түзмөктүн сыртын тазалоо үчүн жумшак, кургак чүпүрөктү колдонуңуз. Суюк же аэрозоль тазалагычтарды колдонбоңуз, анткени алар түзмөккө зыян келтириши мүмкүн.
- Вентиляция: Ашыкча ысып кетпеши үчүн өчүргүч жакшы желдетилген жерге коюлганын текшериңиз. Желдетүүчү тешиктерди жаппаңыз.
- Экологиялык шарттар: Аппаратты экстремалдык температурага, нымдуулукка же тике күн нуруна тийгизүүдөн сактаңыз.
- Кабелдик башкаруу: Keep cables organized and free from kinks or excessive bending to prevent damage and ensure reliable connections.
6. Кыйынчылыктарды
Эгерде сиз IOGEAR GCS1932H түзмөгүңүздө көйгөйлөргө туш болсоңуз, төмөнкү кеңири таралган көйгөйлөрдү жана чечимдерди караңыз:
| Көйгөй | Мүмкүн болгон себеп / Чечим |
|---|---|
| No video display or flickering after switching. |
|
| Keyboard/Mouse not responding after switching. |
|
| Audio is too quiet or not working. |
|
| Monitor does not go to sleep or wakes up immediately. |
|
| Switching takes too long (e.g., 5-6 seconds). |
|
If the problem persists, consult the full product manual or contact IOGEAR technical support.
7. Техникалык шарттар
| Өзгөчөлүк | Деталь |
|---|---|
| Модель номери | GCS1932H |
| Бренд | IOGEAR |
| Connectivity Protocol | USB |
| Видео сапаты | Cinema 4K (4096 x 2160 @60Hz) |
| HDCP шайкештиги | HDCP 2.2 compliant; HDR Support |
| USB хабы | 2-Port USB 3.1 Gen1 Hub (SuperSpeed 5Gbps) |
| Компьютерди тандоо | Front panel pushbuttons, hotkeys, mouse, RS-232 command |
| Өлчөмдөрү (L x W x Y) | 19.99 x 7.47 x 4.29 см (7.87 x 2.94 x 1.69 дюйм) |
| Салмагы | 1.63 кг (3.59 фунт) |
| Түс | Кара |
| Энергияны керектөө | 1.78 Ватт |
8. Кепилдик жана колдоо
For detailed warranty information, please refer to the warranty card included with your product or visit the official IOGEAR webсайт. Кепилдиктин шарттары жана шарттары аймакка жана продуктуга жараша өзгөрүшү мүмкүн.
For technical support, product registration, or to download the latest drivers and full user manuals, please visit the IOGEAR support page:
When contacting support, please have your product model number (GCS1932H) and serial number ready.


