1. Киришүү
Сатып алганыңыз үчүн рахматasing the Optoma X309ST projector. This manual provides essential information for safely installing, operating, and maintaining your device. Please read this manual thoroughly before using the projector to ensure optimal performance and longevity.
Кутуда эмне бар
- Optoma X309ST Projector
- Электр кабели
- Алыстан башкаруу (батареялар менен)
- VGA кабели
- Колдонуучунун Колдонмосу (бул документ)
- Кепилдик картасы
2. Коопсуздук маалыматы
ЭСКЕРТҮҮ: Өрттүн же электр тогуна урунуунун алдын алуу үчүн, бул шайманды жамгырдын же нымдуулуктун таасирине дуушар кылбаңыз.
- Вентиляция тешиктерин жаап албаңыз. Туура аба агымы үчүн проектордун айланасында жетиштүү мейкиндикти камсыз кылыңыз.
- l болгондо проектордун объективине тике карабаamp күйүк. Жарык көзүңүзгө зыян келтириши мүмкүн.
- Проектор менен берилген кубат шнурын гана колдонуңуз.
- Бул продуктту өзүңүз тейлөөгө аракет кылбаңыз. Бардык тейлөөнү квалификациялуу тейлөө кызматкерлерине тапшырыңыз.
- Проекторду суудан же нымдан алыс кармаңыз.
- Проекторду туруксуз беттерге коюудан алыс болуңуз.
3. Продукт бүтүп калдыview
Проектор компоненттери

3.1-сүрөт: Жогорку view of the Optoma X309ST projector. This image displays the control panel with buttons for power, menu navigation, and source selection, along with the focus and zoom adjustment rings located near the lens.

3.2-сүрөт: Фронт view of the Optoma X309ST projector. The main projection lens is visible, flanked by ventilation grilles on either side, designed for efficient heat dissipation.
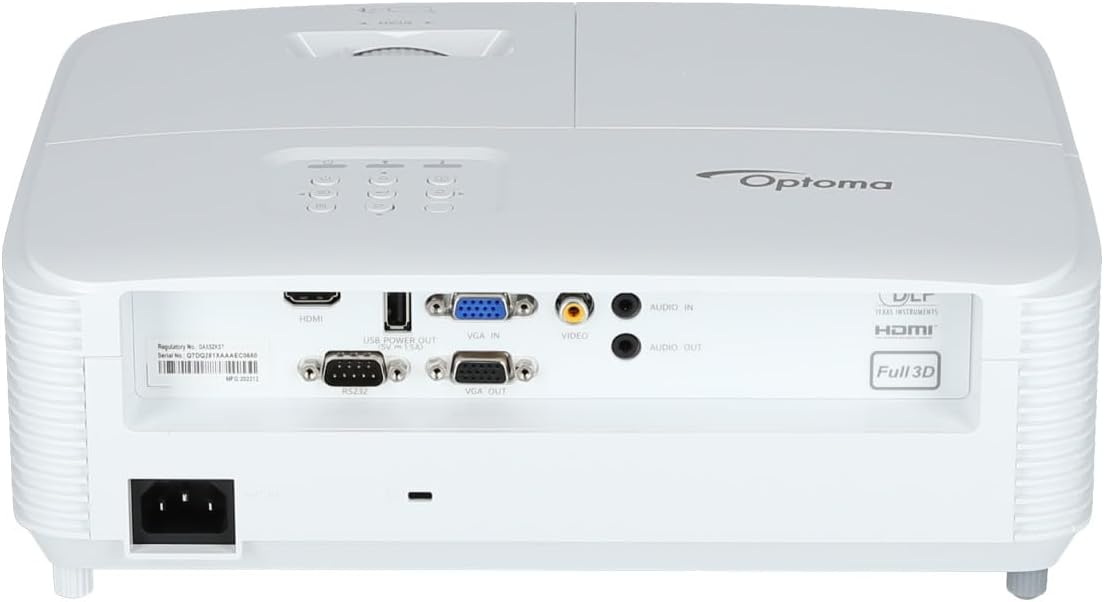
3.3-сүрөт: Арткы view of the Optoma X309ST projector. This image highlights the various connectivity ports including HDMI, VGA In, VGA Out, USB Power Out, Audio In, Audio Out, Video (RCA Composite), and the RS-232 control port, along with the power input.
Башкаруу панели
The control panel on the top of the projector allows for basic operation without the remote control. It includes buttons for:
- Күч: Проекторду күйгүзөт же өчүрөт.
- Меню: Экрандагы дисплей (OSD) менюсуна кирет.
- Чабыттоо жебелери: Меню параметрлери аркылуу багыттоо жана жөндөөлөрдү тууралоо үчүн колдонулат.
- Булак: Selects the input source (HDMI, VGA, etc.).
- Кайра шайкештирүү: Optimizes the image for analog sources.
4. Орнотуу
4.1 Проекторду жайгаштыруу
The Optoma X309ST is a short-throw projector, designed to project large images from a short distance. Place the projector on a stable, flat surface or mount it securely. Ensure the projection surface (screen or wall) is flat and clear of obstructions.
- For optimal image quality, position the projector perpendicular to the screen.
- Maintain adequate ventilation space around the projector (at least 30 cm / 12 inches).
4.2 Кубатты туташтыруу
- Кубат шнурун проектордун арткы жагындагы AC киргизүү розеткасына туташтырыңыз.
- Электр шнурунун экинчи учун жерге туташтырылган электр розеткасына сайыңыз.
- The power LED on the projector will illuminate, indicating standby mode.
4.3 Киргизүү булактарын туташтыруу
The projector supports various input sources. Choose the appropriate cable for your device.
- HDMI: For digital video and audio. Connect an HDMI cable from your source device (e.g., laptop, Blu-ray player) to the HDMI port on the projector.
- VGA: For analog video. Connect a VGA cable from your computer to the VGA IN port on the projector. For audio, connect a 3.5mm audio cable from your computer's audio output to the AUDIO IN port.
- RCA Composite Video: For standard definition analog video. Connect an RCA composite video cable (yellow connector) to the VIDEO port. For audio, connect RCA audio cables (red/white) to the AUDIO IN ports.
- USB өчүрүү: This port provides 5V power for external devices like streaming sticks, but does not transmit data.
5. Проекторду иштетүү
5.1 Күйгүзүү/өчүрүү
- Күйгүзүү үчүн: Press the Power button on the control panel or remote control. The power LED will change from red (standby) to blue (on).
- Өчүрүү үчүн: Press the Power button twice. The first press will display a confirmation message; press again to confirm shutdown. The power LED will return to red.
Эскертүү: Allow the projector to cool down for a few minutes after powering off before unplugging it or moving it.
5.2 Киргизүү булагын тандоо
басыңыз Булак button on the control panel or remote control repeatedly to cycle through available input sources (HDMI, VGA, Video). Alternatively, use the dedicated input buttons on the remote control.
5.3 Сүрөттү тууралоо
- Фокус: Сүрөт так жана даана көрүнгөнгө чейин линзадагы фокустук шакекчени айландырыңыз.
- Чоңойтуу: Rotate the zoom ring on the lens to adjust the image size without moving the projector.
- Негизги ташты оңдоо: If the image appears trapezoidal, use the Keystone Correction function in the OSD menu to square the image. Access via the Меню баскычы.
5.4 Экрандагы дисплей (OSD) менюсу
басыңыз Меню button to access the OSD. Use the navigation arrows to browse categories and options. Press Кириңиз or the right arrow to select an option, and the left arrow or Меню again to go back or exit.
OSDдин жалпы жөндөөлөрү төмөнкүлөрдү камтыйт:
- Сүрөт жөндөөлөрү: Brightness, Contrast, Color, Aspect Ratio, Picture Mode.
- Дисплейдин жөндөөлөрү: Keystone, Overscan, Wall Color.
- Setup Settings: Language, Auto Power Off, High Altitude Mode.
- Lamp Орнотуулар: Lamp Hours, Lamp Mode (Bright, Eco).
6. Техникалык тейлөө
Үзгүлтүксүз тейлөө оптималдуу иштешин камсыз кылат жана проекторуңуздун иштөө мөөнөтүн узартат.
6.1 Проекторду тазалоо
- Сырткы: Жумшак, түксүз кездемени колдонуңуз dampжумшак, абразивдүү эмес тазалоочу каражат менен эритип алыңыз. Тазалоочу каражатты проекторго түз чачпаңыз.
- Объектив: Use a lens cleaning cloth or lens paper with a specialized lens cleaning solution. Avoid touching the lens surface with your fingers.
- Вентиляция торлору: Use a soft brush or a vacuum cleaner with a brush attachment to remove dust from the ventilation grilles. Ensure the projector is powered off and unplugged before cleaning.
6.2 Лamp Алмаштыруу
WARNING: Projector lamps operate at high temperatures and pressures. Allow the projector to cool completely before attempting lamp алмаштыруу. Толук кызматтык колдонмону караңызamp алмаштыруу боюнча нускамаларды алыңыз же квалификациялуу тейлөө кызматкерлерине кайрылыңыз.
лamp life can vary depending on usage and lamp mode. A warning message will appear on screen when the lamp is nearing the end of its life. Only use genuine Optoma replacement lamps.
6.3 Аба чыпкасын тазалоо/алмаштыруу
The Optoma X309ST projector is designed with a sealed optical engine, which typically means it does not have user-serviceable air filters that require regular cleaning or replacement. However, ensure the ventilation grilles remain clear of dust and debris as described in section 6.1.
7. Кыйынчылыктарды
Проекторуңузда көйгөйлөргө туш болсоңуз, төмөнкү жалпы көйгөйлөрдү жана чечимдерди караңыз:
| Көйгөй | Мүмкүн себеп | Чечим |
|---|---|---|
| Экранда сүрөт жок. |
|
|
| Сүрөт бүдөмүк. |
|
|
| Сүрөт трапеция түрүндө. |
|
|
| Проектор ысып кетет же өчүп калат. |
|
|
If the problem persists after trying these solutions, please contact Optoma customer support.
8. Техникалык шарттар
| Өзгөчөлүк | Деталь |
|---|---|
| Модель номери | E9PD7DQ01EZ1 |
| Жарыктык | 3700 ANSI челинин |
| Native Resolution | XGA (1024 x 768) |
| Ыргытуу катышы | 0.617:1 Short Throw |
| Байланыш технологиясы | HDMI, USB, VGA |
| Киргизүүлөр | HDMI, VGA, RCA Composite Video, Analog Audio (3.5mm) |
| Чыгуулар | VGA Out (Loop-Through), Analog Audio (3.5mm) |
| Өзгөчөлүктөр | USB Power Output, Built-In 10-Watt Speaker, RS-232 Controllable, IR Remote Control Included, Full 3D content support |
| Элемент Салмагы | 6.61 фунт (болжол менен 3 кг) |
| Продукциянын өлчөмдөрү (L x W x Y) | 15.42 x 10.35 x 13.52 дюйм (болжол менен 39.17 x 26.29 x 34.34 см) |
| Сунушталган Колдонуулар | Business presentations, Education, Multimedia, Full 3D content |
9. Кепилдик жана колдоо
9.1 Кепилдик маалыматы
Your Optoma X309ST projector comes with a standard manufacturer's warranty. Please refer to the warranty card included in your product packaging for specific terms, conditions, and duration. Keep your proof of purchase for warranty claims.
The product includes 1 year technical support as part of the purchase.
9.2 Кардарларды колдоо
For technical assistance, troubleshooting beyond this manual, or warranty inquiries, please contact Optoma customer support. Visit the official Optoma website for the most up-to-date contact information, FAQs, and driver downloads.
Көбүрөөк маалымат жана колдоо булактарын бул жерден таба аласыз Amazon'догу Optoma дүкөнү or the official Optoma webсайт.


