Introduction
This manual provides detailed instructions for the setup, operation, and maintenance of your Sharp Digital Alarm Clock, Model B08TG1QB2B. Designed for simplicity, this clock features a clear LED display, dual ascending alarms, and a battery backup system to ensure reliability.

Сүрөт 1: Алдыңкы view of the Sharp Digital Alarm Clock, displaying the time 12:08 in green LED digits.
Продукт өзгөчөлүктөрү
- Колдонууга оңой дизайн: Жөнөкөй операция бардык колдонуучулар үчүн ылайыктуу.
- Кош ойготкуч системасы: Ар кандай графиктер үчүн эки көз карандысыз ойготкучту коюңуз.
- Ascending Alarm Volume: Alarm starts softly and gradually increases in volume for a gentle wake-up.
- Батареянын камдык көчүрмөсү: Электр энергиясы өчүрүлгөн учурда убакытты жана ойготкуч жөндөөлөрүн сактайтtages (requires 2x AA batteries, not included).
- Illuminated Green LED Digits: Ачык жана окууга оңой дисплей.
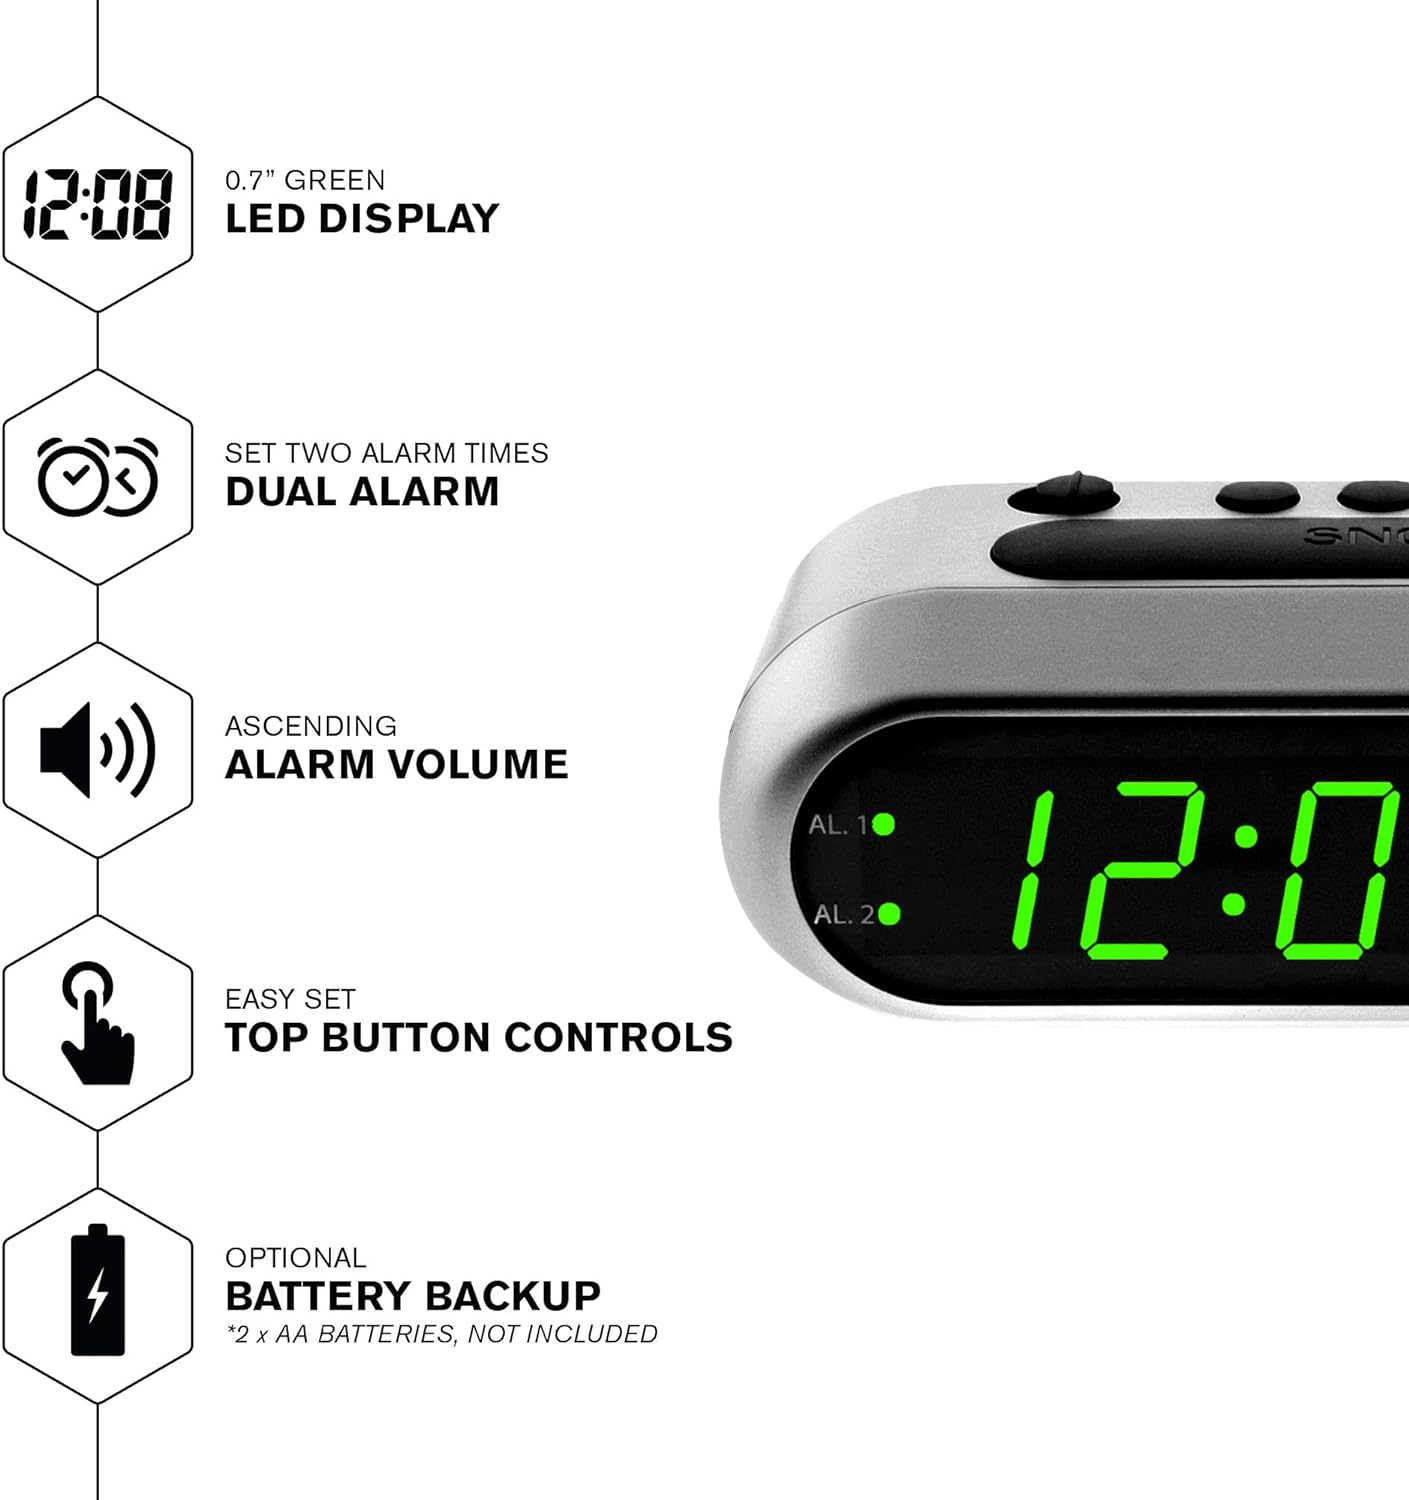
Figure 2: ашыкview of the clock's main features, including the LED display, dual alarm, ascending volume, and battery backup.
Пакеттин мазмуну
- Sharp Digital Alarm Clock (Model B08TG1QB2B)
- AC кубат адаптери
- Instruction Manual
Эскертүү: 2x AA batteries for battery backup are not included and must be purchased separately.
Control жана дисплей
Familiarize yourself with the buttons and indicators on your alarm clock:
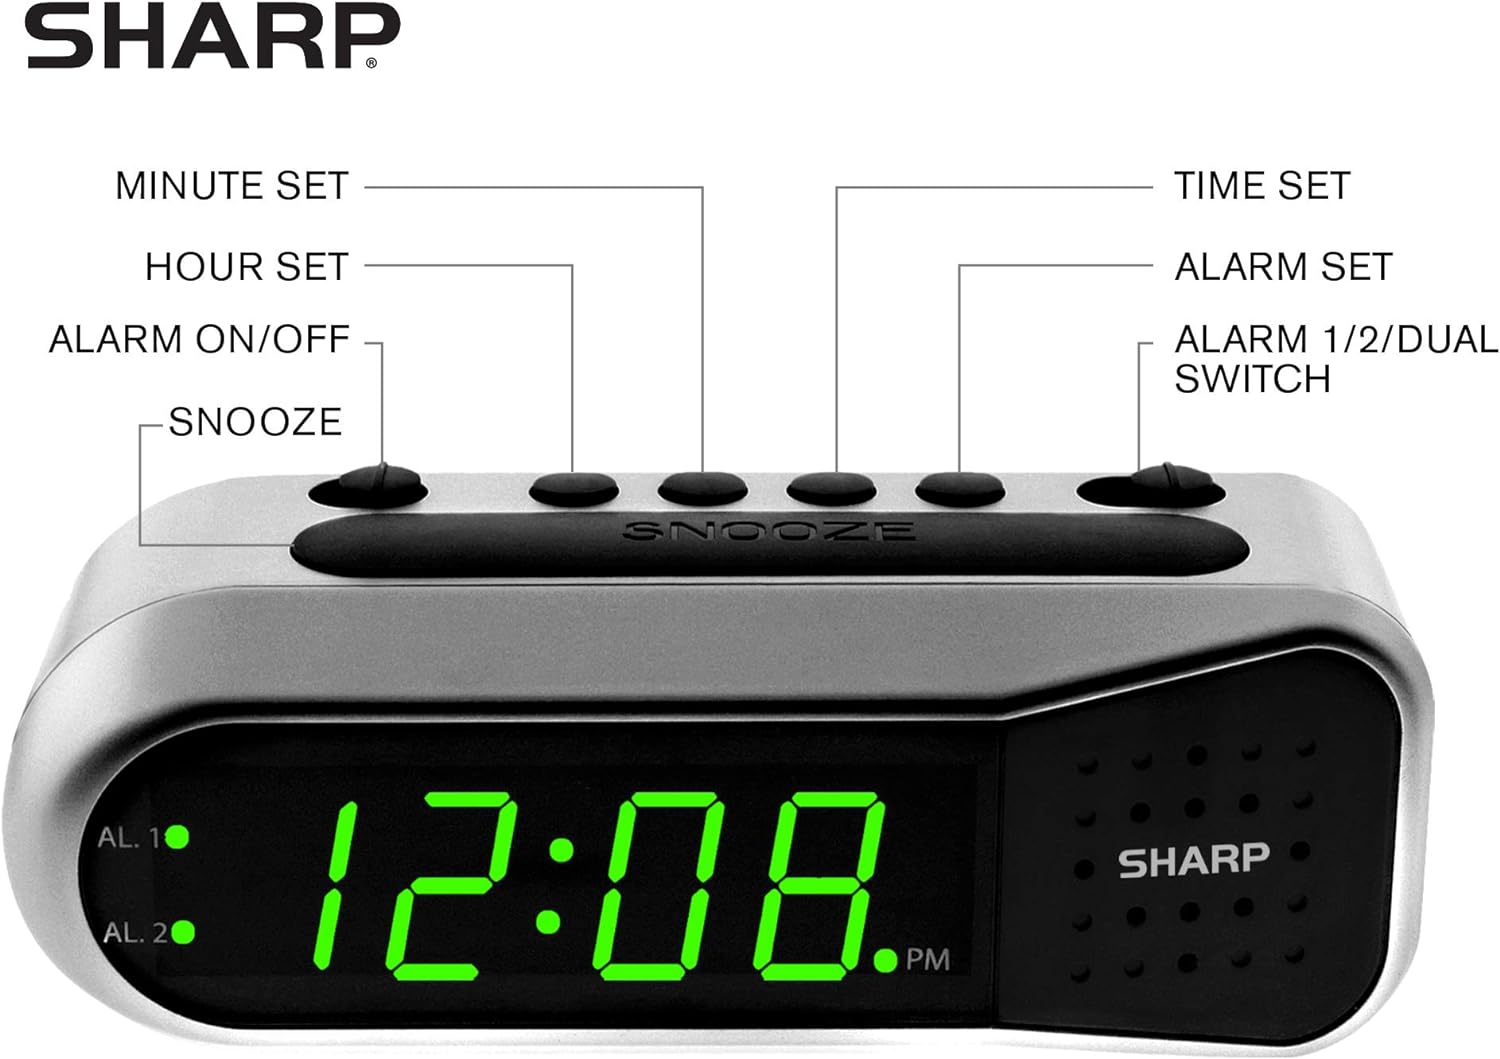
Figure 3: Labeled diagram of the clock's controls and display elements.
- Minute Set Button: Adjusts minutes for time and alarm settings.
- Hour Set Button: Adjusts hours for time and alarm settings.
- Ойготкучту күйгүзүү/өчүрүү: Activates or deactivates the selected alarm.
- Тындырма баскычы: Ойготкучту кыска мөөнөткө убактылуу өчүрөт.
- Убакытты коюу баскычы: Убакытты орнотуу режимине кирет.
- Ойготкуч орнотуу баскычы: Сигнал орнотуу режимине кирет.
- Alarm 1/2/Dual Switch: Selects which alarm (Alarm 1, Alarm 2, or both) is being set or activated.
- AL. 1 Indicator: Lights up when Alarm 1 is active.
- AL. 2 Indicator: Lights up when Alarm 2 is active.
- PM көрсөткүчү: Lights up when the displayed time is PM.
Жайгашуу
1. Power Connection
Connect the AC power adapter to the DC input jack located on the back of the alarm clock. Plug the adapter into a standard electrical outlet. The display will illuminate.
2. Батареянын резервдик көчүрмөсүн орнотуу
The battery backup feature requires two (2) AA batteries (not included). These batteries maintain time and alarm settings during a power outage but do not power the display.
- Open the battery compartment cover on the bottom of the clock.
- Insert two (2) AA batteries, observing the correct polarity (+ and -) as indicated inside the compartment.
- Батарея бөлүгүнүн капкагын ордуна коюңуз.
Эскертүү: Replace batteries annually or when the clock experiences frequent power interruptions to ensure reliable backup.
3. Баштапкы убакытты орнотуу
After connecting power, the display will show a default time (e.g., 12:00 AM). Set the current time:
- басып, кармап туруңуз УБАКЫТТЫ ОРНОТУУ баскычы. Саат цифралары жарк этет.
- Кармап жатканда УБАКЫТТЫ ОРНОТУУ, басыңыз СААТ КОЮЛГАН саатты тууралоо үчүн кайра-кайра баскычын басыңыз. Туура AM/PM жөндөөсү үчүн PM индикаторуна көңүл буруңуз.
- бошотуңуз УБАКЫТТЫ ОРНОТУУ баскычы.
- басып, кармап туруңуз УБАКЫТТЫ ОРНОТУУ баскычын кайра басыңыз. Мүнөттөрдүн сандары күйүп-өчүп турат.
- Кармап жатканда УБАКЫТТЫ ОРНОТУУ, басыңыз Мүнөт коюу мүнөттөрдү тууралоо үчүн кайра-кайра баскычын басыңыз.
- бошотуңуз УБАКЫТТЫ ОРНОТУУ убакытты үнөмдөө үчүн баскыч.
Иштөө нускамалары
Ойготкуч 1 же Ойготкуч 2 орнотуу
Your clock features two independent alarms. To set an alarm:
- жылдырыңыз 1/2/КОШ СИГНАЛ switch to either AL. 1 or AL. 2, depending on which alarm you wish to set.
- басып, кармап туруңуз Сигналды орнотуу button. The hour digits for the selected alarm will flash.
- Кармап жатканда Сигналды орнотуу, басыңыз СААТ КОЮЛГАН button repeatedly to adjust the alarm hour. Ensure the correct AM/PM is selected.
- бошотуңуз Сигналды орнотуу баскычы.
- басып, кармап туруңуз Сигналды орнотуу button again. The minute digits for the selected alarm will flash.
- Кармап жатканда Сигналды орнотуу, басыңыз Мүнөт коюу button repeatedly to adjust the alarm minutes.
- бошотуңуз Сигналды орнотуу button to save the alarm time.
Ойготкучтарды иштетүү/өчүрүү
To turn an alarm ON or OFF:
- жылдырыңыз 1/2/КОШ СИГНАЛ өтүү AL. 1 or AL. 2.
- жылдырыңыз КҮЙГҮЗҮҮ / КҮЧҮРҮҮ га өтүү ON position to activate the alarm. The corresponding AL. 1 or AL. 2 indicator light will illuminate.
- жылдырыңыз КҮЙГҮЗҮҮ / КҮЧҮРҮҮ га өтүү ӨЧҮРҮҮ position to deactivate the alarm. The indicator light will turn off.
To activate both alarms, set both alarm times and then slide the 1/2/КОШ СИГНАЛ өтүү ДУАЛ. Both AL. 1 and AL. 2 indicators will light up.
Тындырма функциясы
Сигнал чыкканда чоң баскычты басыңыз СОЮЗ button on top of the clock. The alarm will temporarily stop and sound again after approximately 9 minutes.
Ойготкучту токтотуу
To stop the alarm completely after it sounds, slide the КҮЙГҮЗҮҮ / КҮЧҮРҮҮ га өтүү ӨЧҮРҮҮ position. The alarm will reset for the next day.
Техникалык тейлөө
Тазалоо
Саатты жумшак, кургак чүпүрөк менен сүртүңүз. Абразивдүү тазалоочу каражаттарды же эриткичтерди колдонбоңуз, анткени алар капталына зыян келтириши мүмкүн.
Батареяны алмаштыруу
Replace the AA backup batteries annually or if the clock loses time during power interruptions. Refer to the "Battery Backup Installation" section for instructions.
Проблемаларды чечүү
| Көйгөй | Мүмкүн себеп | Чечим |
|---|---|---|
| Сааттын дисплейи бош. | AC кубаты жок. | Ensure the AC adapter is securely plugged into the clock and a working electrical outlet. |
| Ойготкуч угулбайт. | Ойготкуч иштетилген эмес же туура эмес орнотулган. | Текшериңиз КҮЙГҮЗҮҮ / КҮЧҮРҮҮ которгуч ON position and the alarm time is correctly set (check AM/PM). |
| Убакыт бийликтен кийин туура эмесtage. | Камдык батареялар өлүп калган же орнотулган эмес. | Install fresh AA batteries or replace existing ones. Reset the time if necessary. |
| Ойготкуч өтө тынч/катуу. | Alarm volume is ascending, not fixed. | The alarm features an ascending volume. It starts faintly and gradually increases. This is normal operation. |
Техникалык шарттар
- Модел: B08TG1QB2B
- Бренд: Sharp
- Дисплей түрү: Digital LED (Green)
- Кубат булагы: AC Power Adapter (included), 2x AA Batteries (for backup, not included)
- Продукциянын өлчөмдөрү: 5.5" W x 2.1" H x 2.3" D (approximate)
- Салмагы: 8.4 унция
- Материал: Пластик
- Түсү: Brushed Silver
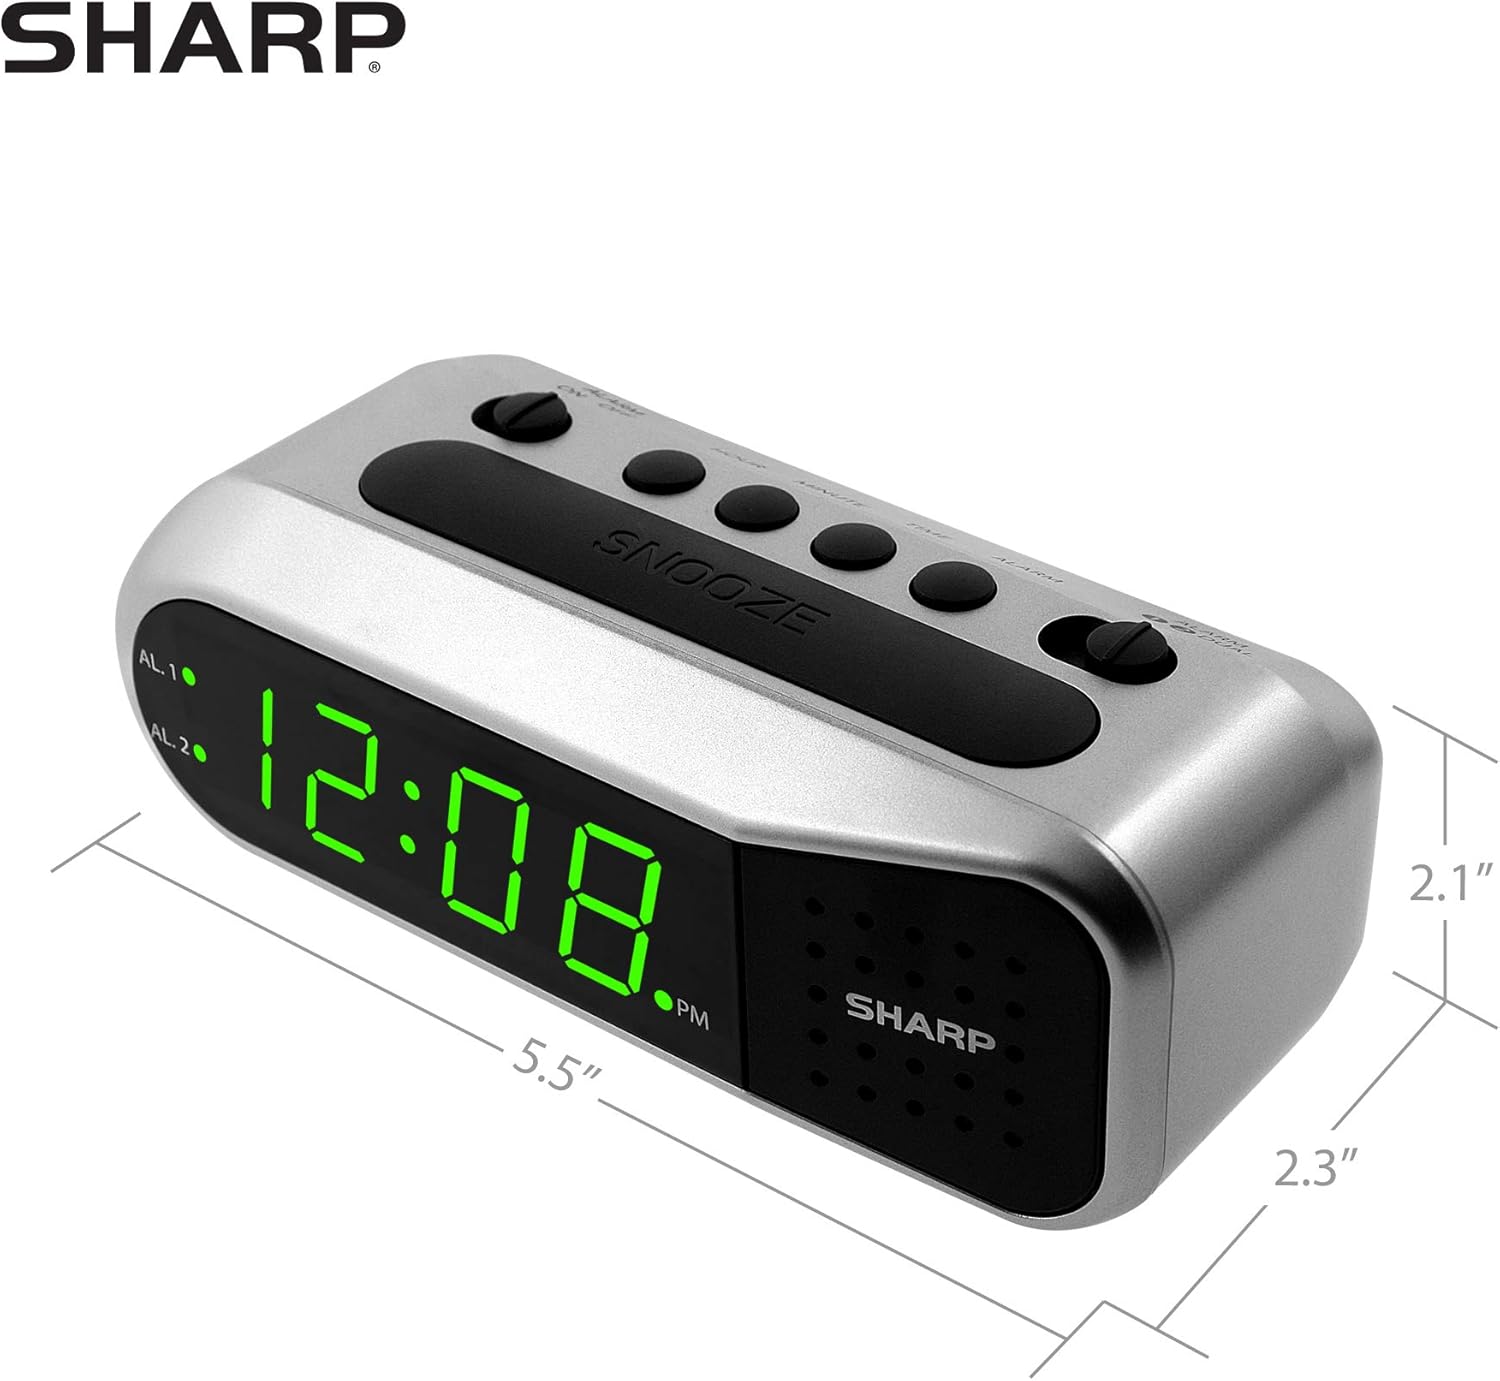
Figure 4: Dimensions of the Sharp Digital Alarm Clock.
Кепилдик жана колдоо
For warranty information or technical support, please refer to the warranty card included with your product or visit the official Sharp webсайт. Сатып алганыңыздын далили катары сатып алуу дүмүрчөгүңүздү сактаңыз.
For further assistance, you may contact Sharp customer service through their official channels.


